Find us on Google+ Inventor Tales

Tuesday, June 02, 2009

Default Inventor Settings... That's Great! How Do I Change It?

I've often mentioned how there are certain things I change as soon as I install my new seat of Inventor. I've done this for as many releases as I can remember, and while not everyone likes my settings, many a user has thanked me for my input, and adopted one of my suggestions.


So after far too long, here's the settings that I change in a part.

You can find them under Tools>Application Options, on the Sketch Tab.

1) Grids - I don't like the clutter of the grids. I leave the axis, because I like the fact that seeing the axis leave me with feedback letting me know when a sketch is active.

2) Edit Dimension When Placed - The default requires an extra click to edit the dimension. I check it so the dialog pops up when I place it.

3) Project Origin on Sketch Create - The default doesn't create a point on origin. I like to constrain to origin myself (must be a holdover from my days at the tool and die shop). So I check this one too.

I've included a Youtube video that shows me changing the steps as well. Feel free to follow the link HERE!

Sunday, May 31, 2009

Inventor R2009 and Vault 2010

I'm currently in the process of coming up with some more blog topics, and hopefully a video or two, but this weekend was spent hanging out with some good friends at an art show, so not much blogging got done! (Hey, even geeks have a life!)

But here's a quick tip for those of us who are working with Inventor, and Vault.

Note that there's one for Inventor R2009 Service Pack 1, and Inventor R2009 Service Pack 2.

One last note! If you've installed the Bonus Packs from the subscription site, make sure you download the service pack for thue Bonus Pack!

Once those are installed, everything should be running just fine!

Happy Inventing!

Friday, May 22, 2009

Once Slice (Graphics) at a Time.

Earlier in the week, I was working with some users. and on a fluke, I showed the 'Slice Graphics' tool.

I was surprised at how few of the users knew it was there. After all, I've known about it since I started on Inventor back on Release 4, right?

It was certainly not the fault of the users. They were experienced users who had been using all manner of CAD software for years.

How did they miss it? They had never known to look for it, and nobody had thought to show them.

A classic the users who know it assume everyone knows it, and the users who don't know it, don't know to look for it.

So without further delay, here's where the slice graphics tool is.

First you'll need to be in a part file, and have a sketch active.

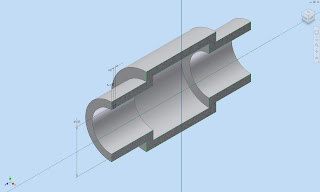
Here I've got a part athat I'm going to create a groove on the inside face. I've already created a sketch plane down the middle of the part.


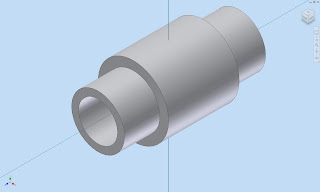
You can already see that the sketch plane runs through the middle of the part, and that trying to sketch the groove is going to be tricky.

I could switch to a wireframe view, but that's not really the point of the exercise! Aside from that, it may not always grant you the detail you need.

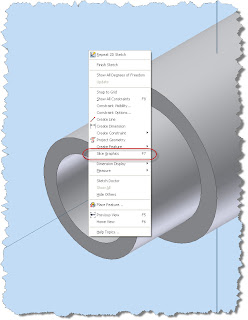
So instead, while the sketch is active, I'm going to right click, and choose 'Slice Graphics' from the context menu. Remember that if you don't see the option come up, make sure you don't have any geometry active, or that there isn't a tool (like dimension) still active.

Also note that the hot key for this is 'F7'


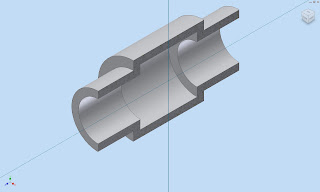
Choose the selection, and the part will be 'virtually' cut. Inventor doesn't actually cut the material away, it's purely a graphical. But it does let you see the inside of the part you're working on.


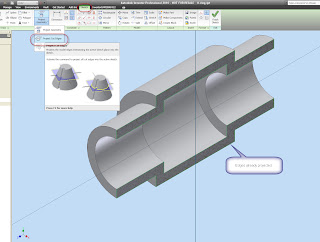
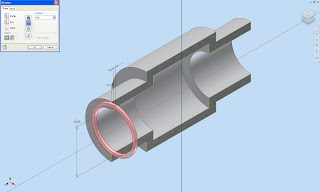
Now, you can use the 'Project Cut Edges' tool to project the silhouette of the part onto your sketch plane.

You'll find it on the Sketch Tab, indicated below. Notice the projected edges already shown below.


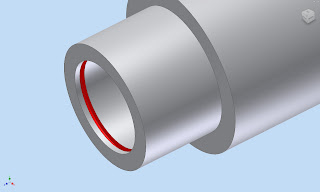
Now sketching, dimensioning, and constraining is conducted the same as you would in any other sketch.


In this case, we finish with a Revolve. And our groove is created. The slice will automatically 'Turn off' when the revolution is complete.


And that's it! Happy Inventing! Happy Memorial Day!

And thanks to Dad for all the years as air crew in the Navy. You earned that retirement.

Tuesday, May 19, 2009

New from the (Autodesk) Labs

Just a quick blog to show that Autodesk issued a new iCopy tool for on Autodesk Labs here:

iCopy on Autodesk Labs

I haven't had a chance to play much with it yet, but it looks like it could be a fine addition to the team!

As for me and my weekend. It was another great weekend at the Chino Airshow watching the warbirds take to the sky again.

I still think the sound of a P-51 Mustang running at full power is one of the sweetest mechanical sounds you'll ever hear!


Wednesday, May 13, 2009

Keeping Tabs on your.... Tabs (Inventor Release 2010)

As I've worked with Inventor, I've come to like the new 'Ribbon' interface. It can be challenging, but the more I use it, the more I like it.


One little trick I've found comes in handy when you have multiple files open.

If you right click on a tab, you can quickly access save and i-property options (among other options), without switching files. Nice for quickly saving a file, or copying and pasting I-properties!


Simple, but elegant!

In other news, we got our Space Pilot Pro for evaluation. Here's some pictures of it, and

And if you happen to make it to the Autodesk Launch Event tomorrow, look me up! I'll be there!

Monday, May 04, 2009

Finding my (Material) Type

It's getting late here in Southern California, and it's almost time for me to hit the sack, but before I do, just a little Showcase tip on a tool that's quickly become a favorite for me.

The tool (insert drum roll) : Select by material:

It's a fairly simple tool that will let you quickly change several items with one material assigned to anotehr material.

Let's start with this car as an example. I want to change the material on the body panels from one type to another. In particular, I want to change the color from red to a dark blue.


Sure, I could choose each panel individually, and select it by left clicking and holding down the shift key, but that' means a lot of different mouse clicks, plus the rotation to get to the panels on the other side of the car.

Tedious, to say the least.

But, there's another option. The body panels are all one particular material, and when this is the case, Showcase gives me a tool to speed the process up.

First, I choose one area (in this case a panel), and right click on it.

When the right click menu comes up, I choose 'Select All Objects with this Material'.


Once this is done, all objects with that material will highlight.


Once the objects are selected, you can bring up your materials tree by hitting the 'M' key.


I'll choose 'Blue Dark' as my color, and I can change all the materials (in this case Red) to another color (Blue Dark) at once.


It can expedite things quite a bit. And, while it grabs all materials of a given type, you can also use Ctrl + Left Click to deselect objects you don't want, and Shift + Left Click to add to your selection. This will let you fine tune the selection to get what you need.

At a little pizazz, such as tilts and a 'rakish' camera angle, and you're ready to go!


I know in the renderings I've been doing, it's a real time save for me.

Enjoy everyone!

Thursday, April 30, 2009

Autodesk Showcase Viewer. Sharing Your Creations

My work with Autodesk Showcase has definitely immersed me in the presentation world. But as I've gone deeper into the artistic world, I'm learning more every day.

But there's been one question that comes up from time to time. "Is there a way that I can share my renderings with someone else? Or "How can someone else view my Showcase work?"

Of course you can save out files in an image format, such as a *.jpg, but that doesn't take full advantage of what Showcase can do.

So you might ask yourself, "Wouldn't it be great if there was a free viewer?"

And I'd respond, "I'm glad you asked! There's a free viewer available!"

You can download it HERE along with sample scenes. The viewer will let you rotate, change between alternatives, etc. You just can't edit the scene itself.

Perfect for taking your presentation on the road where a full seat of Showcase isn't needed!

And it's just cool to play with. ;-)

Here's a couple of screen captures from a sample scene from the site above. If you download the viewer, this is one of four scenes you can paly with.


That's it for now!

Jon
Out of work? Look for the Autodesk Assistance Program for help with free software and training.

Tuesday, April 28, 2009

Inventor RIbbons. That's Great! Now How Do I Use It?

The new Ribbon UI has been the source of some discussion. Is it good or bad. I'm sure there are a lot of opinions on the subject. The old interface has been around since at least R4 (when I started), and I'm all but certain goes back even sooner.

The opinions are varied, but speaking for myself, I like the new toolbar. I like the extra room it gives me for my model browser, and as I'm getting used to it, I find that I'm moving through the commands faster.

But, no matter what side of the discussion you're on, there's no denying that there's a learning curve.

Fortunatley, there's a 'Command Locator' that will help us find the new commands on the new Ribbon UI. Here's a video on how you can use it.


I'd recommend giving the UI a fair chance. I think once that initial learning curve is over, you'll come to like it.

If you do prefer the original UI, then not to fear, it's still available. Check out my older blog HERE on how to set it back!

Happy Inventing!

Out of work? Check out the Autodesk Assistance Program HERE for help with training and software to hone your skills.

Saturday, April 25, 2009

Filling the Void. New Inventor R2010 Fillet Welds.

I've been aching for a chance to work on Camtasia again, and hears a bit of a new test. I wanted to show a new feature in weldments, the ability to fill a gap using the fillet weld.

So instead of taking screen captures and doing a lot of typing, I created a video and embedded it here. I hope this little tip is helpful! I'm hoping to get some more out in the future!


In other news! 3D Connexion announced the new Spacepilot Pro! a little on the pricey side, I gotta admit, but they're pretty cool!

You can check them out on the 3D Connexion website HERE! I especially like the new color screen. :-)

Happy Inventing everyone!

Tuesday, April 21, 2009

That's What Friends are For

With all the what's new in Inventor R2010, there's been a lot to keep track of. Definitely more than little ol' me can keep up with and post! Believe me, I've been trying.

Thankfully, there's more than myself just taking this plunge.

So I've pasted some links for some videos that the team has put together. I've watched some of them, (and even conducted one myself). Just watching my colleagues put up these recordings has taught me a ton!

Thanks to Mike and Javier! And thanks to Kanwar for being our narrator!

Inventor R2010 - What's New

Vault Workgroup R2010


Inventor R2010 - What's New + Sheet Metal

Note that we used gotowebinar to record this, and you may need to download and install their codec to see the videos.

You can get that HERE.

Happy Tuesday everyone!

Sunday, April 19, 2009

(Ray)Tracing your progress

Not to sound like a broken record, but it's been busy as I crash course myself on Inventor and Showcase R2010. As a result, my blogs have been a little weak.

Nevertheless, here's a Showcase 2010 tip.

As I continue on my Showcase Adventures, I've learned a TON of things about creating compelling images. I have to thank all those who've taken time out of their day to teach me. I wouldn't be as far as I am without them.

Mostly, I've learned how far I have to go. :-)

One of the things I've been working with lately is ray tracing. If you're not familiar with what raytracing is, it's the process of 'tracing rays' (well 'duh'!). In essence, you're tracing the rays of light as they bounce from one object to another.

In this process, you'll see things like objects reflecting in other objects, and refraction of light passing through glass or another transparent material.

You can toggle it on or off by hitting 'R' on the keyboard.

But there's been a challenge in Ray Tracing that R2010 addresses.

When you raytrace in R2009, there's no way to tell if the ray tracing has finished it's calculation other than just your eye. Which, isn't always the best. Since raytracing can take a few minutes to calculate, a way of being able to tell when ray tracing is finished would be great!

In R2010, you can hit 'Y', or go to View>Ray Tracing Control Panel to turn on the control panel.

Here's an image that shows where to get it!


Here's a Hardware (standard) rendering image for comparison. Note that in this image, you can't see the reflection of the side view mirror in the fender (like you can in the Ray Traced image above).

Happy start to the new week!

Looking for a job? The checkout the Autodesk Assistance Program HERE for free educational software and training to keep your skills sharp and up to date!

Monday, April 13, 2009

Sometimes, it really is that cool!

Thanks to Shaun Hurley for Twittering this little reminder!

The show on the Discovery Channel, Doing DaVinci, has designers recreating Leonardo DaVinci's designs. If you catch the show, they're using Inventor to help recreate the designs! Probably not fair to Leonardo, but you have to admit, if he could, he probably would have used a 3D modeler to design his machines too.

You can read about Autodesk's participation Here.

You can also see the first episode on the Discovery Channel Website Here.

Happy Inventing!

P.S. If you're one of the many who've found yourself looking for work, the Autodesk Assistance Program can help you sharpen your design skills.

Get a free educational software license, as well as online training, and training assistance Here.

Wednesday, April 08, 2009

There's a Funny Icon in My Assembly Browser

It's been a little hectic of late with the new R2010 products. As with every year, there's a ton of stuff to learn.

But I found something in the category I call 'subtle, but significant'.

While working on a project, I noticed that one of my mate icons looked different.


My curiosity got the best of me, and I had to see what this little guy did.

It turns out that we've got a new mate icon that specifically identifies a mate axis, and differentiates it from one of the other mates.


Is it a huge earth shaking, revolutionary change? Probably not. But it's a nice little improvement that just makes things move along a little more smoothly.

Happy Wednesday everyone!