Find us on Google+ Inventor Tales

Sunday, June 06, 2010

The Sum of Their Parts, Inventor and Inventor Fusion

We have such a mixture now, such a fusion of different genres.
Ryszard Kapuscinski

One of the new Features that''s often mentioned in Inventor 2011 is the ability to use Inventor Fusion to edit base (often referred to as 'dumb') solids for Inventor.

It's great that we know it can be done, but how about how it can be done!

First, you need to get Fusion. If you opted to recieve the DVDs in the mail, it'll be one of the DVDs in the box. (If you don't know how to request your media, there's a KETIV tech tip HERE.)

It's also available from the Autodesk Labs website HERE.

Finally, it's also available on the subscription website if you opted to download your 2011 software. Click HERE (login required).

It's not hard if you know where to look. The first step, is to to go to Application Options, and on the Part tab, make sure you set Base Solid Editing to 'Inventor Fusion'.


Choose your settings
(click to enlarge)

That's it. Now when you want to edit a base solid, just right click on the Base Solid, and choose 'Edit Solid'


Editing a Solid in Inventor
(click to enlarge)

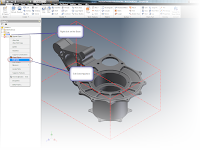
Inventor will tell you it's switching to Inventor Fusion for it's solid editing functions.


Fusion Bound!
(click to enlarge)

Now Inventor will close and Inventor Fusion will open, allowing you to edit the part using all of Fusion's capabilities.

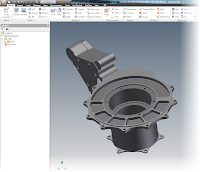
Ready to edit in Fusion
(click to enlarge)

When you're done, click the icon to return to Inventor, and the solid will be back into Inventor, ready to go.

Editing done! We're ready to go back to Inventor
(click to enlarge)


The changes now viewed in Inventor
(click to enlarge)

And that's it. Using Inventor Fusion to edit your solids. If you want more info on Fusion, look back to this blog. Schedule permitting (I have to put in that disclaimer), I hope to put some info on that later this week.

But you can also find info on Fusion from Rob Cohee's Youtube Channel! Check it out HERE!

Thats it for now. I have a new assignment to start working on tomorrow, so I want to be rested up!

Happy Inventing!

Monday, May 31, 2010

Breakout Views. Detailing for Clarity.

“The man who has seen the rising moon break out of the clouds at midnight has been present like an archangel at the creation of light and of the world”

Ralph Waldo Emerson


When I was working in industry, I created a lot of cylindrical parts that had internal features. I created more O-Ring grooves than I want to think about!

That translated into having to create a ton of Breakout Views.

Inventor's Breakout Views are pretty easy in my opinion, but that doesn't mean there aren't a couple of places you can get tripped up.

The basic steps are:
  1. Select the view to breakout (don't miss this step!)
  2. Draw a closed profile
  3. Finish the sketch
  4. Choose 'Breakout View'
  5. Select Options
  6. Hit OK.
Everyone (including myself) tends to make a mistake on Step 1. If you don't select the view first. You'll get the following error:


This error isn't as scary as it looks. Just make sure to select the view first.
(click to enlarge)


If you see it, don't panic! Just make sure you pick the view you want to use first!

As always, a picture is worth a thousand words, so here's a video to go with it!


On a non-Inventor note....

For those in the United States, Happy Memorial Day.

At the Planes of Fame Museum I was lucky enough to sit in the top turret of a B-17 Flying Fortress that is currently under restoration.

It was very cool, but also pretty humbling when I considered the courage of the crews that were in there in combat. Thanks to all those who flew those for real, so I could sit in there for fun.


Here I am sitting in the top turret of a B-17 Flying Fortress. I know I look angry, but I'm really just squinting because of the sun.


The 'business end' of the B-17s top turret. The .50 caliber machine guns are non-functioning of course. That's a DC-3 in view of the turret.


Tuesday, May 25, 2010

Repeat Last Command. Sometimes it's About the Little Things.


“Enjoy the little things, for one day you may look back and realize they were the big things.”

Robert Brault quotes


As I was getting ready to train a class tomorrow, I came to realize a nice little trick that I've come to use all time time, and since it's introduction (in Inventor 2010, as I recall), I've come to take it for granted.

What is it?

Right click to repeat your last command.

The AutoCAD gurus know this one well. They've used it for years. Now, those of us on the Inventor side can make use of it!

The right click 'repeat command' option. In this case, allowing us to repeat 'Place Component'
(click to enlarge)

The option appears at the top of nearly every right click menu, allowing you to quickly reuse the previous command without having to go to a ribbon.

This is a great tool. I've taken to using it hand in hand with tools like the new Assemble tool.

It's easy to miss, but well worth giving a try to.

Oh, and if you're really an AutoCAD guru... You can hit the space bar to reactivate the last command too!

Sunday, May 23, 2010

Using the Assemble Tool to Put it All Together


It was exactly an assembly line. You could look into infinity down these rows of drawing tables.
Gil Kane


One of the new Inventor features that I've come to like the more and more I use it is the new Assemble tool.

The Assemble Tool in Action
(click to enlarge)

This tool let's you apply assembly constraints just by picking the correct geometry, and 'fine tuning' a bit with your direct manipulation tools. You don't have to activate the Constraint tool and tell Inventor which constraint you want.

I had to take some time to practice to get the nuances of it but now that I'm getting those down, all I can say is; 'Wow, I'm having fun now!'

Here's a video I put together. Notice how I use the 'Select Other' tool to cycle through different assembly constraint options.


Happy Inventing!

Monday, May 17, 2010

Finding Hidden Treasure - Degree of Freedom Analysis in Inventor

“Should not every apartment in which man dwells be lofty enough to create some obscurity overhead, where flickering shadows may play at evening about the rafters?”

Henry David Thoreau


While working with an assembly, I stumbled upon a tool that, in the 'fog of time' I'd quite frankly, forgotten about.

Degree of Freedom Analysis.

This slick little tool will show you a dialog box with the remaining translational and rotational degrees of freedom on the parts in an assembly, as well as letting you animate them.

After taking a few minutes to reacquaint myself with this little gem, I don't think I'll be forgetting about this one anytime soon.

The tool is located in the Assembly file in the Productivity section of the Assembly toolbar.


Finding the hidden treasure - Degree of Freedom Analysis
(click to enlarge)

Choosing this tool, you'll see a dialog box showing how many degrees of freedom remain for each component in the assembly. The columns will be split up into translational and rotational.

The degrees of freedom for this clamp
(click to enlarge)

Each component shows the number of rotational and translational degrees of freedom left for each component. If you select a component in the browser, the degrees of freedom will highlight on the corresponding part on the assembly model.

Selecting a component in the dialog box will display the Degree of Freedom indicator for that compononet
(click to enlarge)

One final note, checking the Animate Freedom check box will also animate the component, moving it any degrees of freedom that remain. This can make it a lot easier to find the degrees of freedom that remain, and which ones you may still need to remove to properly constrain the component.


A snapshot of the animation in action
(click to enlarge)

So there it is! A nice little gem that can really help find where new constraints need to be added.

I know now that Ive rediscovered that tool, I'll not soon forget it again!


Tuesday, May 11, 2010

Time for Some Maintenance! Update 1 for Autodesk Vault

“I was always able to see the defects in the design of an instrument which overlooked completely the need of its maintenance.”

Leo Fender


A few weeks ago Update 1 for the Autodesk Vault 2011 family was issued. If you've ready my previous posts, you know I'm a pretty big fan of updates. I'm quick to update my software.

But when I first looked at the update for Autodesk Vault. I saw something. Something that shook my geeky being down to it's very core....

A screen capture from the Autodesk website. Note scary message in red.
(click to enlarge)

I copied it from the Autodesk Website and pasted it below.

WARNING: Failure to follow the ReadMe instructions properly may result in unusable sites. The installation procedure applies to Single Site, Multi Site and Connected Workgroup deployments.

The message was frightening. I didn't even get beyond :may result in unusable sites". For all I knew, the warning could have continued on to say.

"Side effects may include: extreme loss of data, cold sweating, insomnia, loss of social life, and spontaneous human combustion."

So I put my mouse down, and slowly stepped away. I thought about installing the update, but those warning letters would stare me down.

Finally, I had a slower day today, and decided that I would face those warning letters. I even did something that many geeks will only admit in hushed tones.

I read the readme file. That's right. I read the readme file.

But once I did take a few minute to read the file, I learned that the warnings, while important, aren't really all that difficult. As a matter of fact, they're things that I'd probably do anyway.

I'm not going to rewrite the Readme file here. You can see it for yourself HERE, straight from the source.

So what were those critical steps?

1. Make sure you have a backup. That's a given. I'm careful about using harsh language around the server unless there's a backup

2. Install the Inventor Hotfix found HERE.

3, Run an IISRESET before installing the hotfix. I'm not even sure it's necessary. But it takes about a minute, and for something that can be done that quickly, I see no reason to tempt fate.

4. If you're running multisite, install to ALL LOCATIONS before running ADMS. If this was the critical step. THIS IS IT.'

And one last thought that isn't in the readme. The migrations may take some time, so plan accordingly. Mine took about 15-20 minutes, mostly because I have a lot of libraries installed. But if you have a large database and filestore, you may want to consider installing the patch during a time when you can plan for taking Vault offline for awhile.

Those are the highlights. It wasn't as bad as it sounded when I first saw the warnings. I just let myself get too intimidated by those red letters that suddenly seemed 10 feet tall and screaming "YOU CAN'T DO THIS INSTALL! YOU ARE FOUND WANTING!"

So there's another lesson in technology. Be prudent, but don't be afraid.

And if you have to, check the readme file. You don't even have to admit it to anyone. :-)

P.S. I'm taking a couple of days off to do some volunteer time setting up for the Planes of Fame Airshow in Chino, Ca.

THere are giong to be some hectic days, while I quit geeking out over new tech to geek out over old tech. I probably won't be blogging for a couple of days, but I'll post a link to some pictures when it's all done!

Sunday, May 09, 2010

Hatches? We Don't Need New Stinkin' Hatches?


“The biggest difference between time and space is that you can't reuse time”

Merrick Furst quotes


I sometimes find that the coolest new stuff in Inventor is sometimes what appears to be the simplest.

One of those subtle tools is Inventor's ability to reuse hatches patterns from AutoCAD.

I've reused an AutoCAD hatch in the dovetails
(click to enlarge)

For background, AutoCAD stores it's hatch patterns as a file with a *.pat extension.

Now, all you have to do is browse from Inventor to one of those hatch files, and viola! You can reuse those hatches in Inventor! No trying to figure out how to recreate them, or opening an Inventor dwg in AutoCAD to reuse the hatches in AutoCAD

It's all there in one nice little package!

But enough writing about it! Here's a quick video on the actual doing!

Sunday, May 02, 2010

From Art to Part. New 3D Printing Export Options in Inventor 2011


“We now know a thousand ways not to build a light bulb”

Thomas Alva Edison


With the 2011 release of Autodesk Inventor, the pace picks up. I've been out migrating databases, testing hardware, and installing software. It definitely means a little less time to blog, but I do enjoy getting out there and learning new things.

On this Sunday evening, I took a few minutes to review the 'New Features Workshop' in Inventor, and see what new features that might be in there, but not getting lost among the other great features.

One of these is the export to 3D Print Service Option.

Back when I was in industry, we used Stereo Lithography models constantly for things like fit and function test, customer proposals, and in one instance, even to create a master for investment casting.

Even ten years later, I still have a huge appreciation for the technology, and I'm constantly amazed to see how much the technology has evolved in that time.

In this release of Inventor, Autodesk has added some settings that really embrace the technology. Here's a quick video I put together on exporting to an STL Model.


And if you want more information on 3D printing technology, here's a video I grabbed from Youtube that shows the process pretty well.


This particular video was created by OBJET, but there are many technologies to choose from, such as SLS (Stereo Laser Sintering), as well as machines using a variety of plastics and powders.

There are also companies that provide this as a service, such as Peak Solutions LLC. With service bureaus avaiable, you don't even need to invest in the machine!

So whether you've been using this technology for years, or just getting used to it, Inventor is more ready than ever to create the models!

Wednesday, April 28, 2010

Application Options, or Project Folder Options, which is right for me? A Inventor Geek’s thoughts.


It is not best that we should all think alike; it is a difference of opinion that makes horse races.

Mark Twain

Recently, someone asked me my thoughts on how I set up paths in for my design data, templates, and content center files in Inventor, so I thought I'd dedicate this blog to discuss these paths, and why I set mine up the way I do.

First, a few definitions, of what these paths are:

  1. Design Data – This directory is where your external design library data is, such as materials, dimension styles, text styles, etc. are kept.
  2. Templates – This directory defines where your template file location is.
  3. Content Center – This is where Content Center components are created when you place a file from Content Center.

If you don't change anything, these paths are defined inside of your Application Options, on the 'File' tab.


You can change these paths to another location; for example, move them to a network drive. This can be advantageous, even necessary, in a shared environment.

If you do it this way, there's absolutely nothing wrong with it. The method works just fine. But when you move to a new version of Inventor, you will have to makes sure you update these locations in the new installation.

For this reason alone, I like a different approach. I define my paths in my project file.

Defining the paths in Application Options

(click to enlarge)

When defined in the project file, they override any settings from Application Options, causing the project file to now define the paths for this project only.

Where I set my folder options. In the project.

(click to enlarge)


Incidentally, other projects can still use Application Options by leaving these paths set to default, or they can have totally different sets of folders if you'd like.

So, what's the big deal? Why do it that way?

I do it for one big reason; when I migrate from release to release, I open up and save my project. Now my paths for design data, templates, and content center are all updated to my preferred settings. I don't have to go to Application Options, locate all the paths, and reset them.

I really like this for shared environments, especially when Vault is being used. When you have five systems to upgrade, avoiding having to open Application Options and change three paths per machine has a real appeal to me!

So, wrapping up, should everyone use it? I leave that for the individual users to decide. True, if you ask me my opinion, it's my preferred method and I've used this for about three releases for my personal Inventor project, Arduinna.

But if anything, perhaps this is food for thought. In order to exercise your options, you have to know what your options are!


Friday, April 23, 2010

My Viewer Won't View! Design review 2011 with Vault 2010.

Every man is a damn fool for at least five minutes every day; wisdom consists in not exceeding the limit.
Elbert Hubbard


Having been that a fool more than five minutes on a given day, I know the feeling of having the unexpected happen.

One of those is getting Autodesk Design Review 2011 (often abbreviated 'ADR') to run inside Vault 2010.

If you're running and older version of Autodesk Design Review, you'll probably get a notice that an upgrade is available. And which one of us, when presented with that shiny 'Update Now' button, hasn't been beguiled by its allure?

I know I'm guilty of saying 'Update! Of course I want to update! Wait, what did I just update?"

If you're running Vault 2010, and you upgrade to Autodesk Design Review to 2011, you'll get an error in your Vault Explorer preview window that your viewer isn't installed.

But wait, Autodesk Design Review 2011 is installed, right? Shouldn't that work? Ive updated to the latest version, right!

The answer is yes, but Vault 2010 needs a little help to recognize this.

The answer comes in a small hotfix on the Autodesk website located at the link HERE.

This hotfix allows Autodesk Design Review 2011 to work with Autodesk Vault 2010.

After a few minutes, everything should be running smoothly.


There we are, Vault as it should be!
(click to enlarge)


Sunday, April 18, 2010

AutoCAD Mechanical - Where are My Express Tools?


“A good plan violently executed now is better than a perfect plan next week.”

General George S. Patton


This weekend I upgraded my system to Windows 7, and I must say that it was one of the easiest OS upgrades I've ever done. I have my system up, all my important programs installed, and everything working.

But during that install I remembered something in AutoCAD Mechanical that I've encountered before.

That's right, today, I'm posting on AutoCAD Mechanical, although this applies to all AutoCAD based installs.

It's the accidental omission of Express Tools from the installation.

When installing any program, you should at least browse any additional options screens you see. Even if you don't change anything, I think it pays to double check.


When installing an Autodesk program, check the configure screens. You'll rarely regret it.
(click to enlarge)


With Autodesk programs, this can be particular important for things like network licensing. Autodesk software defaults to single seat (node locked) licensing unless you tell it otherwise.

And for AutoCAD based programs, you guessed it, behind this 'Configure' button, is the option to add your Express tools


Check this box to add Express Tools
(click to enlarge)

Granted, you can add them later using 'Add/Remove Features', but that requires extra steps, not to mention you'll have to get the disks. Which may mean scheduling with I.T.

And for you I.T. guys, checking this little box may save you the hassle of having your CAD department outside your office door with torches and pitchforks because their Express tools are missing!

Incidentally, one of the screens behind that 'Configure' button also changes the install from a Stand-alone to a Network license. So if your installing under a network license, make sure you hit that button.

It can save you from some unpleasant reconfigurations after the fact.


Friday, April 16, 2010

Springtime is Upgrade Time


Home computers are being called upon to perform many new functions, including the consumption of homework formerly eaten by the dog.
Doug Larson


It's that time of the year again. Yes, I'm upgrading to the Autodesk 2011 based products, but I've also decided it's time to upgrade to Windows 7 as well.

I've already started my basic steps, I've backed up my data, lined up the programs I have to install. I've spent hours just getting ready to install everything.

In the middle of this, I was posed the following question.


Shouldn't you always install hotfixes and service packs?

In my opinion the answer varies. I'm not going to jump on a rock and proclaim that I have the 'one solution'.

I've just always believed that the world exists in too many shades of gray for a 'one size fits all' approach to service packs.

But what I will do is tell you what I do, why I do it, and give you an opinion that might help you form your own opinion.

So here's my two cents...

I see two major camps with respect to hotfixs and service packs.

Camp 1 is the 'I want to be current on everything' camp. They install every hotfix and update that comes out, installing them diligently

The upside for Camp 1 is they're always current. They fix every bug, glitch, hiccup and security hole as soon as possible.

But Camp 1 isn't all hugs and puppies. The dark side of this approach is the possibility that fix may break something else. It's not likely, but it's been known to happen.

For example, a few years ago there was the KB918118 incident. Where a Microsoft update broke Inventor so you couldn't see the text typed in the drawing.

Camp 1 found themselves uninstalling the hotfix until a second hotfix was issued by Autodesk to repair the issue.

That's right, Autodesk issued a hotfix to repair Microsoft's hotfix. It only happened once in my memory, but it was a busy week in tech support as we fought that issue!

The other camp, Camp 2, never noticed this.

Camp 2 is the 'if it ain't broke, I'm not gonna fix it' camp. They have their automatic updates turned off, and only install an update after checking the readme, and confirming that it fixes an issue they've encountered.

But this camp may find that if they're not updating Windows, there can be some serious security holes. If they're not updating their applications, then they may not be aware that an issue they've been struggling with was repaired by Service Pack 'X' issued three months ago.

These camps, of course, a bit extreme. I don't know how many of us truly fall in completely in to one or the other.

But in Jon's world, I tend to live 'on the outskirts' of Camp 1.

As far as Windows updates go, I always install them. Windows updates contain a lot of security fixes, and I don't want to be the one caught with a hole in my virtual fence.

I may hit the occasional incident (like the KB918118), but for me, the risks of someone infiltrating my system through a security hole is a far scarier prospect.

I'm a bit more liberal with my applications. I do install my updates, but I don't do it with as big of a sense of urgency.

The service packs for applications tend to be bug fixes instead of security patches. So while I do ultimately install them, I'll see if there's an issue I've been having that's been fixed by the service pack. Many times, I'll wait until a Friday when I have a weekend to test things out a bit and make sure that the service pack doesn't break anything.

Although aside from that KB918118 affair, I don't recall a time that I've seen that happen.

And yes, sometimes it slips my mind and I install it weeks later when I remember.

Which camp you exist in, is entirely up to you. I'm sure there's dozens of reasons for a given approach.

So go ahead and comment on what you're thoughts are! I'm curious to see which camp you call home!

Sunday, April 11, 2010

Taking on a Whole New Dimension - New for Inventor 2011


“There is a fifth dimension, beyond that which is known to man. It is a dimension as vast as space and as timeless as infinity. It is the middle ground between light and shadow, between science and superstition.”

Rod Sterling


For today, a simple tip. But if you can make use of this functionality, it's a big one!

Like a creature crawling from a swamp in a movie, I first heard this come up when I arrived on the scene to begin working on Inventor R4.

This was around the year 2000. We'd just averted the anarchy that was supposed to come from the Y2K bug, and we speculated on how wonderful life would be if we could have a full GIGABYTE of RAM on our machines.

The question seemed to come and go, depending on the user. For some, it wasn't a big wish, for others, they really hoped for it's inclusion in the next release.

What was that question?

Can I show fractional dimensions in a part file, instead of decimals?

At the time, the answer was no. And it remained that way until Inventor 2011. But now! Now you can show decimals in decimals, fractions, and architectural. All you have to do is right click in the Edit Dimension dialog box when you place the dimension.

Choose your weapon, er. Dimension type.
(click to enlarge)

You can also type the format directly in the Edit Dimension dialog box. For example

1in/8 will show the dimension as a fraction

1'6" will create the architectural dimension

There it is. I Maybe it doesn't have all the flash of the new Visual Styles, or the 'Gee whiz that's cool' of limit constraints (one of my favorites). But it's that solid little tool that can definitely be part of your daily arsenal!

Happy Inventing!

Wednesday, April 07, 2010

Moving Forward. Migrating Template Files


As always on this boulevard, the faces were young, coming annually in an endless migration from every country, every continent, to alight here once in the long journey of their lives. Brian Moore

As we move to a new release of Autodesk Inventor 2011, migrating files can become a challenge.

In many cases, we can just open and save the files, and go merrily on our way, but what happens if we have several files we need to migrate, and we don't want to open and save each one.

The answer is Task Scheduler. Which can be an excellent way to migrate a group of files without having to manually open each file and saving it individually.


Task Scheduler automates many processes, one of which is migration
(click to enlarge)

Here's a video on using Task Scheduler, where I migrate my template files.


One a 'fun' note. I was at Planes of Fame in Chino, California where I got to see two P-38 Lightnings startup and take a flight. Those big piston engines are mechanical music.


Sorry I didn't get any video of them flying, just some pics. But the run up is still a sight to behold!

Sunday, April 04, 2010

Keeping Up with the Styles of the Times - Migrating to Autodesk Inventor 2011


“We are not the same persons this year as last; nor are those we love. It is a happy chance if we, changing, continue to love a changed person.”

William Somerset Maugham


When I speak of styles inside of Inventor, I talk about things like materials we assign to our parts, the dimensions styles we create our documentation with, the holes we cut into our components, among many other things controlled by styles.

It's possible, even likely, you've spent much time customizing your styles to fit a certain need. That might be adding new holes to the thread table, adding materials you use to the library, or creating that special dimensions style that describes your tolerances perfectly.

For example, for my woodshop projects, I created a dimension style that contains a dual dimension style with both decimal and fractional values.

My version of a dual dimension
(click to enlarge)

Now that we're switching to Inventor 2011, we need to update the new libraries to reflect the changes we've so painstakingly made in the old,

Of course we could create them over again, and that might be easy for small changes, but if we've put a lot of work into them, then that becomes incredibly time consuming.

Fortunately, we have another way. We have Inventor's Style Library Manager.

So what does this tool do? It's designed to copy styles from one Inventor Project Files library to another. However, it does have another purpose....

Migration of styles.

So, how do we get to it?

In Windows, go to Start>All Programs>Autodesk>Autodesk Inventor 2011>Tools>Style Library Manager.

Where to find the Style Library Manager
(click to enlarge)

We see two columns, that's used to copy styles from one project file to another. Today, we're migrating styles, so we only need one column. I'll use the left column.

Inside the Style Library Manager
(click to enlarge)

Step 1, is to browse to the styles library I'm interested in. This is the location where your style libraries are located.


Opening the location
(click to enlarge)

Once you have the Styles Library selected, the Migrate button will light up. Hit that button, and the migration will go!


The migration ready to go
(click to enlarge)


The Styles Library Manager will tell you which libraries require migration
(click to enlarge)


That's it. You're libraries are migrated, and ready to go!

Finished!
(click to enlarge)

Happy Inventing!

Tuesday, March 30, 2010

Direct Manipulation Toolbars - Tools at Your Fingertips!


“Snowboarding is an activity that is very popular with people who do not feel that regular skiing is lethal enough.”

Dave Barry


I took this weekend off for what is probably the last snowboarding trip of the year to Mammoth Mountain in California.

It was a nice break with good friends. I came back tired and sore, but otherwise, unscathed!

Resting beneath the run called 'Cornice'


During that hiatus, I did think about what was next in Inventor, and I did want to talk briefly about the new direct manipulation mini-toolbars.

Direct Manipulation Mini-Toolbar
(click to enlarge)


They might seem simple. A little group of buttons that give you options for your tool, all next to your mouse cursor.

They don't necessarily add a new tool, just give you a different way to access them.

But don't discount them so soon. As I've started practicing with them, they make things so easy to reach, and flow so fluidly.

It's like reaching into your tool box, and your hand instantly finds the 13/16 deep socket with out fishing around.

So here's a video to take a look at!


Enjoy!

Saturday, March 27, 2010

New for Autodesk Inventor 2011-Dynamic Input and Closing Profiles


“Never be afraid to try something new. Remember, amateurs built the ark. Professionals built the Titanic.”

There's a lot of new features inside of Inventor 2011. Definitely more than enough to shake a few of those proverbial sticks at.

Since I'm currently snowboarding in Mammoth, I'll be keeping this one brief.

Two of the new sketching features are dynamic input, and closing a profile.

Dynamic input is similar to the AutoCAD function, where you can type the size of a sketch entity as you create it. The big difference, is in Inventor, it will let you place the parametric dimensions as you go, instead of creating them once the sketch is finished off.

Definitely a potential time saver!

The other is one that is what I refer to as 'subtle but significant'. If you're creating a sketch, and you're ready to close the profile, you can now just right click, and choose 'Close'.

Here's Dynamic Input, and Profile Closing
(click to enlarge)

Just like that, the sketch closes! It doesn't have all the flash of those viewing tools, but it is a nice little day to day tool that I know I'm going to be using quite a bit!

And don't forget! The default option for subscription customers is to download the software. If you want to have a box sent to you, you have to opt in.

You can find instructions at the KETIV Technologies Tech Tip section HERE

Happy Inventing!

Friday, March 26, 2010

New for Autodesk Inventor 2011 - Constraint Limits

In imagination, there's no limitation.
Mark Victor Hansen

Constraint limits have got to be one of the coolest things I've run across in Inventor so far.

In the past, when we've wanted to limit the range of motion for an assembly, we had Positional Representations, and Contact Sets to fill that roll.

Both tools work great, I use them, and I'll continue to use them in the future. For example, using the cylinder assembly below as an example.

Extending and Retracting a Cylinder
(click to enlarge)

Postional Representations are great for creating an 'extended or retracted' scenario, they couldn't let the assembly move between those extremes. Positional Representations can create snapshots in the motion.

Contact Sets, on the other hand, could allow an assembly to move between two positions, but the parts have to physically contact each other. So in our example, the piston inside the cylinder would have to hit the endcaps to stop. This might not be good for the life of the piston.

But now we have Constraint Limits! These set the limits on a constraint offset so the piston moves through it's motion, but I can define the offset in such away that piston doesn't hit the endcaps.

Here's a video showing the new tools!


So far, this is sizing up to be one of my favorite Inventor 2011 features!

Happy Inventing!

Thursday, March 25, 2010

What's New for Autodesk Inventor 2011 - Sketching!


“Never be afraid to try something new. Remember, amateurs built the ark. Professionals built the Titanic.”

There's a lot of new features inside of Inventor 2011. Definitely more than enough to shake a few of those proverbial sticks at.

Two of the new sketching features are dynamic input, and closing a profile.

Dynamic input is similar to the AutoCAD function, where you can type the size of a sketch entity as you create it. The big difference, is in Inventor, it will let you place the parametric dimensions as you go, instead of creating them once the sketch is finished off.

Definitely a potential time saver!

The other is one that is what I refer to as 'subtle but significant'. If you're creating a sketch, and you're ready to close the profile, you can now just right click, and choose 'Close'.

Here's Dynamic Input, and Profile Closing
(click to enlarge)

Just like that, the sketch closes! It doesn't have all the flash of those viewing tools, but it is a nice little day to day tool that I know I'm going to be using quite a bit!

And don't forget! The default option for subscription customers is to download the software. If you want to have a box sent to you, you have to opt in.

You can find instructions at the KETIV Technolgies Tech Tip section HERE

There's still more to come. There's so much to write about, it's hard to know where to start!

Happy Inventing!

Monday, March 22, 2010

Drawing Views from a Different Perspective.


The tragic or the humorous is a matter of perspective”

Arnold Beisser


As we look forward to spring, I like to throw one look back to the old tricks that sometimes become lost in the sea of 'bright and shiny' new tricks.

One of those, is change view orientation.

Occasionally, when creating a new drawing view, the standard views may not create the view we want.


Well that's not right!
(click to enlarge)

In cases like this, you might think that we're stuck. But Inventor does have a way to create that view. That tool, is Change View Orientation.

Here's the fix!
(click to enlarge)

When clicked, this button will open a window into Inventor's viewing window. which will let you use any of Inventor's viewing tools, such as the View Cube, View Face, and 3D Orbit to change the angle that you're viewing the file!


Hitting the 'Finish Custom View' button will commit the current viewing angle to the drawing, even if it doesn't line up with one of the 'standard' views.


Accept this.
(click to enlarge)

c
To get this
(click to enlarge)


Also, if you choose perspective, you can place a perspective view on your drawing, versus the more common orthographic view. Perfect for those drawings that need a bit more of an artistic spin!

A perspective view.
Great for increasing the coefficient of 'Gee-Whiz'
when making a proposal.
(click to enlarge)

And that's it! A trick so simple, it's sometimes overlooked.

Happy Inventing everyone!


Tuesday, March 16, 2010

Freeing Your Constraints! Showing Part Names in the Assembly Browser

Art in Nature is rhythmic and has a horror of constraint.
Robert Delaunay


There are days when you go into a situation, and find that there's something that's been there all along, and for a long time, you've never noticed it.

Today, i was in Inventor, and took a quick spin through the What's New in 2010.

And there it was. A tool that was added in Inventor 2010. A tool I probably saw and took note of. A tool that once I took note of it. I promptly forgot.

That tool is showing component names in your assembly browser.

(click to enlarge)

This was a tool I could have used more than once. One that was avaialble to me. And one that I hadn't taken advantage of because my memory rivals that of your typical goldfish.

So without further adieu, here's a video on how to turn it on!

Friday, March 05, 2010

Recycling Your Inventor Files - Copy Design in Vault


The purpose - where I start - is the idea of use. It is not recycling, it's reuse.
Issey Miyake


I'll confess that this is a bit of a 'redo' of a previous post. But the spammers had overrun that post, so like the cops busting up a party that's gotten out of hand, I had to delete that post and kick them out.

The good news? This one is one of the new videos that I've been creating, so it's definitely new and improved.

So here it is! Copy Design in Vault! Enjoy!

Monday, March 01, 2010

Shortcuts in Vault - A Road Often Missed


“I took the road less traveled by, and that has made all the difference.”

Robert Frost


Shortcuts in Autodesk Vault is a tool many times overlooked by all of us. For those of us using Vault for a while, it lacks the flashiness of a 'Copy Design' or 'Where Used' option.

But what it does have is the trusty reliability of a tool that makes life just a little easier, day in , day out.

And that's something that should never be taken for granted!

What is it about something as simple as a shortcut that makes it so wonderful?

Today, I'm going to start with a jig that many who've followed this blog have seen before.


The good ol' jig, rendered in Autodesk Showcase
(click to enlarge)

Naturally, I keep this project in Vault, but it's a few folders down, beneath the project that uses it.

Digging down... down... down... down...
An inside joke for those who've listened to the B-52s.
(click to enlarge)

It's not a big deal to dig into the folders, whether browsing in Vault, or opening from Vault in Inventor.


Open from Vault
(click to enlarge)

But it does have that 'nag factor'. Sometimes you click on the wrong folder and go down the wrong path. You might forget exactly which folder the file is in if you haven't been there in a while.

While it's true that Vault provides the tools that help you find the file, it also provides a tool that eliminates the need to have to go searching for the file.

That tool is a shortcut. And all you have to do is right click on the file or folder in either Vault Explorer, or the Open from Vault window in Inventor.

You'll be shown the option to create the folder.


The Create Shortcut option in the Open from Vault screen in Inventor
(click to enlarge)


The Create Shortcut tool in Vault Explorer
(click to enlarge)

And what does this do? You now have a shortcut in both Vault Explorer, and the Open from Vault tool in Inventor!


The shortcut created in Inventor's 'Open from Vault' tool
(click to enlarge)


The same shortcut created in Vault Explorer
(click to enlarge)

Now you can use the shortcut to jump right down to the file, instead of browsing through all those folders.

You can have as many shortcuts as you want, and if you right click on the shortcut in Inventor or in Vault, you can rename, or delete it completely, so you can always make sure you have easy to find shortcuts, and only the shortcuts you need.


Right click to edit the shortcut in the Inventor Open from Vault screen
(click to enlarge)

One more time, right click to edit inside Vault Explorer
(click to enlarge)

And that's it. Like the rugged lineman that gives the quarterback time to find an open receiver, the shortcut tool is often overlooked and doesn't always get the credit, or utilization it deserves.

If you're using Vault, take a look at it. It can be a great addition to your box of tools!


Monday, February 22, 2010

Vanishing Constriants, and 'What Gives?"

“There is no such thing as a failed experiment, only experiments with unexpected outcomes”
Richard Buckminster Fuller


Since Inventor R2010 has been introduced, I sometimes see this bout of 'unexpected behavior' pop up.

Have you ever created a sketch, watch the constraints seemingly place, but after completing the sketch, suddenly had your sketch move around again as if the constraints never existed?

It's almost always caused by the inadvertent turning off of constraint persistence. Fixing it is really simple.

Of course all you have to do is know where to look.

See the attached video for a fix.

Enjoy!