Find us on Google+ Inventor Tales

Sunday, November 01, 2015

Show Sick Constraints in Autodesk Inventor - A Newer Trick That's Worth It!

To borrow a phrase from Fiddler on the Roof, "Our old ways were once new, weren't they?"

And I'm reacquainting myself with building, changing, and modifying assemblies in my new capacity.  That means changing geometry after parts have been assembled.

And that means dealing with sick constraints!

They say an ounce of prevention is worth a pound of cure.
But sometimes you need a heaping pile of cure.
I had to change a hole into a slot in order to give a part a easier to adjust.

Note! For this post, the top nut and washer have their visibility turned off to make the slot easier to see.  But it is there!

One of these holes has to become a slot
Creating the slot is easy enough.
However there were threaded rods and nuts that were constrained to the now removed holes, and naturally, those constraints lost association.

Locating these in the browser is usually easy enough.

The sick constraints in the browser.


But then I remembered that there's a tool that will make glyphs visible on screen to show me where my problem constraints were.

It's called Show Sick Constraints, and it was actually introduced in Inventor 2014.

Clicking this tool shows glyphs for the sick constraints right in the modeling window.  By right clicking on these, the options to change the constraints become available

The glyphs shown.  Note one washer/nut combination is invisible
Choosing the Edit option, the lost constraint becomes visible.  It's represented by the red arrow.

Right click on Edit


By clicking it, I can re-associate the missing constraint to the new geometry represented by the slot. It's just like when the constraint was added in the first place.

Replacing the constraint.  The nut and washer are invisible.
This makes it easier to select the desired geometry.

When compared to fixing constraints by the "right click in the browser" method, I found this to go by quickly.  I wasn't checking the browser, and using tools like "Isolate Components and "Find in Browser" nearly as often.  And while those are great tools, "Showing Sick" made the process smoother with a minimal amount of "mouse mileage".


The constraints restored!  The glyphs can now be hidden if desired with
the "Hide All" tool net to "Show Sick"
It's a nice tool that helped me quite a bit in this particular situation, I'd suggest you take a look and add it to your repertoire of tools!

Photo Credits

photo credit: photo credit: Conefluence! via photopin (license)

Wednesday, October 28, 2015

A Lesson in Technology - The Activated Roller Belt

My learning experience in material handling continues and continues.... and continues some more.  Many times faster than I can absorb it.

Learning.  It can be a bit like this!
One newly acquired bit of knowledge I thought I would share is something called the "Activated Roller Belt" made by Intralox.

This fascinating bit of technology has a conveyor chain, like you might expect on a conveyor line, but in addition to that, it has small rollers embedded in the belt at an angle to the belts direction of travel. 

By activating these rollers in a controlled manner, the direction of travel for anything on the belt can be changed.  This is accomplished without gates or any other (apparent) physical force. 

Instead of trying to describe it, I was able to find a video showing it in action.  It's an interesting little watch.

I hope you enjoy a sharing my little bit of insight into the material handling world!


Photo Credits:

photo credit: punch via photopin (license)

Sunday, October 25, 2015

Using the Refresh tool from Autodesk Vault

There's no better experience than real experience.  Especially when it comes to the nuances of things.

Some things you can learn by reading, others, like riveting, you must get out there and do!
One of the tools I've been using quite a bit in the last month is Refresh from Vault, particularly when I'm renaming or moving a file.

And I've found I do this a lot.  File names, which go part and parcel with our part numbers are always being tweaked in Vault.

With regard to moving files?  I have found that sometimes, I get in a hurry and hit that save button before I realize where I've saved to!

Fortunately, Vault's rename feature makes renaming files easy.  And it's just as easy to drag files from one folder to another in Vault  But there's always one rub.

I have the assembly containing the files open in Inventor at the same time.

Now I could always close Inventor, rename the assembly, and reopen the file, but that takes those few, precious, minutes I don't always have.

I could always wait to do it at the end of the day, just before I leave, but who am I kidding!  I'll never remember at the end of the day!

These don't often work for me...

I'll just keep repeating the remember/forget/repeat process in an engineering version of Groundhog Day!

But here's how you can use Refresh from Vault to quickly update files after a rename or move.

After files have been changed in Vault via Move or Rename, switch to your Vault browser in Inventor.  You may need to refresh the browser to make sure it's up to date.

You'll see a red symbol next to the files that need to be updated.

Files that need refreshing after a move or rename operation
All that's required is to right click on the file you need to update and choose, you may have guessed it, Refresh!

Right click to rename the files

Once that happens, the files will update!  If you've moved files, the locations will be updated, checking the files into the correct location in Vault, and the renamed files will be updated.

Files have been refreshed! 

It's a nice trick that saves a few minutes, makes my day a little smoother, but most of all, makes sure I do something that needs to be done, when it needs to be done, and makes sure it doesn't get "saved for a later that never comes".

Photo Credits:

photo credit: Riveting team working on the cockpit shell of a B-25 [i.e. C-47] bomber at the plant of North American Aviation, Inc., Inglewood [i.e. Douglas Aircraft Company, Long Beach], Calif.   (LOC) via photopin (license)

photo credit: Russell Building: Interior Design Studio via photopin (license)

Sunday, October 18, 2015

Getting Your Autodesk Inventor Threads to Stay on by Default

Foreword 

A couple of notes before you read the whole blog!

  • My tests were conducted with Autodesk Inventor 2015, the version I'm currently using at work. Other versions may behave differently!
  • If you're comfortable editing your registry, follow the instructions at Being Inventive here, and you won't need to follow the steps I describe.  

If you choose to read on... Welcome!

Thread solo! 
Relearning design engineering has been an eye opening experience, and there's no doubt it will continue to be.

I had forgotten, in the mad world of hustling drawings, every little thing you can do to make your life a little easier helps.  Something a little faster or a little more accurate can save you a lot of time.

One setting that got me on a drawing was the default thread behavior in Inventor.  It's unchecked by default, which means that threads won't display in a drawing.

It's not a big deal to check the box and turn it on.  The trick is remember into to check the box!

What would really be desirable, is to set it once, and have it stick that way.

Fortunately, there is a way!  Here are the steps.

The first thing to do is start a base view just like you would any view.


But before you place anything, make sure to check the "Thread Feature" option to turn on the hidden lines that represent threads.

This part is important.  Make sure to check the box before placing the view!

Check this box BEFORE placing the view.

Once the box is checked, place the view.  The threads will not only show, but the threads will "persist" and display by default the next time you place a view..

There are my threads!

There is a small downside though.  You'll have to do it for each file type.  That means doing this procedure for parts, sheet metal, assemblies, etc.

It's not difficult, it just takes a little bit of time.

Also, if you want Autodesk to change it, don't shake your fist in the air.  Let them know at the Autodesk Idea Station here!

I've placed my vote!

Photo Credits:

photo credit: The Backup Band via photopin (license)

Monday, October 12, 2015

Never, Ever, Stop Learning

This week's post isn't an Inventor related post, at least not directly.  The new job has been keeping me hopping.  But I do have a post in the works.  I'm hoping for something next week!

This particular weekend was consumed by attending a 15 hour avionics and electricity course with the Experimental Aircraft Association (EAA).

An example of a harness I learned to make! 
It was exhausting, but on so many levels, amazing and inspiring.

If you've read back to my post a few months ago, you know that electricity has intimidated me in the past.

In fact, it still does in some ways.

But there I was, on October 10th, 2015, facing electricity again.  And just like in my last class, I took a deep breath and told myself; "You can learn this!"


And.. I did!   How?

The instructor was amazing.  He had worked on aircraft for years, and had that rare gift of making the topic interesting, and easy to understand.

The examples contained both theory, and hands on exercises that reinforced the theory by application in the real world.

So I listened, I practiced stripping and crimping coax cable.

That making taking this.

A journey starts with a single step.


And turning it into this!

The end of one, small journey. 

I studied a chart that sized wires based on voltage, amperage, and wire length.

With a little work, I can interpret this chart now!
(From FAA AC43.13)
Finally, at the end of day two, I was given the following pile of components and a schematic


  • Power (AA battery)
  • Circuit Protection ( a fuse)
  • Switch
  • Light which was turned on by the switch
  • Dimmer
  • A light controlled by the dimmer
  • An aluminum chassis to mount it all in


I took a few minutes, to look at the schematic and components.   I had to use those components to make the schematic reality.


I traced schematics, I cut and stripped wire, I soldered wires to connections and crimped on round connectors.

Finally, it was time to test.

I flipped the switch... and the light turned on!

I twisted the dimmer... and the light dimmed and brightened.


I had actually done it!  Me, the man who hated electricity built a circuit that worked the first time!

It even looked reasonably clean!

So in the end, so what?  I soldered a grip of wires and components together.  There is no doubt that there are those of you out there who can outdo my work in your sleep.

Two words.....  Confidence.  Inspiration.

Not mine.  Yours.  Ponder that a moment, if you will.

The business types, the ones in the fancy offices and neatly pressed suits sometimes wag their fingers at me and say "there always has to be a call to action".

So here is your call to action.

Never stop learning.

I'll say it again.

Never.  Stop.  Learning.


Try.  Fail.  Even fail epically.

Ignore the peanut gallery mocking you from the safety of their couch.

Why? They're safe on the couch.  They aren't out there trying.

Go out there, and do what scares you a little.

Maybe learn a new software package, or learn how to run a 3D printer.  Learn how to change the oil on your car if that excites you!

It might be tough, it might be intimidating.  But if it inspires you, it's going to pay off.

It's worth it.

Now, go find it!

Photo Credits:

photo credit: Hello My Name Is a Student of Life via photopin (license)

Monday, October 05, 2015

An Application Engineer's Tale of Returning to Design

Last week, I accepted a job working as a design engineer again.

The engineer print.  It's been a while, my friend.
This meant leaving the world of being an applications engineer, or "AE", where my job functions included the support, training, and implementation of software such as Autodesk Inventor, AutoCAD, and Autodesk Vault.

Now, my function is to create designs for material handling equipment using those very same tools.  Conveyor lines, in a word or two.

My first steps to "learning the ropes" was helping another engineer create drawings for his project.

And I while I can't say that I was surprised at any one change in particular.  The experiences I saw were for the most part, what I expected. Yet, I still found myself reflecting on what I saw during week one.

Here are a few.

I have a desktop, not a laptop!

Well, this is different!
If there was a surprise, this was probably the one.

I've been running Inventor on laptops for over ten years.  I've gotten accustomed to just flipping open my laptop at home and running Inventor.  Now, when I leave work, I'm done with CAD until the next morning.

That also means that creating Inventor videos for InventorTales is on pause for the moment.  I don't currently have the gear.  But I am hoping to be able to do that again soon.  :)

Change is hard... For a reason.

Changing is one thing.  Making the right changes?  Another thing entirely. 
As an AE, running my own system, I could turn on a dime.  If I wanted to change how I maintained templates, for example, I just did it.

I could take a couple of hours to reinstall software if I needed to.  It just took a little planning.

Now, I'm exposed to the deeper ramifications to changing things.  How does this affect your fellow engineers? Will this "simple" change cause confusion on the shop floor that will cause delays and mistakes?

Change often requires the careful thought of a chess master, not the lightning fast reactions of a table tennis player.

Just because change is hard, it doesn't mean good people are unwilling to make changes.

One thing about change.  You can't avoid it.
My new coworkers have started asking me questions in Inventor.  I've gotten a couple of "how to's", and I'm more than happy to help.   If a new tool or process in Inventor makes sense, they're willing to adopt it.

Which brings me to my final point...

Know your product! 

Remember, tools are what make your product. Good tools should make a better product faster.
As an application engineer, my product was software, and the processes that surrounded it.  Software like Inventor and Vault, and their services were the product.

Now....  Surprise!  Material handling equipment is the product.  Software exists as a vehicle to get that equipment built.  It's a tool, just like the laser mill for cutting steel, and the router for cutting plastic.

No matter how cool the tool is, how pretty it works, if it doesn't help get the product made, then it's just a cool parlor trick.

In Conclusion?

First of all, there is no conclusion.  This story is still getting written and it will get written for some time to come.  I hope to be an asset to my new employer helping them make a better product, and I hope to learn a new set of skills myself.

In one week, I've only taken the very first steps.  I hope in the following weeks to keep taking those steps, and to share them with you out in the 'Verse.

Stay tuned!

Photo Credits

photo credit: Rolleiflex TLR on Rollei blueprint at Rollei/DHW factory Braunschweig Germany via photopin (license)

photo credit: Choose Your Direction Sign House Gainesville via photopin (license)

photo credit: Changes #2 (lock) via photopin (license)

photo credit: A Worker at Linread via photopin (license)

Saturday, September 26, 2015

The (Bald) Eagle has Landed

I think I'm quite ready for another adventure."
Bilbo Baggins - Return of the King


Time to find out what's over that hill. 
This week is a short post to announce that I'm joining Can Lines Engineering as a Mechanical Engineer.

I'm looking forward to getting back into a design and manufacturing again.

I'm sure it's going to be a new adventure full of new challenges and learning experiences.

I'm hoping to "relaunch" InventorTales as a part of this, and share new tips and new experiences.

Stay tuned!


Photo Credit

photo credit: Nick via photopin (license)

Friday, September 18, 2015

A Visit to Westec 2015!

I've had some time on my hands while I've been on the job market, so I decided to take a drive to the Los Angeles Convention Center and spend a short time at Westec 2015.  

A little tech in action
There was some pretty cool technology there!   

The first machine I saw was a waterjet machine made by Flow Waterjet.  It's been a little while since I've had any interation with one, but the most interesting thing I learned was that the taper (caused by the waterjet spreading out as it cuts through the material) has been eliminated by automatically tapering the head.

I also made a trip to see if there were any 3D printing companies there.  I did find the 3D Systems booth.  Most of the things I have seen before.  But it's always an amazing technology to see.  There's a certain Zen I find watching the machine build,   And the things have gotten much more amazing since I last saw it in the early 2000s. 


And seeing how it's a show for machine tools, I had to see a few more "traditional" CNC machines.  I only call it traditional because they're probably the oldest technology there, but event that technology evolves constantly.  

I was able to get a pretty good video at the Datron booth of a machine running toolpaths.  I wish I had gotten there when it was cutting the part instead of repeating the path over a finished part, but I'm sure aluminum billet gets expensive after a while.  Not to mention cleanup!  


Finally, I did swing by the Autodesk booth where they were showing Autodesk Inventor HSM and HSM Works.   As a long time CAD jockey, I can say that it's strange to see Solidworks running in an Autodesk booth!   But this is life in the modern era.  Autodesk is a Solidworks supplier after all. 

The Autodesk booth was like this all day! 
They were making parts on a Haas CNC machine, and they were getting a lot of attention.  I could barely get room to get the video! 


I was really amazed at how crowded the show was.  It was a zoo!  Which is great for the vendors.  I'm glad they're busy.  It took me nearly 45 minutes and repeated flybys of the SolidCAM booth before I was able to talk to a friend for 10 minutes.

But all in all, it was a good show.  I just wish I'd been able to grab a few more pictures and videos! 

And by the way, if you ever have a chance to swing by a trade show in your industry, I encourage you to do it!  You don't have to spend all day, you don't have to become the "turtle person" who is weighed down by twelve bags full of t-shirts, pens, and squeezy stress balls.

But see what's out there, and see what you thought was state of the art, may have past into history while you were hunched over your desk in the cubicle farm.

Technology will march on!  And it won't wait for you to make sure you packed a lunch. 

Monday, September 07, 2015

When is it the Right Time to Buy the Right Tool?

Recently I had the experience of changing my own front brake pads again on my runabout, the 2007 PT Cruiser.

A typical caliper for disc brakes. 


In the last couple of years, my schedule has been busy enough where it's been easier to take it to the shop, and pay someone else to do it.  But I decided to do it myself this particular day, because I missed that certain Zen I get when I work with my hands.  

The steps to change brake pads isn't a hard one.  It's a matter of jacking up the car, taking a tire off, removing the caliper, swapping the brake pads, and reversing the steps.

You can find the basic steps here. 

But there's always one step that makes it a little tricky.  

The calipers, which press the pads against the rotor to slow the car, are extended because the old pads are worn down.

One of my old pads vs the new.  You can say I got my money's worth! 


That means that getting the new pads to fit around the rotors, which means compressing the caliper piston, which means using a tool, improvised or otherwise. 

Many years ago, when I was a broke college student and would spend hours working on my own car, I would wrangle a the calipers open using a combination wrench or a screwdriver as a pry bar.  This usually included a lot of grumbling as I balanced the caliper in my hand an tried to get leverage with whatever improvised tool I was using.

One day, I was having one of those "garage conversations" with an old mechanic laughing about opening calipers.  He reached into his toolbox and said "buy one of these".  And showed me a caliper opener.

I bought one that same day.

Although there different styles for this tool, the one I purchased nearly twenty years ago uses a screw and scissor mechanism.  Not unlike the scissor jacks included with most modern cars.

The piston compressing tool ready for action
By twisting the screw, the scissors open, and the caliper piston compresses.

It has reduced both the time, and aggravation of getting the calipers open.

You may have guessed that the moral of my story is "have the right tool for the job".  As a matter of fact, I've written a post on a very similar vein before.

But that's not always part of it.  Many times, there always a "better tool".  But in order to enjoy the savings of the tool, you have to spend the money on the tool.

I'm sure there are a few of you who are thinking, "that tool is a waste of money, an improvised pry bar will work just fine!"

Are they wrong?  I don't think they are.  It's a choice they've made based on their own unique experience.

The other question?  Is there enough benefit to having that tool to justify the investment?  

That's the big question that has to be answered.  Depending on your tool, ROI calculators may be available, but do they tell the entire story.

Some other things that might be worth considering.

  • How often will you use the tool?  Are you going to use the tool every day?  Every few months?  Or "Who knows when the next time will be?"  The more use you get out of the tool, the better off you'll be. 
  • How much time does it save? If it's saving you 5 minutes every 2 years, and costs thousands of dollars, it's not as wise of an investment as something that costs a few hundred dollars and saves thirty minutes every few weeks. 
  • How much frustration does it save you? Are you, or one of your coworkers cursing a blue streak while trying to "make it work"?  Someone who's frustrated can make other costly mistakes.  That frustration can even seep into other projects. 
  • There's never time to do it right, but there's always time to do it twice! In other words, how much does it cost *not* to have the right tool? Are you scrapping parts because it takes more than one try to do what the right tool could do once?  Scrap costs money too. 
The right tool can turn a frustrating job into a "cakewalk",  But at the same time, buying a tool "to have it" can get expensive quickly. 

Whether it's a caliper opener costing 15 US Dollars, a CNC machine costing 100,000 US Dollars, or a CAD Program costing 10,000 US Dollars, it's not always a simple decision.  

From the wrench to the CNC machine in the background, every tool has to
make more than it cost to make its purchase worth while.
Image courtesy KRF Machine
That's where consideration, analysis, and a large dose of experience have to combined to decide when the time is right to make that investment. 

Photo Credits:

photo credit: Primed Caliper via photopin (license)


Tuesday, September 01, 2015

My Test Drive of a 3Dconnexion CadMouse

The last few weeks I've had an opportunity to test drive the new CadMouse from 3Dconnexion.

The guest of honor for this post. 
Color me impressed.   Very impressed. Here's why.

Initial Impressions

Naturally, I had to inspect the mouse when I first freed it from it's packaging.  The feel is nice and solid, and it fits comfortably in my hand.

It was much bigger than my current go to mouse, a Logitech Anywhere Mouse MX.  Which I am a big fan of, incidentally.

My CadMouse on the left, my Anywhere MX mouse on the right. 

As I inspected the buttons, I quickly noticed there are three mouse buttons, plus a wheel, plus a gesture button.  On top of that, there are two additional buttons on the side.


  1. Side buttons
  2. Left button
  3. Middle button
  4. Right button
  5. Scroll wheel
  6. Gesture Button


Each button has its purpose. And you can control that purpose
The Test Drive

Installing  the driver, was pretty easy.  Having my laptop recently go back for repairs, I had to reinstall my drivers. But after a quick download, a few clicks and a little waiting over a cup of coffee, and it's ready to go.

Next it's time for the rubber to meet the road.  Drive it!

I purposefully ran without my usual SpacePilot Pro.  I didn't want to use it as a crutch and skew my opinion of the CadMouse.

So in I dove into Autodesk Inventor with the CadMouse alone.

The first thing I fell in love with was the wheel.  As much as I love my Anywhere mouse, I hate the scroll wheel for panning.  It's great for non-CAD applications.  But for double clicking to "Zoom Extents" in Inventor with the Anywhere mouse?  Forget it.  I programmed the menu button to duplicate the middle mouse so I could zoom and pan with that.

The CadMouse on the other hand, works beautifully for scrolling and panning. That alone is a big winner for me. It's designed for CAD users, nuff said.

The rest of the buttons are smooth, and work nicely.  I customized the extra middle mouse button as the "F4" key, so I can use that as a shortcut to access my orbit tools.

The Gesture button is a nice tool.  It places commands on a "Heads Up Menu" that you can customize.  I haven't had a chance to really customize it, but I see it as a great way supplement the commands on Inventor's marking menus.

The gesture menu in Autodesk Inventor.  And it can be customized.


The "Side Buttons" are set to Zoom in and Out by default.  I've changed them to Undo and Redo.  Since those are tools I use often.  I'm content to scroll with the mouse wheel.

And as for that optional mouse pad.  It's not a necessity to use it with the mouse.  The CadMouse works great on the surfaces I've used.  This includes tables made out of plastic laminate and my mahogany coffee table.

3Dconnexion also included the optional mouse pad.  The first thing I noticed about this is it's about the size of a small helipad at 350mm x 250mm (13.75 inches x  9.875 inches).

The mouse pad has plenty of room! 
While not required to use the CadMouse, the mouse pad makes the CadMouse just glide.  It's like having a great car on the urban freeway, versus having the right car on a wide open country road.

I do recommend the mouse pad for the desk at home, although it might be a little tough to travel with.

The "Drawbacks"

I really can't find much to say is "bad" about it.  I always feel I have to find "something" to have a proper review, but I'm really splitting hairs.  I had to try to find something.

The cord sometimes gets in my way. Due to the fact I'm very mobile and always have it connected to a laptop, I tend to have a lot of extra slack. Wireless might be nice, but in a few seconds, I can arrange the cord so it's not in my way.

And because it's corded.  No batteries to change!

.But that's a minor complaint, really.  If the cord is the best I can come up with, then I have a collection of nits I'd love for you to pick through.

At 100 US Dollars, it costs more than a many mice.  So sticker shock might be an issue.  But if much of your job is driving a CAD machine, this is an investment that will pay off quickly, especially with the ability to customize the buttons.

The Summary

The CadMouse is great.  That's all there is to it.  3Dconnexion put some thought into it, and it shows.  I've thoroughly enjoyed the time I've had with it so far, and I'm looking forward to getting some more time with it.

If you're in the market for a new mouse, I think you should seriously consider the CadMouse as an option.  You're doing yourself a disservice by not taking a look.

Next, I'll be customizing the buttons even further.  Not to mention connecting my SpacePilot again!

Friday, August 21, 2015

Defragging Autodesk Vault Using a Script

It's been a little while since I've been able to dig into Autodesk Vault, but just this week, I had to locate a script to defragment the Vault database. 

The reason for a defragment is to make sure Vault performance doesn't degrade when making database queries.  For those of us not intimate with SQL, those are Vault Searches.

A manual defrag can be kicked off from the ADMS Console on your server at any time.  All you have to do is right click on the database you want to defrag, and choose "Defragment Database".

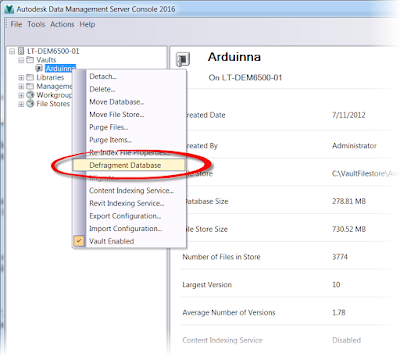
A manual defrag from the ADMS Console


But the next warning will give you an indication that this isn't a small feat.


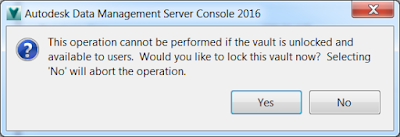
You should read and heed this message! 
The database will lock during a defragment, and the users won't be able to use it.  As a rule, this is undesirable during working hours.

What would be better, is if we could run it during off hours when nobody is accessing the server.

A script can be used to make sure you, as a CAD Manager, don't have to log in during the dead of night to execute the command yourself.  The script is just a text string that runs the same function as the command shown above.

An example of the script in Notepad.  Click to enlarge this image.

This can be set to run as a Window Scheduled Task.  You can let the server run this at a time of your choosing.

First of all, the text for the script is listed below.  You can type this in Notepad.  Also, it's all one line of text.  Don't let the wrapping below fool you.

"C:\Program Files\Autodesk\ADMS Professional 2016\ADMS Console\Connectivity.ADMSConsole.exe" -Odefragmentvault -NVault -VUAdministrator -VP -S

There's a lot of geeky sort of words and phrases in this script.  So let's break it down a little bit.

C:\Program Files\Autodesk\ADMS Professional 2016\ADMS Console


This line just opens up the directory where the executable file to run thee script is located.  Note that it's version specific if you use the default location.

To make sure I've got it right, I copy and paste the location into Windows Explorer.  If it opens up the folder location with the file, Connectivity.ADMSConsole.exe in it, congratulations, it's right.

Go get yourself a cookie!

Speaking of Connectivity.ADMSConsole.exe. 

This one is pretty simple, it's the executable file that starts Vault commands.  In effect, it's starting the ADMS Console without the interface.

-Odefragmentvault

This is the switch that tells Vault that a defragment is being done.  Different switches can get Vault to do different functions, such as backup.

-N

This is important! The -N is a switch tells Vault which Vault database is going to be defragmented.  For example -NOlympus would defragment the Vault database named "Olympus".

-VU

Often the user "Administrator", the -VU switch tells Vault which user the Vault is using to run the defragmentation.  The user running the script isn't important, but they must be a Vault user with administrative permissions.

-VP

This is the password for the user identified by the -VU switch.  In my sample, it's blank because my administrator doesn't have a password.

Yes I know, this is a terrible practice.  Do as I recommend, not as I do!  (cheeky grin).

-S

This runs the script silently.  That means that it won't show you any dialog boxes and wait for you to hit "OK".  It's just going to chug along.

Now that all that is been explained, you can save this script with a *.bat extension.

Now, set it up as a Windows Scheduled Task, and you should be off and running!

It's hard to give a solid schedule to run a defrag on, but I usually run my tasks about every six months or so, but that's just what works for me.  You'll have to keep an eye on your Vault and see how it performs.  You may be able to go longer or shorter depending on your personal experience.

If you want, you can always check the ADMS Console, if it says "Defragmention Recommended", it's probably a good idea to run that defrag!

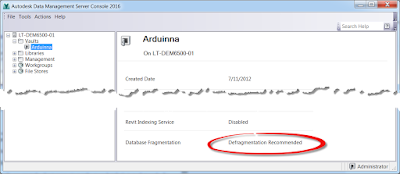
Time to do a little maintenance! 
One more tip, but this is a big one.  Always! Always! Always! Make sure you close the ADMS Console interface when you log off your machine!  

Vault will only allow one instance of the ADMS Console to run at a time!  If you forget this step, the script won't be able start.  That means that no backups, defrags, or anything else that runs off Connectivity.ADMSConsole.exe will work!

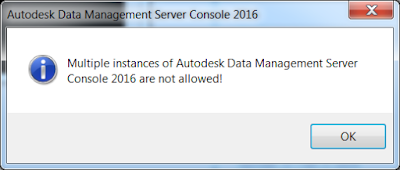
You don't want to see this message
The last thing you want to see is this message when you need a backup, and one hasn't been running for six months because you forgot to close the ADMS Console!

In conclusion, good use of batch scripts can be a boon to making sure your Vault runs efficiently.  It can eliminate the need to constantly log into run maintenance processes.  Instead, you can let them run on a schedule, and just monitor to make sure the finely tuned system is still finely tuned.

The defragmenting script is one, the backup script is another.  But there is a lot more that can be done.

For a full reference, check out this link from Autodesk here!


Sunday, August 16, 2015

After a GPU Failure, Fusion 360 Keeps Me Designing!

This Friday, my laptop had to go to back to the manufacture because the graphics card was spiking at a 100 degrees C.  Needless to say, my GPU was better suited to making coffee than processing graphics.

At least that GPU is good for something! 
With my laptop, I also lost my installs of Autodesk Inventor, Autodesk Vault, and AutoCAD Electrical.

Fortunately, I have a personal laptop that I can use, but it doesn't quite have the horsepower to run 3D modeling software.

So what do I run in the meantime?  I decided to take it as an opportunity to use Fusion 360 in the meantime.

I've not used Fusion 360 much but I have created some files, and that did allow me to enjoy a couple of benefits.

1. I had very little configuration to get up and running on my "backup" system.

Most of the configuration is stored in the cloud.  I only had to install the Fusion 360 application.  At about 1.5 GB, it not a big install.

The client itself is pretty small. 


2. All my files were readily accessible.

The files are all stored online, so there was no backup to restore.  I just need an internet connection, and I just log into the system.

My training files. No restore needed.  They were there when I logged in to my account.
3. The hardware requirement isn't nearly as heavy.

My "backup" laptop only had a 4 GB of RAM, a 2 GB ATI video card, and a respectable AMD processor.  Not a bad machine, but not a CAD station for sure.

But it does run Fusion nicely!

Most of the drawbacks are matters of my own personal preference, but I suppose in many cases, drawbacks always are.  And ultimately, it's all a result of my acceptance of the "status quo".

1) It's not Inventor!

I've been using Inventor since 2000.  That's right!  Since the turn of the century!  I'm used to it, I'm comfortable with it.  Fusion is new, and different.

I guess I'll just have to expand my comfort zone!

2) All that data is online.

It's a little weird at first, isn't it?  I'm used to having my data local.  I'm comfortable with it, I know it.  But I'm already backing up my Vault data to Dropbox, so it's not that big of a departure, in many ways.

So I'll have a bit of learning to do!  I'm planning spend a little time this week!

Friday, August 14, 2015

It's Been a Great Run - Farewell to KETIV

After 7 incredible years, I've decided its time to move on from KETIV Technologies.  I will remain with them until August 31, 2015, in order to make sure our transition is as smooth as possible.

They've been good to me, they deserve my best efforts.

A perfectly natural question to ask is "Why?" or "What's the story?".  Some may even ponder, "What's the real story?"

And that question has really been posed to me!

Some seem to think that this is a good analogy for leaving a job.
This is far from reality for KETIV and I.
I can say there are no great wrongs, real or perceived, no dirty laundry to air.  It is simply time for me to move in a new direction.

I'm going to miss my colleagues at KETIV, even as I look forward to my new course.  They're an outstanding group of people, and I look forward to seeing them at a future event!

As a user, I wouldn't hesitate to have KETIV support any engineering department I land in!

So what does that mean for InventorTales?  I plan on keeping it going and adapt it to my new path.

And as for that path?  What does that look like?

It's a trail I'm still blazing.  I'm hoping continue taking aircraft maintenance classes, combining my theoretical engineering mind with the practical lessons of grimy hands and bloody knuckles.

It may yet be a while, but I'm hoping to gain my aircraft maintenance certification from the FAA some day.

I also plan on continuing to expand and improve my work in CAD, I'm not quite sure what form that's going to take, but stay tuned! There will be more news for sure!

I'll add updates as I have them, and I will certainly have some!

Thanks to all those who've supported me over the years!


You'll never find out what's over the next hill, if you don't get up and take the journey.

Acknowledgements

U.S. Thunderbird F-16 Ejection: By U.S. Air Force photo by Staff Sgt. Bennie J. Davis III [Public domain], via Wikimedia Commons


Sunday, August 02, 2015

Does the Future of Making Things Spell the End of the How it Was Done?

There's a lot of buzz about the "Future of Making Things" lately.  Personally, I'm a big fan of the possibilities this new wave has to offer.  Things like connected devices, cloud technology, and 3D printing, just to name a few.

But while I excitedly absorbed this new age, I was reminded of an experience I had.

Not to long ago, perhaps a year at the most, a colleague needed to find a component in an industry catalog, like many of us designers needed to do.
Most of us have thumbed through catalogs like this one from Aircraft Spruce
But we were standing in a large hangar, the closest computer wasn't readily accessible.

I began browsing in my smart phone, to which he proclaimed to me defiantly, "I bet I can find this in the catalog faster than you can find it on that contraption.

"You might."  I responded, sensing his need to prove a point.  I willed my smart phone to pull those bits and bytes faster.

And in fact.... He did beat me! He found his part before I had found it in my smart phone.

"See!  Those smart phones aren't the answer to everything! I'll take that over that fancy thing any day!"  He stated proudly.  I'm sure he felt he had proved that his older technology had beaten my new tech.

You might think I would have felt the frustration of having "lost".  My colleague certainly felt like he'd "won".  But in truth I had earned valuable experience.

Sometimes, I find myself looking at new technology as a "replacement" to old technology.

Throw away your catalogs and reference books!  Dispose of your paper prints.  

The Internet, connected devices, and data shared via the cloud will replace that!

3D printing is the future!  Why machine, mold, or cast parts when you can print them at will!

We've all likely heard a similar mantra before.


Will the Future of Making things make prints like this a thing of the past? 
But reflecting on that inner monologue, I asked myself a different set of questions.

Will it the future of making things spell the end of the "Past of Making Things"?  

Should it?

And finally.

Does it have to?

I have battery operated screw drivers now, but that doesn't mean I threw away my hand screwdrivers.  I've reached for my thirty year old screwdriver for a quick job, or when the battery in my power screwdriver is dead (usually because I forgot to charge it).

I have a belt sander and two orbital sanders, but I've still folded sandpaper over a block of wood to make a sanding block.

Why?  It was the right tool for the right job.

The power tool vs the hand tool.  Is one better than the other?
Or does it depend on what you need it for? 
Doesn't each one of those cases represent a situation where an old technology wasn't replaced by a new one, but instead augmented by it?

I've lost count of how may times I've seen oil, water (including coffee), or grease smeared on paper prints.  Would you rather see that on paper, or an expensive tablet?

In this environment, paper gets torn, but tablets get shattered.
Would you rather print a new document, or replace a tablet?
Picture taken at Mt. SAC Aircraft Maintenance Dept 
But why not use that tablet to quickly find the information, then print to a piece of paper?  All without a trip to the engineering department!

Does that make one better than the other?  Or does it make one better suited for one type of job over another?

The lesson I learned was valuable indeed.  My colleague's catalog beat my smart phone.  No doubt about it.  On the other hand, what if his catalog is out of date?  Even if it was slower, it's likely my smart phone would have been more accurate, since an online catalog can be easily updated with new information.

So what?  What's the lesson, the "call to action"?

Stay open minded, and don't throw the "baby out with the bath water".  Don't integrate new tech at the cost of your old tech, but use the "new fangled", add it to the "tried and true', and make it greater than the sum of it's parts.

Jonathan Landeros

Acknowledgements

photo credit: should you really be letting those just hang around? via photopin (license)