Find us on Google+ November 2010 ~ Inventor Tales

Monday, November 29, 2010

Keep Your Finger on the Trigger - iLogic and Event Triggers

“Next in importance to having a good aim is to recognize when to pull the trigger.”
David Letterman

Just a short post for today.  I spent the holiday snowboarding in Mammoth, so I only had limited internet access for a few days.  But for views like this, I'll give up a bit of web access.

And the time off was great!

The view from town is pretty nice.


Who wouldn't want to have a morning like this.

For today, I wanted to expand upon last week's post and talk about Event Triggers in iLogic.  In that post, I talked about creating a rule to choose my sheet size, border, and title block by choosing them from a dialog box created in iLogic.

This rule could be fired by clicking the iTrigger icon on the 'Manage' Tab in the drawing.

The dialog box created in iLogic


But what if you want a rule to fire automatically, under a specific condition? 

That's where an Event Trigger can come into play. 

By clicking on the Event Trigger icon, you can specify the condition under which a rule fires without you explicitly asking it to. 

1) Click Event Trigger from the 'Manage Tab'.

Access the Event Trigger
 2) Right click to edit an event.

Right click to add or remove the rules attached to an event
 3) Choose the rule (or rules to attach to the desired event)

Edit your rule
One you do that, you can now fire the rule when you want it to.  For example, when I start this file from a template, the option to choose my sheet size, border, and template fires up automatically!

Sunday, November 21, 2010

Drawing Conclusions on Formatting a Drawing with iLogic

“Information is a source of learning. But unless it is organized, processed, and available to the right people in a format for decision making, it is a burden, not a benefit.”
William Pollard


***Edit 4-April-2012***

I've added the file I used in this blog post to the GrabCAD website if you want to download it and take a look.  You do have to be a member, but I think you'll find that it's a great site with a lot of free CAD models. 
***

As I was wrapping up my videos for the Autodesk Manufacturing Academy, I found a video that had slipped through the cracks.  I had recorded it, but I hadn't produced it.  So I finished it up and added it for this weeks post.

This video discusses how to change drawing formats with iLogic.


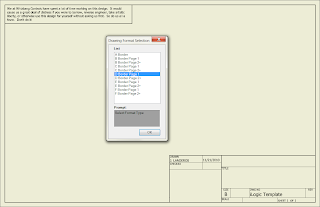
The finished rule asking you for the format you want to use
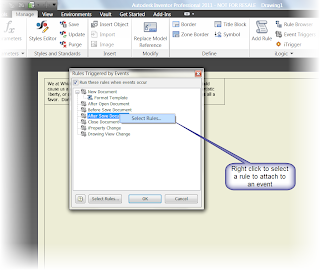
One more note before you look at the code below!  If you use event triggers, you can fire the rule automatically.  For example, the image below sets the drawing to fire it's rule when I start a new drawing.  If you set this from a template, the drawing will ask you which drawing format you want when you start it!

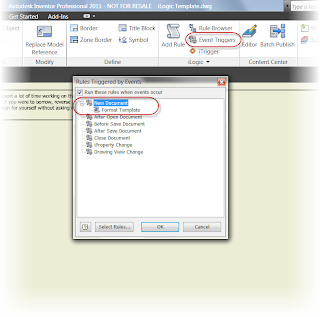
Use event triggers to fire a rule when a particular event happens. This one occurs when you start a new file
So without further delay, here's the video!

Here is the full code for this particular rule.  Once you get the first couple of rows down, it's a matter of copying, pasting, and changing options to get the others.


'Fires Rules when iTrigger icon is clicked
trigger = iTrigger0

'Creates a dialog box asking us which format we want
Format_Select= InputListBox("Select Format Type", MultiValue.List("Border_Type"), Border_Type, Title := "Drawing Format Selection", ListName := "List")

'Sets sheet size, title block, and border for A size
If Format_Select = "A Border" Then
ActiveSheet.ChangeSize("A", MoveBorderItems := True)
ActiveSheet.TitleBlock = "Small Border Title Block"
ActiveSheet.Border = "A-Border"

'Sets sheet size, title block, and border for B size Sheet 1
ElseIf Format_Select = "B Border Page 1" Then
ActiveSheet.ChangeSize("B", MoveBorderItems := True)
ActiveSheet.TitleBlock = "Large Format Page 1"
ActiveSheet.Border = "B thru F Border"

'Sets sheet size, title block, and border for B size Sheet 2+
ElseIf Format_Select = "B Border Page 2+" Then
ActiveSheet.ChangeSize("B", MoveBorderItems := True)
ActiveSheet.TitleBlock = "Large Format Page 2"
ActiveSheet.Border = "B thru F Border"

'Sets sheet size, title block, and border for C size Sheet 1+
ElseIf Format_Select = "C Border Page 1" Then
ActiveSheet.ChangeSize("C", MoveBorderItems := True)
ActiveSheet.TitleBlock = "Large Format Page 1"
ActiveSheet.Border = "B thru F Border"

'Sets sheet size, title block, and border for C size Sheet 2+
ElseIf Format_Select = "C Border Page 2+" Then
ActiveSheet.ChangeSize("C", MoveBorderItems := True)
ActiveSheet.TitleBlock = "Large Format Page 2"
ActiveSheet.Border = "B thru F Border"

'Sets sheet size, title block, and border for D size Sheet 1
ElseIf Format_Select = "D Border Page 1" Then
ActiveSheet.ChangeSize("D", MoveBorderItems := True)
ActiveSheet.TitleBlock = "Large Format Page 1"
ActiveSheet.Border = "B thru F Border"

'Sets sheet size, title block, and border for D size Sheet 2+
ElseIf Format_Select = "D Border Page 2+" Then
ActiveSheet.ChangeSize("D", MoveBorderItems := True)
ActiveSheet.TitleBlock = "Large Format Page 2"
ActiveSheet.Border = "B thru F Border"

'Sets sheet size, title block, and border for E size Sheet 1
ElseIf Format_Select = "E Border Page 1" Then
ActiveSheet.ChangeSize("E", MoveBorderItems := True)
ActiveSheet.TitleBlock = "Large Format Page 1"
ActiveSheet.Border = "B thru F Border"

'Sets sheet size, title block, and border for E size Sheet 2+
ElseIf Format_Select = "E Border Page 2+" Then
ActiveSheet.ChangeSize("E", MoveBorderItems := True)
ActiveSheet.TitleBlock = "Large Format Page 2"
ActiveSheet.Border = "B thru F Border"

'Sets sheet size, title block, and border for F size Sheet 1
ElseIf Format_Select = "F Border Page 1" Then
ActiveSheet.ChangeSize("F", MoveBorderItems := True)
ActiveSheet.TitleBlock = "Large Format Page 1"
ActiveSheet.Border = "B thru F Border"

''Sets sheet size, title block, and border for F size Sheet 2+
ElseIf Format_Select = "F Border Page 2+" Then
ActiveSheet.ChangeSize("F", MoveBorderItems := True)
ActiveSheet.TitleBlock = "Large Format Page 2"
ActiveSheet.Border = "B thru F Border"
End If

Monday, November 15, 2010

Oh Wait, Maybe We Do Need Those Stinkin' Passwords After All

"My intention was never to disrupt security. The fact that I logged on when there was no password meant that there was no security to begin with."
Gary McKinnon

Today's blog contains a video created by KETIV Technologies own Mike Carlson.  I provide the narration, but this time, I'm only giving a voice to his expertise.

We've all had it happen.  A password is forgotten, or a user parts ways with the company, taking their password with them into the wilds of the outside world.

So how do you access that account when the password has been lost to the ages?  The video created by Mike shows you how.

Before we get started, make sure you're logged in as the Administrator (or have the Administrator logged in), since changing the password to another account is an Administrator privilege! 

It's good to be king, isn't it?

Sunday, November 14, 2010

Just a Tip or Two - A Short Blog

“Of all the things which wisdom acquires to produce the blessedness of the complete life far the greatest is the possession of Friendship.”
Epicurus

Today I had a hectic weekend, including attending my Uncle's 80th birthday.  To say the least, a worthy cause to skip blogging.  So tonight's blog is pushed back a little later in the week, but it is coming! 

Until then, here's three tips that I've uploaded to my Twitter account over the last few weeks!

Tip 1:  When working in a model (*.ipt) file in Inventor 2011, click where indicated to change the dimension display.  Inventor 2011 even lets you choose fractions!

Get fractions too!

 Tip 2: In an Inventor 2011 drawing, use 'Change Model Reference' to make your model reference a different drawing

Change the model reference here!
Tip 3: Do you want a work plane, work axis, or work point to remain in the command (so you can place more of the same), instead of cancelling after you place the first work feature?  While in the command, right click, and choose 'repeat command'.

Right click while in your work feature command and check 'repeat command;

That's it for now.  But I should be able to get something up by Wednesday!

Happy Inventing!

Sunday, November 07, 2010

What's Old is New Again - Using AutoCAD Blocks Inside Your Inventor DWG

“Every block of stone has a statue inside it and it is the task of the sculptor to discover it”
Michelangelo

Recently, I found that I wanted to use some data in my Inventor drawings.  The problem was, that the only resource I had available to me was a group of AutoCAD blocks.

Boym, wouldn't it be nice if I could reuse these?  :-)
Fortunately after Inventor 2010, we can reuse AutoCAD blocks inside of Inventor.  On the Annotate Tab, you can choose "Import AutoCAD Block" to reuse your AutoCAD blocks.

Insert Blocks from the Annotation Ribbon


Choose the block you want

Serve and Enjoy!  :-)


And of course, here's the video on how to do it. 


Finally, a couple of notes.

There is one thing to be aware of.  The blocks only work in the Inventor *.dwg file, not in the *.idw file.  It;s the only place I can think of where I've ever noticed a difference between the two files.

I'm not sure if the exact whys of this one, but it would be remiss of me not to mention it.

Also, I would be equally remiss not to thank Woodworkers Woodshop.  I located these profiles here, and converted them into AutoCAD blocks that I can reuse.  So if you're in the market for wood working info, swing by there site!

Tuesday, November 02, 2010

Exporting a Sheet Metal Flat Pattern with Autodesk Inventor

“Many attempts to communicate are nullified by saying too much.”
Robert Greenleaf

Here's what we're going to export

 Every once in a while the export of sheet metal flat patterns comes up, and how best to export the flat pattern.

One way I really like is directly exporting from the part file, primarily because it gives you several options to adjust how your file is exported.  One often overlooked method is to save the settings in an *.ini file.

Here's a video showing how you can export to a *.dxf from the Inventor part file.   And don't forget to make sure those unfold rules are set up correctly!


Video & Screen Capture created using Snagit & Camtasia by Techsmith
SpacePilot Pro by 3DConnexion used to navigate model