Find us on Google+ Inventor Tales: 3D Printing
Showing posts with label 3D Printing. Show all posts

Friday, June 03, 2022

All PLA Prints the Same, Right? WRONG!

I print a lot of Polylactic Acid (PLA) in the 3D printer at work. I've found it's a great material to work with. It prints easy, and generally gives great results. 

A sample of a different PLA print. 
Usually a great material to work with.
Sorry, the actual print is proprietary.
Almost without exception, I have great results.

At least until all of a sudden I start having problems with it! 

When printing new color, silver from Amazon the PLA started peeling off the bed. 

It didn't matter how much glue I put down on the bed, It would peel up after a few layers. 

So what to do? 

My first step was to try a few troubleshooting steps. 

First, I raised the temperature of the bed from 50 degrees Celsius to 55 degrees Celsius. No luck there. 

Next, a thorough cleaning of the bed with isopropyl alcohol. I definitely had a cleaner bed, but still, the problem persisted.

Finally, I found a trick that solved the problem. Move the nozzle .05mm closer to the bed. Success!

The Z setting adjustment in my slicer.
I moved the nozzle slightly closer to the bed.

What is it about the silver filament? I'm not sure. But during my troubleshooting, I did notice that the gray filament did appear to be laying down a thinner layer. 

My only guess is something with the dye used to color the filament. But that's just a wild guess. 

So what's the takeaway? 

Keep an eye on those layers, and remember that not all filament of the same material prints the same! 

Resources used for this post: 

3D Printer: Fusion3 F400
Slicer Software: Simplify3D

About the Author:

Jonathan Landeros is a degreed Mechanical Engineer and certified Aircraft Maintenance Techncian. He designs in Autodesk Inventor at work, and Autodesk Fusion 360 for home projects. 

For fun he cycles, snowboards, and turns wrenches on aircraft. 


Monday, June 24, 2019

3D Printing Threads - A Few Tricks I Picked Up

When I first took on 3D printing, the subject of threaded fasteners always made me a bit nervous.  While I try to use actual hardware whenever possible, there are cases where the thread isn't used on a simple part that can be purchased from McMaster-Carr.
An example of a part requiring a thread

That meant, eventually, I was going to be faced with making a thread. What made me nervous was how to I make the thread work? Especially since I typically deal in machine threads? Machine threads can get pretty fine. 

First, I want to get the acknowledgements out of the way. I didn't come up with these ideas on my own.  I started by watching the following videos, and adapted them to fit my needs.  

The first is from KETIV Technologies, and the second, from 3D Printing Nerd.  Those videos are certainly worth taking a look. But I did need to tweak their procedure to get the result I needed.

So here's a quick rundown of the procedure I used, with a couple of changes I made to make it work for me.  

I'll be using Fusion 360 for this example.  I've found it gives me the best results, but I'm sure other CAD tools can perform similar functions.
 
Here we go! 

Thread Reliefs are Not a Relief

First of all the part I work with often have thread reliefs modeled in. I found out the hard way that these can sometimes interfere with the thread lead in.  I've had the best luck deleting them and making sure the thread starts right at the end of the desired starting point. 

The thread relief has been deleted.
Click image to enlarge

Tune up the Virtual Tap and Die Set

After deleting the reliefs, the modeled thread needs to be added.  This may be done by editing an existing thread, or creating a new one if a thread feature doesn't exist. Fusion 360 has a check box that models the thread,  Other programs have different methods of adding the thread. 

The modeled thread and dialog box.
Click to enlarge image.

Practice Your Scales

Now comes my challenge and the solution I found for that challenge. I needed to scale the thread to increase the clearance between the mating thread so it will thread smoothly. But I can't scale the entire part, because the rest of the geometry needs remain the same size.  

So I split the part into two different solids.  In this case, I used an extruded surface as my splitting surface.  The diameter of the surface is only slightly smaller than the minor diameter of the thread.  

Remember the goal is to scale the thread, not anything else! 

An example of the surface that becomes the cutting tool.
Click image to enlarge

Now the solid containing the thread can be scaled. For the parts I work with, I only scale radially.  The thickness is left alone. 

Scaling the solid that contains the thread.
Note the use of Non-Uniform Threading
Click image to enlarge
As far as the amount to scale, I've found that it varies.  I've done between 0.5 and about 5 percent.  With larger percentages working for smaller threads. However, I'm still working on the guidelines, so I wouldn't consider these numbers absolutes.  

Check the Thread Clearance

As a final check, I compare the part to it's mating thread, assuming I have it, and if I have what looks like a good clearance, I roll with it. 

Comparing the mating threads to eyeball the clearance.
Click image to enlarge


I know it's not very scientific, but so far, it's been effective. 

Glue it all Together with the Combine Command

For my final step, I combine the solids back into one.  Now the part is ready to be exported as an STL file, and imported into your slicer. 

Combining the two solids back into one.
Click image to enlarge


Speaking of slicers, I use Simplify3D at work. And what I've also found works best is to remove any supports that are automatically generated inside the thread. I've found they aren't needed, it's just that Simplify3D thinks they are.  

And thus far, these guidelines have worked well for me.  Feel free to take them and give them a try, and modify them as you see fit!
Good luck! I hope this is helpful! I hope you can take these ideas and use them as seeds to develop your own. 

And please share your tricks with others! 

Friday, May 31, 2019

Eighteen Months of 3D Printing - Where Have I Learned to Use It?

Eighteen months ago, I took on the task of running the 3D printer at work.  It's a Fusion3 F400-S, similar to the upgraded 410 shown on Fusion3's website.

It's a FDM (Fused Deposition Modeling) printer, in other words, it melts plastic and lays it down one layer at a time until it produces the desired result.  '


At least that's what's supposed to happen!

All I can say is that it's been fun, frustrating, rewarding, and discouraging at various stages of the journey.  I've tasted the sweet joys of victory, and I've muttered the bitter "F-Bomb" of defeat.

Most of all, I've realized that while I've learned a lot, I'm far from an expert. Because of that, I'm not going to tell you how to make a successful print.  There are plenty of people who are doing that, and frankly, they are much more knowledgeable than I.

But what I can share are my experiences watching our 3D printer making an impact in our design process.  So here I go, showing a few places where having a 3D Printer has shown itself to be a helpful part of our design processes.

One disclaimer before I get started.  I can't share the real parts online.  Words like "proprietary" and "security" start getting thrown around.  So I have to use "surrogate" parts that represent the concept.

Thanks in advance for bearing with me!

1) The "Show and Tell" 

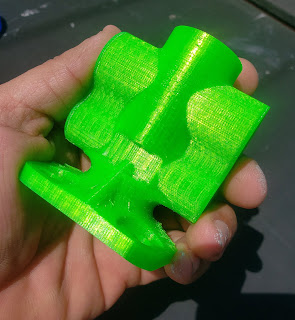
There's nothing like holding a represenation
of the part in your hand.
When I think of 3D printing, this is the first application that comes to my mind.  It's simply a cosmetic print meant to give an idea of the "form and function" of the part.  In our case, it didn't do anything but give everyone a sense of size and shape. 

This might seem simple at first.  With 3D CAD Modeling tools, we can model our designs precisely.  So why "waste time" printing a part that's just "for looking".

Well, I know I've fallen victim to being able to zoom into a small screw until it looks like a table leg.  And with that, comes a distortion of scale that can affect those of us that live in the real world.

And I know I'm not the only one.  I've heard more than one person say, "I really didn't think about big/small that part is!"

A particular example comes to mind.  I was in a meeting where the projected image of the CAD model rotating on the wall was completely ignored because engineers and customers were drawn to the 3D printed model that represented a much more tactile experience that couldn't be experienced with the 3D model.

2) The "Assembly Test" 

This print is in reality a series of parts that make up an assembly.  It may even be a combination of real and printed parts.
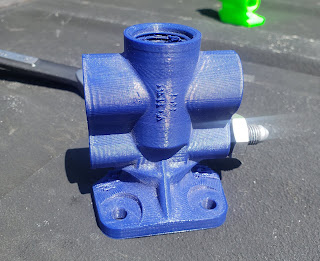
A sample part with a real hydraulic fitting threaded into one hole

The purpose of this part is to ensure that the parts you've carefully designed can not only be put together, but put together easily.

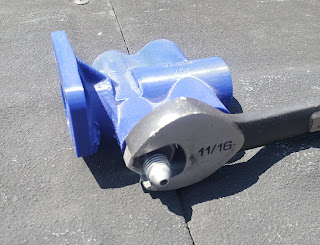
I can see which fitting will have to get torqued in first! 
For example, can a bolt be inserted into the bolt hole, and once in there, can the wrench follow up and turn the bolt once it's in the hole.

3) Tooling and Covers

I've lumped these tooling and protective covers into the same category, partially because the two sometimes blend into each other, at least where I work.

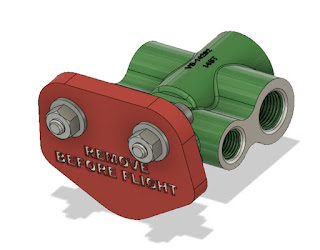
An example of a protective cover that has a unique shape

Because the 3D CAD model exists, it can be relatively quick to create a negative of the part, then print that negative as quickly as a few hours.

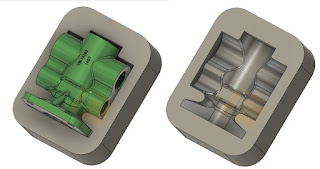
An example of a cradle created by creating
a negative of the part. 
Sometimes these shapes are odd or unique, and can't be easily duplicated by the machine shop, or frankly, the machine shop just doesn't have the time to make them.

In any case, 3D printing provided us with the ability to create odd geometry quickly, without disrupting other operations.

In Conclusion

My intention here was just to share a few cases where I've found 3D printing helpful.  By no means is it comprehensive.  If anything, I hope it provides a few ideas, and dare I say, inspiration.

I think it's also important that we bear in mind that 3D printing is a new tool that can supplement existing tools.  Don't by a 3D printer thinking that you'll be able to shut down your machine shop, woodshop, or welding shop. .

So take these ideas and make them you're own.  And feel free to share in a comment if you have a good use for 3D printing in your home or office.

Acknowledgements


Wednesday, March 13, 2019

Painting PLA 3D Printed Plastic.

The valve body part I use for everything from machine
calibration to well, paint tests! 
One of my newer endeavors is running the 3D printer at work.  And with any new journey, it's got is rewarding victories, and frustrating setbacks. 

My most recent "let me figure that out" moment came when printing a "presentation" part, meant to give an idea of shape and volume.

I printed the company logo into the part, because that's just good marketing right there.  But then came the suggestion....

"Can we paint the logo to make it pop?  Do we have an white out anywhere?" 

After a build lasting 22 hours, I wasn't willing to roll the dice with white out.  But while home sick, recovering from the flu, I had an idea (fever dream?) to go to the local crafts store and see what they had for paint. 

So once recovered, I wandered off to the crafts store and found a paint pen.  Not willing to try my first attempt on the part at work, I tried it on another PLA part I had. 

The results for a first attempt weren't too bad.  We're they perfect?  No. but it'll do for what we're currently after, and if I do say so myself, not bad for a first attempt.

The "paint pen" and its willing test piece

Have you got any suggestions for painting PLA?  I've heard acrylic and spray paint work well, but haven't tried it myself.  For that matter, has anyone tried the good old fashioned whiteout?  Maybe I'm being a little elitist and it really is a good choice!


Wednesday, September 12, 2018

Improvising Dry Storage for 3D Printing Filament with Help From my Cat

A little less than a year ago, I found myself learning how to use the 3D printer at work.  It's a Fusion3 F400, and it's been a pretty good machine so far.  I've learned a lot from it!

Samples of a valve body I use for calibration.  From left to right, PLA, PETG, and Nylon

One of the things I've learned is that many 3D printing filaments are "hydroscopic". That is, they absorb water from the atmosphere.  After absorbing water, the part finish will deteriorate as the en-trained water boils as it leaves the print head.

That means finding a way to keep filament dry.

Some methods include:

  • Keep filament stored in it's shipping bags until just before use.  That reduces the time that filament is exposed to the atmosphere.
  • Store filament in containers with a desiccant. 
  • Use a filament dryer, if you have one, such as this one from PrintDry.
Over time, I found I had several spools of partially used filament with no place to put them, and I didn't have access to a filament dryer.  

That left me with the option of trying to find a good way to store several spools of filament in a container with desiccant.  

The answer came as I was sitting on the couch, scratching the ears of my cat, "Runtley the Runtling".  
The Runtley seems interested in his potential contribution
to the 3D printing industry.
I had an empty 35 lb cat litter container!  It's free with the purchase of 35 lbs of cat litter, it's big enough to hold 4 or five spools of filament, and airtight enough to keep cat litter dry, and that's designed to absorb liquid!

This can be a dry storage container!

So after being emptied and thoroughly rinsed to make sure there was no lingering dust, the container made its way to work.  

It now resides at my desk with a few bags of desiccant and a few spools of printer filament inside.

The container at work

Add a few desiccant packets

Mix in a few spools of filamnet

Tag it so it doesn't get thrown out by the cleaning crew! 

 Hopefully this soles my filament storage issues!

Do you have a clever way of dry storing your filament?  Leave a comment! 

And thank you Runtley the Runtling for your donation! 

In true cat form, Runtley is unimpressed.