Find us on Google+ Inventor Tales: iLogic and Customization
Showing posts with label iLogic and Customization. Show all posts

Sunday, January 22, 2012

Creating Custom Content for Autodesk Inventor Content Center - Part 4 (Hint: Editing Family Tables)

“I won't deny there's some big changes coming down the road.”
Rick Higgins

In my last blog post on Content Center, I wrote about adding components to Content Center.  But just because the component is added, doesn't mean it's ready yet.

An image of the wood screw I placed into Content Center in my last blog

There may be fields to be added, removed, or changed.  You might want to add components to your tables, making more variations of your part available.


So this is a blog on how you can start making changes to your tables, expanding them and making them work for you .

In this video, I take the wood screw that I added to my Content Center in my last blog, and add some stainless steel variations, remove an unneeded column.

I'll also make one of the columns a "Key" column that will allow me to choose a Stainless Steel or Carbon Steel wood screw.

Placing the screw.  Nominal size, Total Length, & Material are my key columns.

I wish I could cover all the possible changes that could be made, but there's just too many to cover.  But the video should help get you started!

Sunday, January 15, 2012

Creating Custom Content for Autodesk Inventor Content Center - Part 3

 “Then memorize it, practice it, personalize it and then you can easily customize it for success, ... The Boy Scouts have it right: Be prepared - always.”
Steve Walsh  

In my blog last week, I described how to setup Autodesk Inventor's Content Center Libraries so they could components could be written to it.

Now with the custom component created, I'll take the next step and show how you can publish an iPart to the read/write library that was created earlier.

An example of a part that's been published to Content Center


When published to Content Center, a custom component places into Inventor just like a component that shipped "in the box" with the product.


Placing a custom part into an Autodesk Inventor Assembly

This can help centralize components, keeping things manageable from one place instead of several.

Special thanks to Charlie Bliss's website.  Where I got the iPart I used for this example.

When creating these components, I would recommend one thing.  Make sure that you test the library out a couple of times before you "release it into the wild".  I've found that I'm never 100% happy with my first result, and make a couple of changes before I'm ready to let it go.

So double check, it's a lot easier to fix it before you let other designers get their grubby little hands on it!

And to get all the details, here's a video for you to check out the steps!

And don't forget to click here for the final part of this series, Part 4!


Wednesday, January 11, 2012

Creating Custom Content for Autodesk Inventor Content Center - Part 2

“I have always imagined that Paradise will be a kind of library.”
Jorge Luis Borges

In my last post, I talked about Content Center.  Mostly what Content Center is, particularly with respect to Desktop Content Center versus Content Center running through the Autodesk Data Management Server Console.

But the long term goal of this series of blog post is to publish content to a custom library of our own creation.

So for our next step, I'm going to create a short blog post on creating those custom libraries.

The libraries that come with Autodesk Inventor are Read Only.  So you can only use them, you can't modify them, or add to them. 

In order to be able to make additions and modifications, you need to create a Read/Write Library.

The first thing to know, is if you're using Desktop Content, or Vault Content.  The libraries are created in different places for each.

I'm using Desktop Content Center

With Desktop Content, go to the "Get Started" and choose "Projects".

Choose "Configure Content Center Libraries.  A new screen will appear that will allow you to configure the libraries for your project.

Now you're ready to create a Read/Write library

Select "Create Library", and a new Read/Write Library will be added with the name you enter

Creating the Read/Write Library
Important!  Make sure the new library is checked!  If it's not, the library won't be available to the project!  This, needless to say, makes the whole point of creating it moot.  

Custom Library Created.  Note that it's checked! This makes it available for the project to use!
I'm using the Autodesk Data Management Console (Server)

We'll need to access the server, and have administrative rights to the Autodesk Data Management Server, so be ready to bribe the I.T. staff or Cad Manager if necessary.

Once you've gained access to your server, right click on the Libraries folder and choose "Create Library".

Creating the Library Folder
A new Read/Write Library will be added with the name you enter.


New library selected!


Note that just like above (with Desktop Content), you'll need to make sure the library is checked in the project!  If not, it won't be available!

Make sure you make the libraries available! 

So that's getting the stage set to create the read/write library for your Content Center.  Now we're ready to start adding data to the Content Center!

That will be the next post here!  Creating Custom Content for Autodesk Inventor Content Center - Part 3


Sunday, January 08, 2012

Creating Custom Content for Autodesk Inventor Content Center - Part 1

“Our doubts are traitors and make us lose the good we oft might win, by fearing to attempt”

I haven't spent a lot of time with Content Center in Autodesk Inventor.  It's just one of those things I always told myself I'd get into, but like so many projects and intentions, it was set aside for more pressing matters.

But during the holiday break, I found the need to dive into Content Center, and start peeling back it's layers and start creating some custom content.

One of the things I found, was once I got into it, was it's not as intimidating as it might look at first glance.  Once I dug into it, I found that, dare I say, it began to make sense.

So I decided to start sharing what I've learned (and I'm still learning).  I hope you find it helpful.  These are just my thoughts on what I've seen so far.

Since there are so many facets to working  with Content Center, I found the prospect of doing it in one big blog post pretty daunting.  So I decided to break it up into smaller bits that might be easier to digest, and yes, it's going to be a lot easier for me to write! 

So for starters.  Let's talk about this Content Center thing.

To get started, what exactly is Content Center?  

Content Center is a series of libraries that generate standard components when you place them in an assembly inside of Inventor.

Now that's not to say that you can open up your Inventor media, and find a series of folders full of Inventor *.ipt files and copy them locally.

This is a misconception I sometimes hear.  That on that media, is a whole bunch of *.ipt files you can get to.

The files actually contain the databases that build the components.  So when you place a component in an Inventor assembly, Content Center builds that component and places it into the assembly for you.  The functional word is "building".

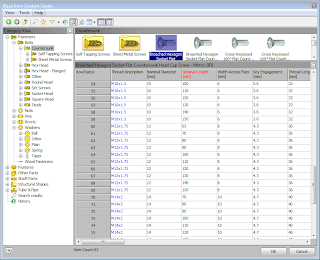
The Place from Content Center Screen.  This is what's talking to your libraries

Content Center using the following procedure to build the parts.

1) A part is requested from the Content Center databases
2) It checks to see if the part has been published already.
3) If the answer is yes, it retrieves the part and places it in your assembly
4) If the answer is no, it builds it and puts it your Content Center directories, so it will be available for the next time.

So that's what they are?  But where to we keep them? 

There are actually two different answers to this one.  There's the Content Center stored locally (Desktop Content Center) or Content Center managed via your Vault Server Console.

Desktop Content Center works great for single users, or users who don't want to install the Autodesk Data Management Server on a network server for some reason.

The advantage is that this is a pretty simple model to work with, since everything resides locally on your machine.

The disadvantage is that only the machine the Desktop Content is installed on can use the libraries.  There's no sharing across machines.

So if you have several machines that are using Content Center, and you want to use Desktop Content, each machine will need to have it's own copy of the libraries.  This may not be too bad, but what happens when you start customizing your libraries?

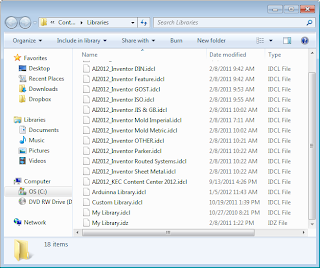
The Desktop Content Libraries in their folder.


It can be tricky to manage indeed!

Content running through your Vault Server is intended for a central Content Center shared among several users.  Even if you're not using Vault, you can run Content from the Vault server.  You just don't use the "Vaultiness" of Vault.

The advantage of this model, is your Content is managed from one location.  The bad side?  You now have a server, network connections, and possibly even I.T. to work with.  So it can be a little more involved getting started.  Although since everyone is now on the same set of libraries, it can be easier to maintain.

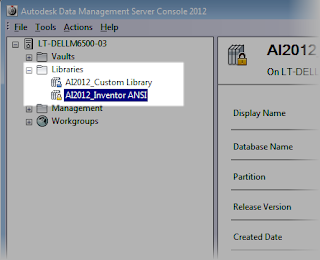
Vault content (I only have two libraries right now)
So these are the two options we have available to us.  You'll have to decide which to use in your own application and install the appropriate one.

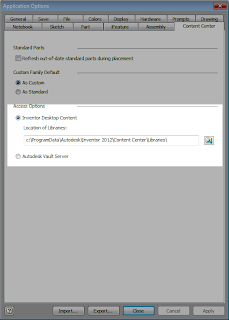
In Inventor, you can tell Inventor which it's using by going to Tools>Application Options, and choosing the Content Center Tab.

Selecting which content center your running.
That will choose where you're accessing Content Center from.  

Wow, that's a lot of writing!  So I'll save the rest for later.  Next, we'll talk about creating custom Content Center components!  

If you're wondering, I use Desktop Content.  Why?  It's actually, it's for a reason that is completely different than most will encounter. 

I'm constantly uninstalling and reinstalling Vaults.  Far more than the user in the "real world"  for that reason, I run a Desktop Content Vault.  That way I don't have to worry about which Vaults have what Content attached!  It's as simple as that!

Click here for Part 2: Creating Custom Content for Autodesk Inventor Content Center

ADDENDUM

Thanks to Paul Munford at The Cad Setter Out for pointing out that I overlooked a third way of using Desktop Content.

The third way would be to place the libraries on a server, and point the Desktop Content to that location in Application Options.  This would allow multiple users to access the same set of libraries, without having to install Vault on the server.

I've not used this way myself.  But this can be yet another way to organize your Content Center data! 

Sunday, October 30, 2011

Modifying the Hole Table in Autodesk Inventor

“Not that easy, but just a boring hole.”
Kevin Hayashi

In the last Autodesk Inventor course, the subject of modifying the hole tables in the hole dialog box came up.

How did we add this new standard?


It's not something many of use do.

Frankly, that's because many times, it's not really required.  Most of us can lead a long, happy life using the default values and carry on about our business.

But what if you have to work with a difficult material that needs different holes to be used?  You may find it valuable to modify the chart.  For example, a machinist colleague of mine once told me that Inconel is so difficult to tap, that the standard tap chart table is thrown out, and a custom table is used.

It all comes down to the thread.xls chart that maintains Inventor's thread information.  By adding tabs, you can customize your hole charts! 

Just add the new tabs, and change the names!

So for those rare cases, here's a video on how to customize your hole chart inside Inventor.

One more note, I'm trying a new method of creating videos, it's going to take some practice, so bear with me as I try the new process!  I'm hoping that with a little practice and the riding of a learning curve, the videos will be better than ever!

Sunday, May 08, 2011

How's Your Form - iLogic Forms in Autodesk Inventor 2012

“I know it may seem surprising to people, but learning dialog that has a conversational flow to it is not that difficult.”
Deidre Hall

I'm not a Visual Basic programmer.  That much is apparent pretty quickly.  I can create a dialog box in VB, but it can be a process of determination winning over skill.

Now, in Autodesk Inventor 2012 iLogic provides the ability to quickly create a form (read dialog box), without having to be a Visual Basic genius.

So one night, I sat down and tried creating a form on a Inventor 2011 template I created.

The template changes the joints on the end of a wooden board from a tenon (tabbed) joint, to a regular joint.

All I can say is that I was amazed at how easy it really is.  I had it done in a few minutes.

I'm not joking, it really is that easy.
Here's my finished form.  I'm not kidding.  Less than 5 minutes!

So here's the video everyone.  Don't be intimidated by it!

Wednesday, January 26, 2011

Creating a Simple Release Reminder Using iLogic

“The best solutions are often simple, yet unexpected.”
 Julian Casablancas

The other day I found myself trying to find a way to get a release state (Work in Progress, In Review, Released, Obsolete) to appear on the drawing. 


That first part is no problem.  You can do that with iProperties.

A custom iProperty holding the release state.

But, how do we help the =remember to set the state.  We're all guilty of forgetting, right?

That's where a little iLogic can come in.  We can set a reminder to remind us to set the state.

First, we create some parameters in iLogic.  In this case, I've named it "Design_State".  Notice that this is a multi-value list.

The multi-value list.
Now I add rule to use this multi-value list.

Creating and naming the rule

Once the rule is named, you can use the wizard to build the rule. 

Typing the rule in the wizard
Here's the text itself.


'Updates rule when done
iLogicVb.UpdateWhenDone = True

'Creates input list dialog box & allows the user to choose the state
Design_State = InputListBox("Enter Current Work State", MultiValue.List("Design_State"), Design_State, Title := "Work State", ListName := "Available States")

'Writes values to Custom iProperty
iProperties.Value("Custom", "Release_Condition") = Design_State

'Saves file in this rule
ThisDoc.Save

This will create the rule.  But there's still one issue left over.  How can we trigger the rule so it reminds us to check this state, while at the same time not nagging us all the time?

We can edit the event triggers, and set the rule to fire when the document closes.  This way, the rule will ask us to check the state of the drawing.
Setting the event trigger
Here's a little tip on the rule.  You'll might notice that the rule saves the document at the end.  That's to make sure that the file is saved with the state I've set in the rule!

One last step, not related directly to the rule.  I place the custom property into my title block, so the text will show on the drawing.  

The iProperty called out on the drawing


Now, with the parameters set, and the triggers in place, I can close the drawing.  The event trigger fires the rule, and I can set the value of my state.

Firing the rule
There it is!  I hope this helps those who want to create a simple reminder, populate fields, or some combination of everything!  

For reference, here are some previous posts I've made on iLogic that may help if you want more information on some of the steps I've used here.

My post on Creating a Warning Dialog Box (shows process of creating a rule)

My post on Creating a Drawing Format (shows creating a multi-value list)

My post on using  Event Triggers to control when a rule fires

And for good general knowledge on iLogic.  Here's a video from Rob Cohee's Youtube Channel.

So there we go, another little midweek blog on iLogic.  Enjoy!


Sunday, January 02, 2011

Creating Searches in Autodesk Vault, and Remembering Them Later!

“New Year's Day - Now is the accepted time to make your regular annual good resolutions. Next week you can begin paving hell with them as usual.”
Mark Twain

First of all...  Welcome to my first post of 2011, and Happy New Years to everyone.  I hope you had a great, and relaxing holiday!

On one of my day's off for the holiday, while I was sitting down having breakfast at a local haunt in Whittier, I came up with a Vault question that I've been asked fairly often, and thought "I should post on that."

The question I've been asked, many times, in one form or another is, "How can I quickly check to see if I've got any files checked out?"

The answer is to create a search, and save it for later.  Start out by going to Tools>Find, and making sure you're on the Advanced tab.

The Tools>Find Pulldown


Creating the Saved Search

Once you create the search,  you can save it, and recall it any time you want. With the search saved, it shows up in the Vault browser, and you can recall it any time you want!


Recalling the search

Perfect for making sure that you check in all your files before a weekend or long vacation!

Without further delay!  Here's the video!

Monday, November 29, 2010

Keep Your Finger on the Trigger - iLogic and Event Triggers

“Next in importance to having a good aim is to recognize when to pull the trigger.”
David Letterman

Just a short post for today.  I spent the holiday snowboarding in Mammoth, so I only had limited internet access for a few days.  But for views like this, I'll give up a bit of web access.

And the time off was great!

The view from town is pretty nice.


Who wouldn't want to have a morning like this.

For today, I wanted to expand upon last week's post and talk about Event Triggers in iLogic.  In that post, I talked about creating a rule to choose my sheet size, border, and title block by choosing them from a dialog box created in iLogic.

This rule could be fired by clicking the iTrigger icon on the 'Manage' Tab in the drawing.

The dialog box created in iLogic


But what if you want a rule to fire automatically, under a specific condition? 

That's where an Event Trigger can come into play. 

By clicking on the Event Trigger icon, you can specify the condition under which a rule fires without you explicitly asking it to. 

1) Click Event Trigger from the 'Manage Tab'.

Access the Event Trigger
 2) Right click to edit an event.

Right click to add or remove the rules attached to an event
 3) Choose the rule (or rules to attach to the desired event)

Edit your rule
One you do that, you can now fire the rule when you want it to.  For example, when I start this file from a template, the option to choose my sheet size, border, and template fires up automatically!

Sunday, November 21, 2010

Drawing Conclusions on Formatting a Drawing with iLogic

“Information is a source of learning. But unless it is organized, processed, and available to the right people in a format for decision making, it is a burden, not a benefit.”
William Pollard


***Edit 4-April-2012***

I've added the file I used in this blog post to the GrabCAD website if you want to download it and take a look.  You do have to be a member, but I think you'll find that it's a great site with a lot of free CAD models. 
***

As I was wrapping up my videos for the Autodesk Manufacturing Academy, I found a video that had slipped through the cracks.  I had recorded it, but I hadn't produced it.  So I finished it up and added it for this weeks post.

This video discusses how to change drawing formats with iLogic.
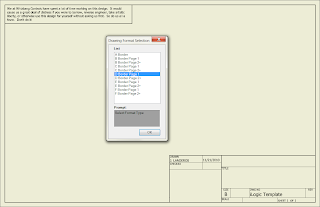

The finished rule asking you for the format you want to use
One more note before you look at the code below!  If you use event triggers, you can fire the rule automatically.  For example, the image below sets the drawing to fire it's rule when I start a new drawing.  If you set this from a template, the drawing will ask you which drawing format you want when you start it!
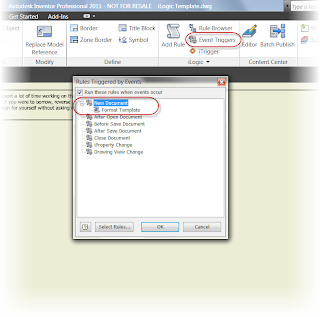
Use event triggers to fire a rule when a particular event happens. This one occurs when you start a new file
So without further delay, here's the video!

Here is the full code for this particular rule.  Once you get the first couple of rows down, it's a matter of copying, pasting, and changing options to get the others.


'Fires Rules when iTrigger icon is clicked
trigger = iTrigger0

'Creates a dialog box asking us which format we want
Format_Select= InputListBox("Select Format Type", MultiValue.List("Border_Type"), Border_Type, Title := "Drawing Format Selection", ListName := "List")

'Sets sheet size, title block, and border for A size
If Format_Select = "A Border" Then
ActiveSheet.ChangeSize("A", MoveBorderItems := True)
ActiveSheet.TitleBlock = "Small Border Title Block"
ActiveSheet.Border = "A-Border"

'Sets sheet size, title block, and border for B size Sheet 1
ElseIf Format_Select = "B Border Page 1" Then
ActiveSheet.ChangeSize("B", MoveBorderItems := True)
ActiveSheet.TitleBlock = "Large Format Page 1"
ActiveSheet.Border = "B thru F Border"

'Sets sheet size, title block, and border for B size Sheet 2+
ElseIf Format_Select = "B Border Page 2+" Then
ActiveSheet.ChangeSize("B", MoveBorderItems := True)
ActiveSheet.TitleBlock = "Large Format Page 2"
ActiveSheet.Border = "B thru F Border"

'Sets sheet size, title block, and border for C size Sheet 1+
ElseIf Format_Select = "C Border Page 1" Then
ActiveSheet.ChangeSize("C", MoveBorderItems := True)
ActiveSheet.TitleBlock = "Large Format Page 1"
ActiveSheet.Border = "B thru F Border"

'Sets sheet size, title block, and border for C size Sheet 2+
ElseIf Format_Select = "C Border Page 2+" Then
ActiveSheet.ChangeSize("C", MoveBorderItems := True)
ActiveSheet.TitleBlock = "Large Format Page 2"
ActiveSheet.Border = "B thru F Border"

'Sets sheet size, title block, and border for D size Sheet 1
ElseIf Format_Select = "D Border Page 1" Then
ActiveSheet.ChangeSize("D", MoveBorderItems := True)
ActiveSheet.TitleBlock = "Large Format Page 1"
ActiveSheet.Border = "B thru F Border"

'Sets sheet size, title block, and border for D size Sheet 2+
ElseIf Format_Select = "D Border Page 2+" Then
ActiveSheet.ChangeSize("D", MoveBorderItems := True)
ActiveSheet.TitleBlock = "Large Format Page 2"
ActiveSheet.Border = "B thru F Border"

'Sets sheet size, title block, and border for E size Sheet 1
ElseIf Format_Select = "E Border Page 1" Then
ActiveSheet.ChangeSize("E", MoveBorderItems := True)
ActiveSheet.TitleBlock = "Large Format Page 1"
ActiveSheet.Border = "B thru F Border"

'Sets sheet size, title block, and border for E size Sheet 2+
ElseIf Format_Select = "E Border Page 2+" Then
ActiveSheet.ChangeSize("E", MoveBorderItems := True)
ActiveSheet.TitleBlock = "Large Format Page 2"
ActiveSheet.Border = "B thru F Border"

'Sets sheet size, title block, and border for F size Sheet 1
ElseIf Format_Select = "F Border Page 1" Then
ActiveSheet.ChangeSize("F", MoveBorderItems := True)
ActiveSheet.TitleBlock = "Large Format Page 1"
ActiveSheet.Border = "B thru F Border"

''Sets sheet size, title block, and border for F size Sheet 2+
ElseIf Format_Select = "F Border Page 2+" Then
ActiveSheet.ChangeSize("F", MoveBorderItems := True)
ActiveSheet.TitleBlock = "Large Format Page 2"
ActiveSheet.Border = "B thru F Border"
End If