As of May 2013, The Augmented Reality Plugin for Autodesk Showcase has been retired. I liked this plugin, and the post does state that it may be back at a later date.
My fingers are crossed!
Shame on me for not updating this sooner, but things sometimes go into the archives, and collect dust.
******************
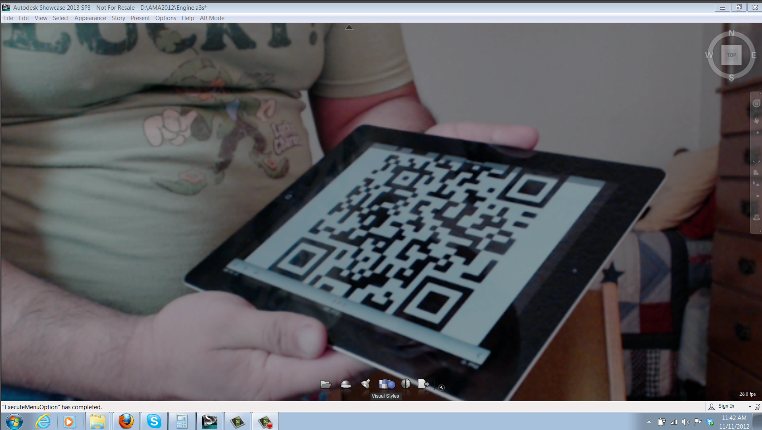
1) Instead of printing out the markers, try using a mobile device, such as an iPad or Android to host the marker
Holding the iPad with the QR code marker
2) Instead of the markers provided with the plugin, use an image created from the scene. This will make it look like the 3D model is "growing" from the 2D image.
I didn't have as much luck with this step. I was able to create a marker using the exported 2D image, but when I tried to use it as a marker, the model seemed to have a difficult time picking up the marker, it was jumpy and inconsistent.
But I did get the effect I wanted. It took some trial and error, a few more ideas, and a slightly different approach.
And here are those steps!
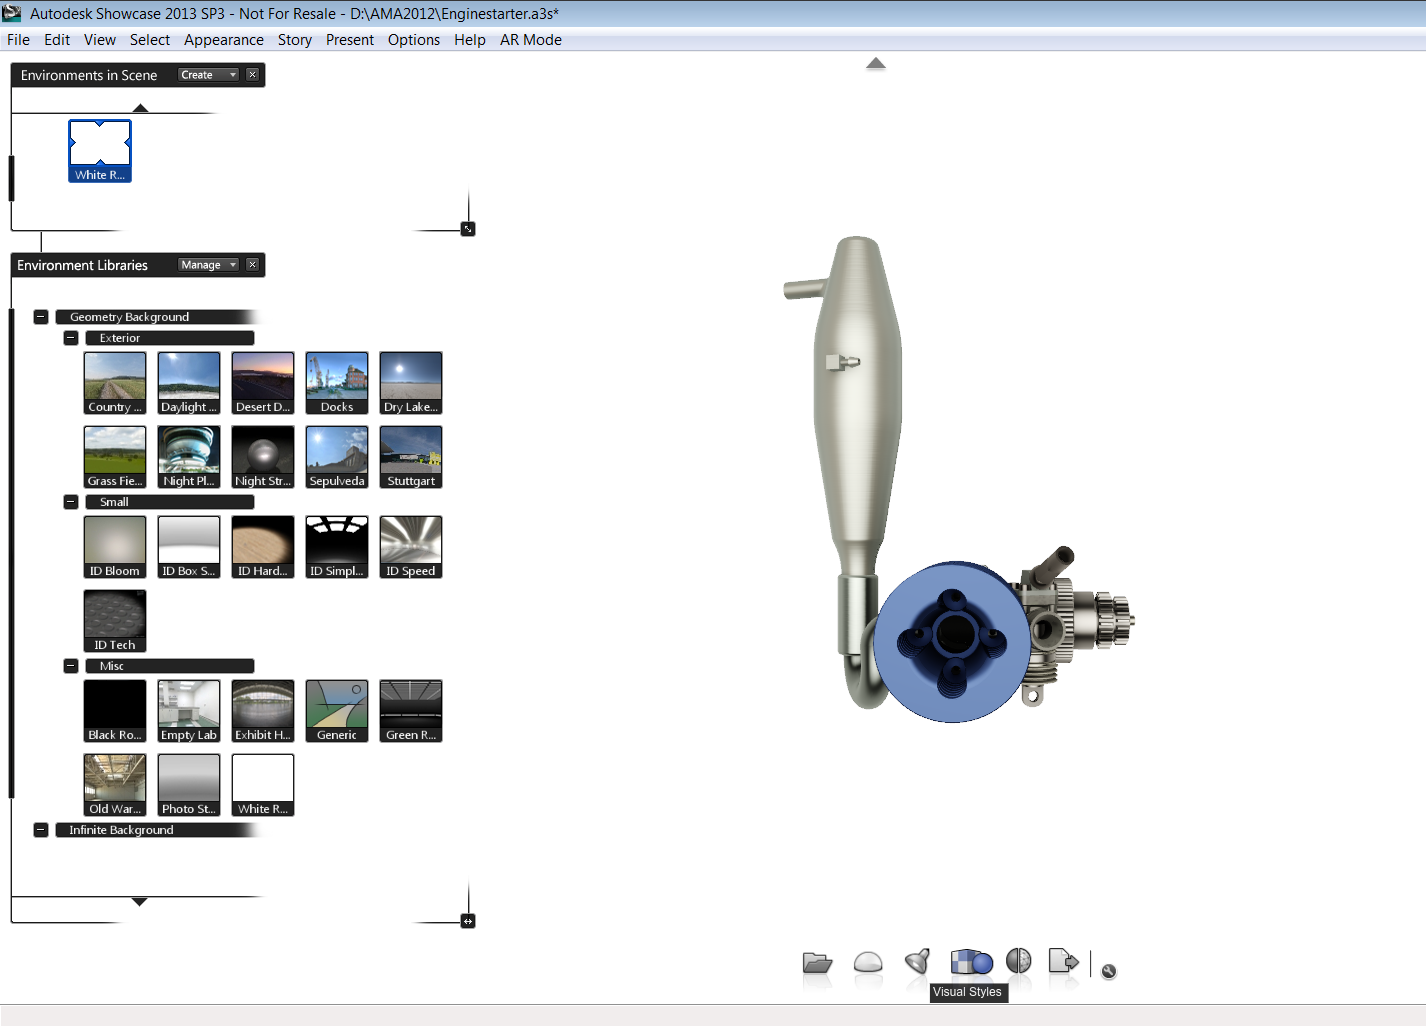
The first step was to create an image of the scene I wanted to use, and set up the angle I wanted using the "White Room" environment. I also turned off the shadows for this environment.
Using the "White Room" environment.
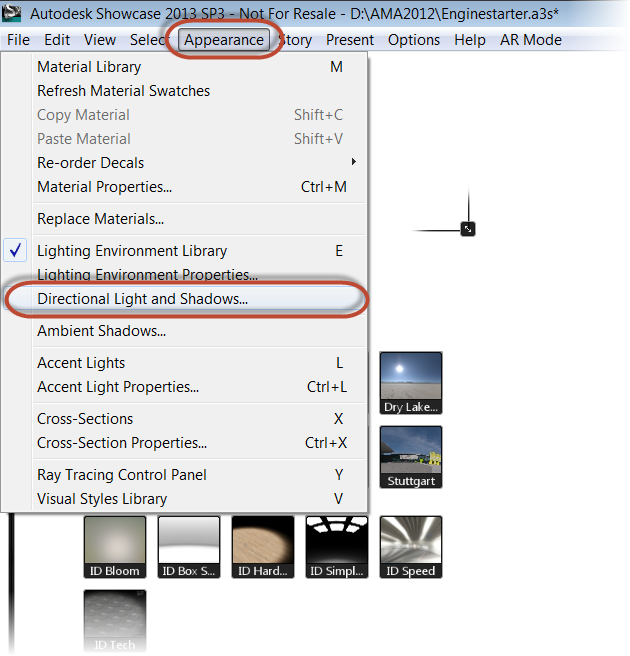
I also went to the Appearance>Directional Light and Shadows.
Locating the pulldown
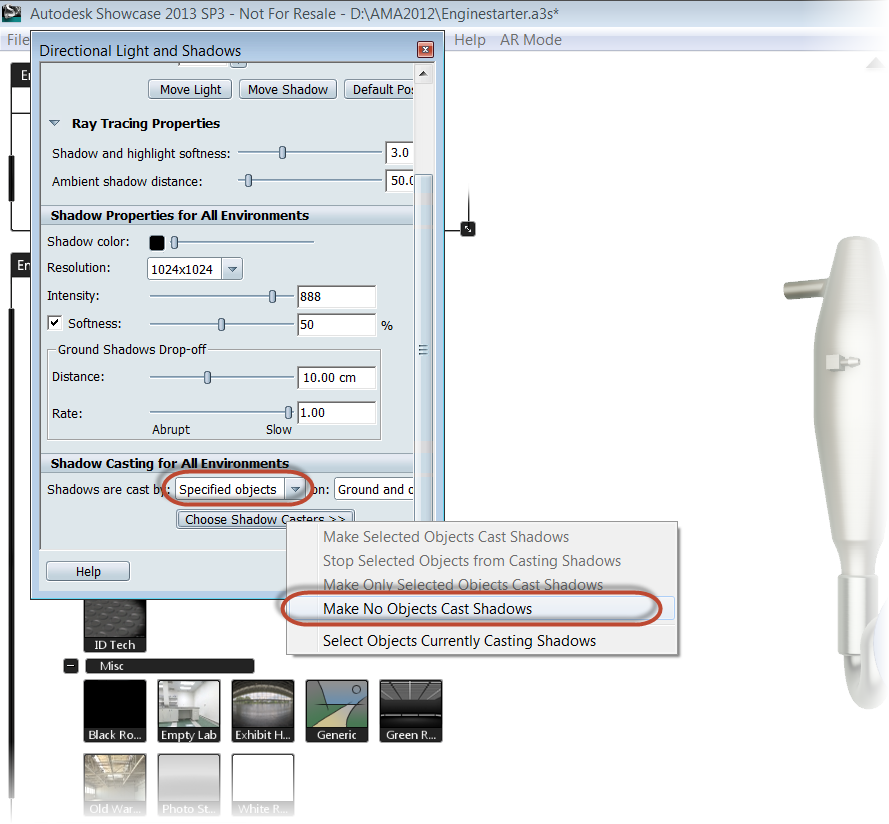
I then set the "Shadow Casting for All Objects" to "Specified Objects, and changed it's setting to "Make no Objects Cast Shadows".
Turning off Shadows
Next, I published the image to a *.jpg
Publishing the image
I then created a decal, using the jpg I just exported.
Creating the decal, with the critical settings shown
I then placed that decal on a "floor" I had created in Inventor, then imported and positioned in Showcase.
The decal placed, and being positioned
Once this is done, I setup the Augmented Reality and I was ready to go! And here's the video that goes with it!
P.S. If you're going to Autodesk University in Las Vegas this year, look for me! I'm going to be there myself!
As of May 2013, The Augmented Reality Plugin for Autodesk Showcase has been retired. I liked this plugin, and the post does state that it may be back at a later date.
My fingers are crossed!
Shame on me for not updating this sooner, but things sometimes go into the archives, and collect dust.
******************
Tonight is a quick blog on a cool bit of news.
A few months ago, the Augmented Reality Plugin for Autodesk Showcase was released on Autodesk Labs.
This cool plugin for Showcase 2013 allowed a webcam to take an image, and project it into the Showcase scene.
It was so cool, I bought a webcam just to be able to try it out! And once I tried it, it was indeed very cool!
An example from my own Augmented Reality Session. Pretty cool! But I need to adjust the marker!
But it had one big downside. It would timeout on October 31st, 2012. So it's tenure on Labs was seemingly going to be short.
But just today, I was asked about it again by a user. I checked out the website, and BEHOLD! The Augmented Reality plugin has gotten a life extension until January 31st, 2013.
So if you have a webcam and Autodesk Showcase 2013, download it and give it a try. I don't think you'll be disappointed!
Here's a video created by the Autodesk Labs Team. Take a look and give it a download! I think you're going to like what you see!
Today's blog is just a quick blog to say "Happy Halloween", and add a quick tip for Autodesk Showcase. .
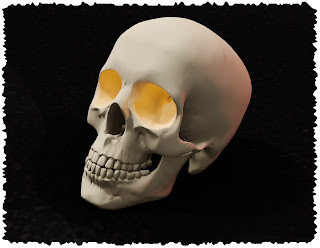
Earlier today I downloaded a 3D model of a skull, in a STL format, from GrabCAD and imported it into Showcase.
But once the file imported. It looked dark. Almost like charcoal. It was like the environment light was having no effect on it.
This skull shouldn't look this dark. Somethings wrong (hint: check normals)
Experience has taught me what the cause of this is. But not everyone may know the secret.
The normals on the skull were all reversed.
For those who may not be as familiar with surface normals, each surface in Showcase has a positive and negative side, often referred positive and negative normals.
While I can't say I know all technological reasons for the how the normals behave. I do know one thing. If the normals are backwards, which sometimes happens on imported models, the object won't light correctly. That's what's going on with the skull.
So now that I know what's wrong, how do I fix it?
First, I went to the "Appearance" pull down menu and choose "Visual Styles Library".
Bringing up the Visual Styles Library
Once the Visual Styles Library menu appears, expand the "Diagnostics" section. This is where I find the option for "Normals". Choosing this option, I see that the entire skull shades yellow.
Viewing the Normals
The yellow indicates that I'm looking at the negative side of the normal. This is why the skull isn't lighting correctly. Showcase is also helping me out by telling me to Select an object and hit the "F8" key to flip the normals.
The yellow tells me I'm looking at the negative (back) side of the normal
I can hit the F8 key or I can select my objects and choose Edit>Reverse Normals from the pulldown menus.
Flipping the normals
The normals will flip, and the skull will turn blue. This tells me I'm looking at the positive side of the normals now.
The normals are flipped!
Now, all I have to do is select a new option from the visual styles (I chose the "Both Shadows and Ambient Shadows" option)
Now the skull looks a whole lot better, and I'm ready to complete the rendering. Add a few shadows and lights, and I have something I can say "Happy Halloween with!
The skull with some materials and lighting
And with glowing eyes!
So that's it, a quick tip on flipping the normals on a model! Have a great holiday everyone!
But yesterday I came upon two fantastic Autodesk Showcase videos created by Marion Landry from Autodesk.
Marion created two outstanding videos on creating and manipulating materials in Autodesk Showcase.
I've already watched them once, and I picked up quite a few tricks I'll use in the future. As a matter of fact, I'll watch them again, just because I know there are more tricks I'm going to pick up.
So here are the videos that Marion has graciously created for us. Be sure to check out her channel here!
Today is a much shorter post that usual, since most of my waking hours has been spent on creating my materials for KETIV's Autodesk Manufacturing Academy in Oregon on October 10th.
So in this post, I'm afraid I don't have much that I can get into regarding new adventures or experiences, since..... well. Look at that above statement on AMA!
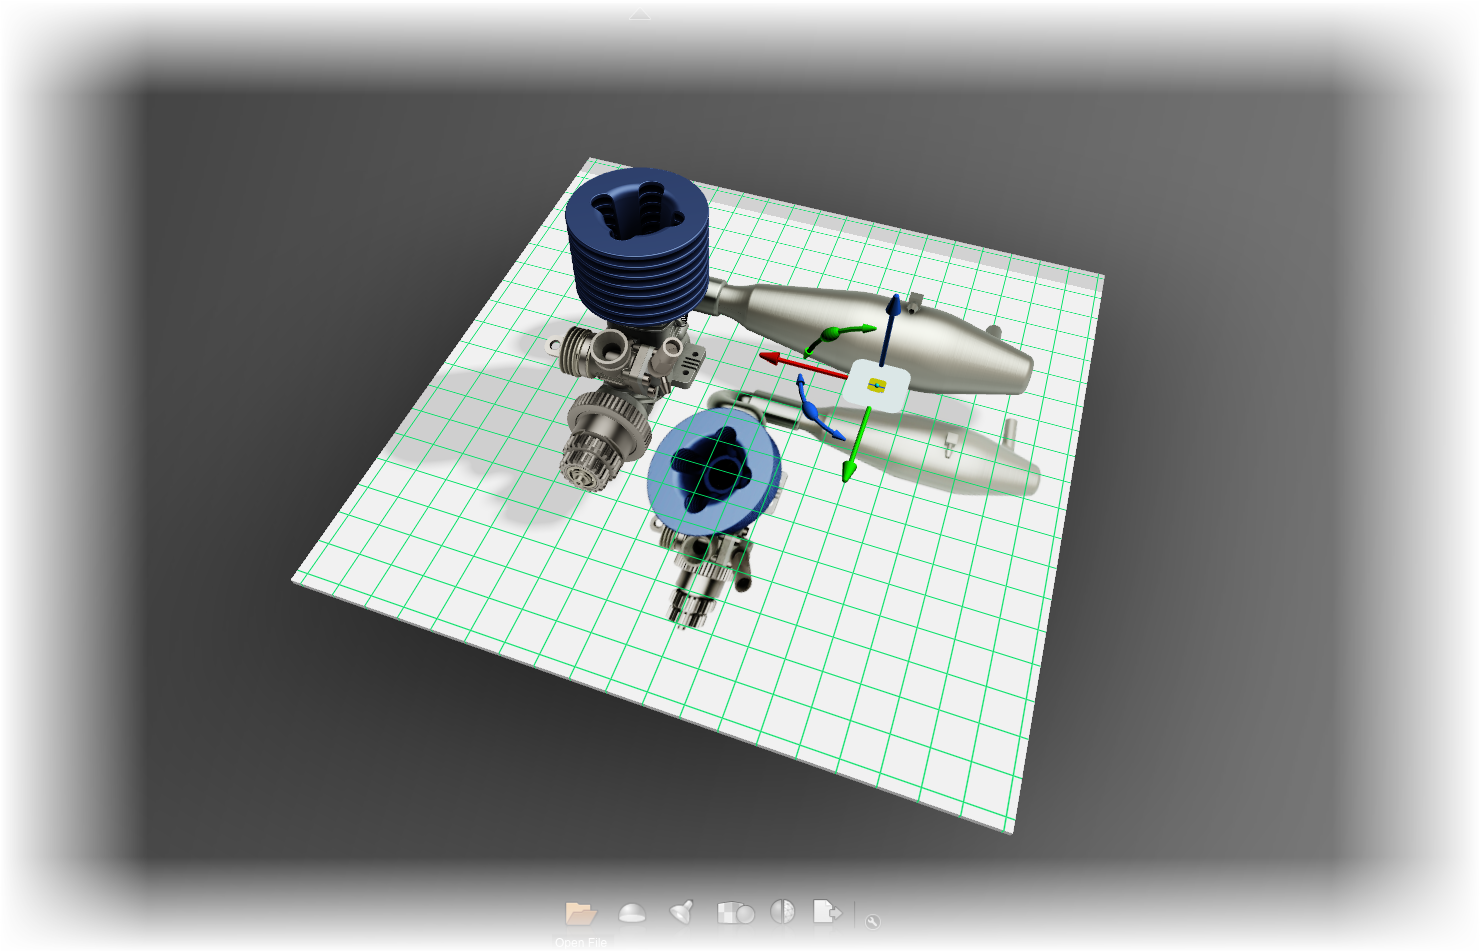
But to that end, I've got a fantastic dataset graciously provided by Datum3 Studios. You can check it out as the "Flight Controller Bases" section in the gallery HERE! This data will be playing a big part in my "Digital User Manuals & Documentation" session.
The Throttle rendered in Autodesk Showcase
As part of the event, I've been busy creating supplemental videos that go along with the sessions, so this is what I'm sharing today.
In this video for AMA, I briefly show how Autodesk Inventor and Autodesk Showcase can link their data together, creating a loop of "collaborative development" where the rendering in Showcase can develop along side the engineering design developing in Inventor.
By utilizing this process, the aesthetics of a product can be developed and approved by the customer, all the while the engineering is going on in the background. Both can develop simultaneously, instead of linearly as in the "traditional way".
Here's the video! I hope you all enjoy this AMA preview!
As we head into a long weekend here in the states. I found a cool video produced Marion Laundry at Autodesk.
Why do I like this video so much? Marion showed a great tip that I hadn't taken advantage of yet! (Hint: Never stop learning!)
How to blur reflections! I've always thought that if a rendering looks "too perfect", it gives it away as being a computer generated image.
It's a fact of life, nothing is perfect.
Take a look at this Lockheed P-38 Lightning owned by Allied Fighters in California. It's got a pretty shiny paint job. Not fully polished, but pretty shiny.
The Allied Fighters P-38 Lightning "Honey Bunny"
Notice how the reflections are blurred however? It's not a mirror finish.
Marion's Video gives a great tip on how to create blurred reflections. So instead of talking about it, check out the video below!
One last note! While it should be obvious right away, I DID NOT CREATE THIS VIDEO! This is created by Marion Landry at Autodesk, and all credit belongs to her! Take a look at her channel here and check out more of her videos!
And just for the fun of it, here's a video of Honey Bunny in flight at the Living History Event at Planes of Fame Air Museum. With a unique camera perspective too!
It's back everyone! KETIV's Autodesk Manufacturing Academy returns to Lake Oswego in Oregon (October 10th), & Cerritos in California (October 25th)! Registration is now open!
I'll be there again, and so will all the techies from the KETIV team!
So if you need a reason for work to send you to Oregon, or Southern California, check out this link!
(nudge nudge) Check out the keynote speakers!
And look below for the "preview movie". If you look quickly, you can see me. It's like Where's Waldo for bald guys!
I was out of town this weekend, enjoying a short weekend excursion to Big Bear, Ca. with some friends.
It was a good weekend of hanging out, having a drink or two, and enjoying attending the local Renaissance Faire.
So this week, there isn't an Inventor or Showcase Video. But since last week I posted about the release of Autodesk Inventor Update 2, I thought I'd continue the theme of updates and point out that Autodesk Showcase 2013 has updates for it as well.
So if you're running Autodesk Showcase 2013, and you want to make sure you have the latest updates, check the following links:
As of May 2013, The Augmented Reality Plugin for Autodesk Showcase has been retired. I liked this plugin, and the post does state that it may be back at a later date.
My fingers are crossed!
Shame on me for not updating this sooner, but things sometimes go into the archives, and collect dust.
******************
This earlier this week, an email flew about the KETIV Technologies office with the subject: "Watch Autodesk Showcase blow your freaking mind".
The body of the email just said: "Watch the video!"
There's some text talking about "the ability to overlay semantically in context information", but my mind interprets this as "Blah Blah Blabbity Blah".
I click the link, and immediately feel like I've just taken the red pill in The Matrix.
With a help of a webcam and the plugin, a Showcase scene can be overlaid into the real world, so it can be interacted with.
A "marker" board is held in front of the webcam, and Showcase projects takes reality, and uses it to create an environment for your scene.
And it's all real time.
Now I feel like Neo in The Matrix when I say "Whoa."
Here's a link to the Autodesk Video. Lets see if you say the same thing I did when I saw it.
And by the way. It seems I may be in the market for a webcam soon. So if you have any recommendations, leave a comment! :-)
This week is only a brief post, as I've taking this entire week for a holiday in Lake Tahoe. This time I've brought my trusty mountain bike up with me, so I'm hoping to get some good riding in, even though I'm about 6000 ft (roughtly 2000 meters), higher than my usual riding altitude.
My truck and my bike. Both better prepared for working at this altitude than I am!
I hope I don't end up gasping like a landed fish.
But now, the post!
Most of the time when I'm using Autodesk Showcase, I can pick what on want by choosing the part, on screen, right in the scene. It's there, it's simple, and it's easy.
But there are also those scenes that aren't so simple. They have a lot of parts that aren't easy to find on screen, making working with the model a tedious and frustrating affair.
Not every component in this scene can be easily selected
But Showcase provides a tool that can help out with that. It's called the organizer, and it lists the parts by in a list type of format that you can use to, well, organize your information!
The Organizer can help locate and organize your scene!
It's my personal belief that this tool doesn't get the credit it deserves, and is probably underused since I think many users get accustomed to picking on screen, which lets face it, probably covers most of our needs.
By using the organizer, data can be moved into folders that make it easier to select, move, hide, change materials, etc.
But why describe it when I can show it. Here's a quick video on using the organizer.
And by the way, have a suggestion on how you use the organizer? Throw a comment (it's down at the bottom).
There are times when I'm working in Autodesk Showcase that I find I need to change the color of a portion of a face, and I'm not able to do so.
For example, here's a model I built in Autodesk Inventor. It has the KETIV logo on it, which I'd like to change it to red. When I select the model, the entire model highlights
I just want to select the letters!
Usually this is because the faces were imported as a single color, and Showcase "unified" them.
So what to do? I could open the file in Autodesk Inventor, copy faces or change color there, and update the CAD model. But Showcase has a tool that can do this for us, without having to fall back to a CAD tool.
Extract Patches as New Objects. This tool copies faces and creates new ones that can have Showcase materials applied to them.
Extract Patches as New Objects will do the trick!
Once the patches are selected, all that's left to do is select which patches to extract!
Extracting the patches
And these colors of these faces can be changed separately from the faces they were copied from!
Now the patches can be selected separately
For a little more detail, here's the video portion! Enjoy!
And if you have a tip on how you might approach this challenge, leave a comment!
Autodesk Showcase. When I first started learning it, about three years ago, I was told by my mentor: "Remember that you want to catch the viewers eyes. Take a look at how photographers use things like lighting and camera angles.
What he was trying to tell me during his explanation, was that I needed to break my engineer's brain of perspective and isometric views. The goal is to create a rendering that grabs the viewers attention.
Some of the old tricks I learned, that I use to this day are playing with camera angles. I'll adjust camera tilt, focal length. and sometimes height.
As a matter of fact I shared these tricks in a blog back in June of 2009 (see that post here).
Here's an example where I changed the camera tilt to add a more dramatic effect.
But now! (drumroll) In Autodesk Showcase 2013, there are some more options! By going to the View>Camera Properties pulldown, there are more options are available.
The new camera properties.
The new settings are for Image Control, and control the tone mapping for the rendering. Now there are more ways to adjust the appearance and quality of your scene.
Here's an example of a few of the settings:
Compensation: Think of this as exposure. Make a scene brighter or darker with a slider.
A Showcase rendering with a compensation of 2.36
The same scene with a compensation of 1.36. Notice that this scene is darker
Highlights, Midtones, Shadows: These three sliders affect the brightness and darkness of your highlights, midtones (similar to gamma control), and of the shadows in the scene.
Saturation: A favorite for me. I refer to this as the "Band of Brothers effect". This WWII based mini-series subdued the colors to give it an aged effect. This was accomplished by reducing saturation. Showcase 2013 can do the same thing!
A scene with the standard saturation of "1.0"
The same scene, reducing the saturation to "0.5"
Color Filter: Maps a new color to be "White". It creates a different feel for the scene.
Changing the color filter of a scene
White Point: Shifts the white balance of the scene. This can create a warmer or cooler overall feel for the scene.
An example of a scene shifted to the "full warm" setting.
Take a look at these settings, including focal length, and tilt angle too.
They can really add that extra pizazz!
And now, the video showing the tools. Give them a try in your next Showcase project!
Have some thoughts on how you make your renderings stand out? Tell us how in the comments!
A few days ago, I pulled the cover off my Autodesk Showcase 2013 installation, and took it for a test spin.
The first thing I found when I took a look, the user interface has changed. It's subtle, but it is significant.
There a new "Task UI" that's been added.
It's called the "Task UI", and it contains many of the functions normally accessed via hotkeys and pulldown menus.
The pulldown menus are also hidden now. Although you can click on the arrow at the top of your screen to show them again. All the hotkeys from Showcase 2012 are still there too.
The menus can still be viewed.
My "knee jerk" reaction was much the same as a lot of us. I'll have to learn a new user interface.
But I tried it for a little while, and I've found that it's not that bad. It wasn't that long before I was starting to get used to it, and (gasp) starting to like it.
So here's a quick video I put together on the new UI. It's just a preview. But as I dive further into Showcase, I'll be sure to post some more!
Taken a look at some of the new features in Autodesk Showcase 2013? Share you thoughts and drop a comment!
One of the great things about Autodesk Showcase is that it comes with plenty of materials that you can get started with. It lets us get right to creating renderings without having to devote time to customizing your material library right out of the gate (that step we can save that for later).
But there is a downside. With so many materials available, how do we find the one you want? It can take forever to find the right red, green, or blue!
So many choices, and this is only a few!
The first trick is to use the filter. This will let us search for a material that contains the text string we type into the filter.
Notice that in the image below, I've typed "Blue" into the filter.
Materials filtered for "Blue"
All materials containing "Blue" are shown.
We can type in anything we want. But be aware, that if the material contains the text you type, it will show it! For example, typing in "Red" will of course bring up red materials, but it will also bring up materials that contain the word "textured".
Why? Because "textured" contains "red". "Textured". Get it? And no, I have not found a wildcard that works.
Still this can be a great way to filter down the materials and make it a little easier for us to find the material we're after.
Another trick we can use, is take commonly used materials and copy them to a custom library. Even if we don't change them, we can at least put them in one easy to locate category, and not have to look through several categories to find them.
Materials added to my own library
So those are some suggestions on making life a little easier. Naturally, there's a video to go with it, so take a look!
Do you have your own methods you use to organize your materials? Post a comment and share!
Once again, I've crept off to Mammoth Mountain to enjoy the long holiday weekend in the United States. But true to my geeky nature. I've still created a blog, albeit a short one.
Looking at Crawley Lake from Chair 3. Amazing view!
Last week I encountered an error I hadn't seen before. An end-user was trying to install Autodesk Product Design Suite 2012 on their machine, but they were encountering the error below when trying to install Autodesk 3ds Max.
So what does this mean?
The user, understandably frustrated, had also tried to install the Autodesk Showcase, and received the same error.
1606
So we tried running the installation again. It turned out that it wasn't 3ds Max that was having the problem. It was the material libraries that were associated to 3ds Max were erroring out.
That explains why Showcase would have the same problem. It uses the same libraries.
So I resorted to any techies next weapon of choice. I used Google. That's right. That Google. It's a great tool when casting a wide net.
Today was my day at the Pacific Design & Manufacturing Show in Anaheim.
It was a busy show, with lots going on with CAD software (like at the Autodesk booth) as well as with the 3D Prototyping booths around us.
My laptop ready to go. Yep, I managed to sneak a warbird picture in there!
There was no shortage of 3D rapid prototyping available! I love this stuff!
There was a lot of activity today. I spent a lot if time talking about Autodesk Showcase, Autodesk 3ds Max, and of course Autodesk Inventor. The whole time the Autodesk team was running presentations.
There was a lot of interest. Most of all, it seemed like the black cloud of the Great Recession that had been hanging over us the last few years was but a memory.
Good news indeed!
The team getting ready
And Mr. Mike Aubry goes on stage!
And in the middle of it all.... My Droid X chirps as an e-mail arrives in my inbox.
I open it up, quietly hoping its not disposed foreign royalty offering me untold millions to help them get their fortune out of "SouthNorthern Whatsitsplace".
It's not. It's an announcement...
"Autodesk Design Review for the Android is now available".
There's some other words in there. But it's those few that grab my attention.
With cat like reflexes I go to the Android market and begin downloading.
After a few minutes of waiting, there's a glow & the sound of angels singing as the app installs.
There it is! In all its dwf-y glory! Now you can view 2D and 3D files, as well as markup dwfs on the comfort of your Android based mobile device!
Oh.. .this is cool!
Yep, pretty cool!
So if you've got an Android and you've been waiting for your own version of Design Review, wait no longer!
Head over to the Android Market and get your copy! It's free!