“A pessimist only sees the dark side of the clouds, and mopes; a philosopher sees both sides and shrugs; an optimist doesn't see the clouds at all--he's walking on them.”
Leonard L. Levinson quotes
The last couple of days I've been going through my daily duties of installing network deployments (which I refer to as the 'Progress Bar Rodeo') and preparing Vault data for implementation.
But during this time, my Twitter account has been buzzing about something new on Autodesk Labs called the 'Project Centaur Technology Preview'.
My first thought is, I have no idea what it is, but it sounds cool.
So I took a look, and found out that it looks very cool! Upload your files to the cloud, let it run optimization over the web. Then, it'll spit back results when its done.
I'll be the first to confess that I haven't tried it yet. I haven't had the time to install and try it. But here's a video from our good friend Rob Cohee who gives a quick run through of Centaur in action.
Take a look!

Wednesday, July 28, 2010
Sunday, July 25, 2010
Searching Your Memory - Saving Searches in Autodesk Vault
“We believed we could build a better search. We had a simple idea, that not all pages are created equal. Some are more important,”
Sergey Brin quotes
If you've looked at Autodesk Vault, you probably know that it runs on a database that makes searching for data much faster than just standard file searching inside of Windows Explorer.
But it's one thing to search quickly, it's another entirely to recall what you were searching for.
Lucky for us, Vault has a way to save it's searches!
First, I'll open up my Vault Explorer, and search for the word 'Green'. Vault locates all the files that have the word 'Green' in their= fields. In this case, it finds it in the 'Description' filed.
You can narrow this search by typing another bit of data to filter down the search even more. For example, if type the word 'Drawer' into the search now, I'll search the data containing 'Green' for data containing 'Drawer'. Now I've filtered my search even further.
Now that I've searched this data, narrowed it (possibly multiple times), what happens if I need to return to it? Of course I could go through the process, but I can also save the search. All I have to do is click on the pulldown next to my search box.
Once this screen is selected, you'll be asked to save your search.
One the seach is named, it is placed in the 'My Search Folders' section of Vault.
All you have to do now, is click on when you want to go back to the search data, and you'll return to that search in a flash without having to type in the same information all over again.!
On a final note, if you need to edit, rename, or delete a search, just right click on it in the browser, and you can do whatever you need.
That's it for now! Happy Inventing!
Sergey Brin quotes
If you've looked at Autodesk Vault, you probably know that it runs on a database that makes searching for data much faster than just standard file searching inside of Windows Explorer.
But it's one thing to search quickly, it's another entirely to recall what you were searching for.
Lucky for us, Vault has a way to save it's searches!
First, I'll open up my Vault Explorer, and search for the word 'Green'. Vault locates all the files that have the word 'Green' in their= fields. In this case, it finds it in the 'Description' filed.
 |
| A search for 'Green' |
You can narrow this search by typing another bit of data to filter down the search even more. For example, if type the word 'Drawer' into the search now, I'll search the data containing 'Green' for data containing 'Drawer'. Now I've filtered my search even further.
 | |
| The search narrowed further |
 |
| Saving the search |
Once this screen is selected, you'll be asked to save your search.
 |
| Now the search can be named |
 |
| Now the search is saved. |
All you have to do now, is click on when you want to go back to the search data, and you'll return to that search in a flash without having to type in the same information all over again.!
On a final note, if you need to edit, rename, or delete a search, just right click on it in the browser, and you can do whatever you need.
 |
| Editing the search |
Friday, July 23, 2010
Lost Inventor Tool Ribbon. An Addendum
“Why did you want an addendum to what you had already written and signed?”
Thomas Mesereau
While reading my previous post on the Vault Add-In, Mike Carlson, KETIV's Data Managment Specialist Extraordinaire, pointed out that there's another Add-In that, if set not to start, can cause you a bit of grief.
The Add-In is called the EDM Add-In, and if it's not set to Load on Startup, Vault won't work correctly. It'll try to start, but then shut down again.
Turning it on is the same as in my previous post, but with one exception.
This Add-In is hidden!
So when you go into Tools and choose Add-Ins, you won't see the EDM Add-In unless you right click and choose Show Hidden Members.
So there it is, another one of those Add-Ins that in the rare case where it breaks, can be fixed in seconds.
All you have to do is know where to look!
Thomas Mesereau
While reading my previous post on the Vault Add-In, Mike Carlson, KETIV's Data Managment Specialist Extraordinaire, pointed out that there's another Add-In that, if set not to start, can cause you a bit of grief.
The Add-In is called the EDM Add-In, and if it's not set to Load on Startup, Vault won't work correctly. It'll try to start, but then shut down again.
Turning it on is the same as in my previous post, but with one exception.
This Add-In is hidden!
So when you go into Tools and choose Add-Ins, you won't see the EDM Add-In unless you right click and choose Show Hidden Members.
 | |
| Here's that crafty little Add-In! Set it to Loaded, and also to Load on Startup. |
All you have to do is know where to look!
Wednesday, July 21, 2010
Lost Inventor Tool Ribbon. Answers the the Name "Vault"
“Buying the right computer and getting it to work properly is no more complicated than building a nuclear reactor from wristwatch parts in a darkened room using only your teeth.”
Dave Barry
Every once in a while, you see a strange little thing come up. You don't know why, but it's easy to fix once you know where to look.
In this case, a Vault ribbon doesn't show up, even though the Vault client was installed.
It was puzzling, but the fix ended up being pretty simple. In the end, it turned out that the add-in for Vault wasn't starting when Inventor was started. Clicking a few buttons was all that was needed.
The first step was to go to the Tools ribbon, and Choose Add-Ins.
After choosing the Add-Ins icon, you'll see the add in screen. Once this comes up, select Inventor Vault and make sure that the Loaded/Unloaded and Load on Startup options are both checked for that line item.
Once you do this, The Vault Add-In will start, and the next time you start Inventor, the Vault ribbon will be available.
Granted, this won't fix every issue, but when Vault is installed, and you can't get it to show up in Inventor, many times, this will fix it!
Happy Inventing!
Dave Barry
Every once in a while, you see a strange little thing come up. You don't know why, but it's easy to fix once you know where to look.
In this case, a Vault ribbon doesn't show up, even though the Vault client was installed.
It was puzzling, but the fix ended up being pretty simple. In the end, it turned out that the add-in for Vault wasn't starting when Inventor was started. Clicking a few buttons was all that was needed.
The first step was to go to the Tools ribbon, and Choose Add-Ins.
 | ||
| Choose the Tools Ribbon, and click Add-Ins |
 |
| Make sure the indicated options are checked for Inventor Vault |
Once you do this, The Vault Add-In will start, and the next time you start Inventor, the Vault ribbon will be available.
 | |
| The Vault ribbon found |
Happy Inventing!
Saturday, July 17, 2010
Life Lessons - The Ghost of Engineers Past
“There is a certain majesty in simplicity which is far above all the quaintness of wit.”
Alexander Pope
We live in a world where things we take for granted would have been considered science fiction only fifty years ago.
Today I've updated my Facebook and Twitter pages from my Blackberry Storm (on which I've also received several e-mails today). I also used a GPS to find the coffee house where I'm writing this blog with a laptop that has more calculating power than the computers that flew to the moon and back.
In a world of ever increasing complexity, I know I often forget the beauty and elegance of a simple solution.
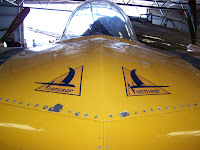
Today I was walking the floors of the Planes of Fame air museum (where I saw a great seminar on aerial photography by Paul Bowen), and notice some ingenious solutions created by our engineering forebears.
The first, if you're flying a 1940s vintage aircraft, and need to check to see if you're landing gear had lowered, what did they do? Gauges, sure! They had them.
But what if you wanted to double check?
The designers created a simple tab on top of the wing that popped up when the landing gear was down. Purely mechanical, just a little piece of metal.
 The landing gear indicator on a A6M5 Zeke "Zero" Japanese fighter
Yes this is a real, flyable WWII era Japanese Fighter
The indicator is just highlighted, on top of the wing, above the landing gear
(click to enlarge)
 A closer look at this simple solution

Another incredibly simple solution, the 'yaw' indicator on the N9MB Flying wing.
'
Considered the B-2 Spirit's 'grandfather', this aircraft tested the flying wing concept back in WWII.
I'm told the airplane has a tendency to yaw (if your looking from the top, the nose would be swinging from side to side slightly). It is however equipped with a yaw indicator.
How does this sophisticated instrument work? It's a piece of string attached to the nose in front of the pilot. If the string is blowing to the right or left, the airplane is yawing. If the string is blowing back toward the pilot, the airplane is flying straight.
That's right, the precursor to one of the most sophisticated aircraft in the world today used a piece of string as a flight instrument.
 The flying wing back in May
(click to enlarge)

 Notice the string between the canopy and the Northrop decals
This is the yaw indicator
(click to enlarge)
Alexander Pope
We live in a world where things we take for granted would have been considered science fiction only fifty years ago.
Today I've updated my Facebook and Twitter pages from my Blackberry Storm (on which I've also received several e-mails today). I also used a GPS to find the coffee house where I'm writing this blog with a laptop that has more calculating power than the computers that flew to the moon and back.
In a world of ever increasing complexity, I know I often forget the beauty and elegance of a simple solution.
Today I was walking the floors of the Planes of Fame air museum (where I saw a great seminar on aerial photography by Paul Bowen), and notice some ingenious solutions created by our engineering forebears.
The first, if you're flying a 1940s vintage aircraft, and need to check to see if you're landing gear had lowered, what did they do? Gauges, sure! They had them.
But what if you wanted to double check?
The designers created a simple tab on top of the wing that popped up when the landing gear was down. Purely mechanical, just a little piece of metal.
 The landing gear indicator on a A6M5 Zeke "Zero" Japanese fighter
Yes this is a real, flyable WWII era Japanese Fighter
The indicator is just highlighted, on top of the wing, above the landing gear
(click to enlarge)
 A closer look at this simple solution
The same solution on a Russian Yak-3
(click to enlarge)
(click to enlarge)
Another incredibly simple solution, the 'yaw' indicator on the N9MB Flying wing.
'
Considered the B-2 Spirit's 'grandfather', this aircraft tested the flying wing concept back in WWII.
I'm told the airplane has a tendency to yaw (if your looking from the top, the nose would be swinging from side to side slightly). It is however equipped with a yaw indicator.
How does this sophisticated instrument work? It's a piece of string attached to the nose in front of the pilot. If the string is blowing to the right or left, the airplane is yawing. If the string is blowing back toward the pilot, the airplane is flying straight.
That's right, the precursor to one of the most sophisticated aircraft in the world today used a piece of string as a flight instrument.
 The flying wing back in May
(click to enlarge)

The back of the Flying Wing
(click to enlarge)
(click to enlarge)
 Notice the string between the canopy and the Northrop decals
This is the yaw indicator
(click to enlarge)
So why do I mention this? Because I think we all get caught up in complex solutions involving computer controlled whirlygigs with a galloping rod adjusting feedback loop, that sometimes, we forget that there might be a simpler solution for that.
If anything, seeing things like that makes me appreciate (and look) for the lessons taught by the designers who sat at a drafting board where the sketching toolbar was a pencil, the delete key was an eraser, and the 'computer' was a slide rule.
If anything, seeing things like that makes me appreciate (and look) for the lessons taught by the designers who sat at a drafting board where the sketching toolbar was a pencil, the delete key was an eraser, and the 'computer' was a slide rule.
Tuesday, July 13, 2010
Chains of Thought - Chain Dimensions in Inventor
“Loyalty to petrified opinion never yet broke a chain or freed a human soul.”
Mark Twain
Chain dimensions in a manufacturing drawing have always made me 'squidgy' (that's the official term for it).
When you start thinking of how chain dimensions can affect tolerances, and how they stack up across a set of chain dimensions, it can get a little bit frightening.
 Chain Dimensions
(click to enlarge)
In the sample above, look at how the tolerances stack up, let's assume a dimension of +/- .005
That means that the '3.916' dimension can vary safely between 3.911 and 3.921. So far, so good.
But we start to see a problem with the next dimension, 10.284. The way this is dimension is placed, it's .005 tolerance adds up with the previous dimension, meaning that it can actually vary between 10.274 and 10.294, and still meet the tolerances as dimensioned (even if that's not what's intended.
As we go on, the 7.50 dimension will stack up with the previous two, and so on. The problem compounding as the chain passes the previous tolerances to the next.
This is why baseline dimensions are so popular among the mechanical crowd.

In this case, the dimensions are all measured from the edge, and totally independent of each other. This eliminates the 'stacking' issue that chain dimensioning has with tolerances, and generally conveys that this part needs to be held to a tighter tolerance.
But does that mean that as a manufacturer, you'll NEVER use chain dimensions?
Not necessarily. The obvious case for chain dimensions is when tolerances aren't important, such as a rough cut, or a series of outside dimensions with loose tolerances.
The other is a case where the dimension from edge isn't as critical as another dimension. Looking at the example below:
I have a stretcher, a common tool in woodworking. There are many cases where the length of the shoulder is critical, and the tolerance of the tabs (known as tenons), is secondary to that shoulder length.
Cases such as this, and also cases similar to this are where I've used chain dimensions to get exactly what I want.

Chain dimensions used to get the desired effect.
(click to enlarge)
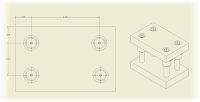 A dieset using chain dimensions. The Center to Center between the pins is critical.
The sides are flame cut a typically only for reference
(click to enlarge)
(click to enlarge)
 A dieset using chain dimensions. The Center to Center between the pins is critical.
 The sides are flame cut a typically only for reference
(click to enlarge)
So there, you can see where chain dimensions aren't ALL bad. Like most tools, it's knowing when you can make the best use of them.
Food for thought I hope!
Sunday, July 11, 2010
Taking a Sampling - Where Did My Inventor Sample Files Go?
“The proof of the pudding is in the eating. By a small sample we may judge of the whole piece.”
Miguel de Cervantes Saavedra
Last week I was fortunate enough to receive my new laptop. 64bit Windows 7, 8 GB of RAM, 500GB hard drive. It'll be a dream for at least the next 6 months, before the next dream box comes along.
Of course with that comes the installation of the software I'm using. To date, I have Inventor, Vault, and Showcase installed. Not to mention Snagit, Camtasia, and several other small programs I usse
After getting my system ready I found that I need to run a quick test on some files. No problem! I'll just grab a sample file! There's sheet metal parts, assemblies, drawings, a slew of flies I can use for a quick test when I don't have the time or desire to build a data set.
Well, when I went to get them, they weren't there! There were some iLogic files, a translator folder, and an html document named 'Where are my sample files'.

The 'Where'd they go file'
(click to enlarge)
(click to enlarge)
Not to fear, if you click on the html file, it opens up to a hyperlink that takes you to a page where you can download the files.
 Found them!
(click to enlarge)
The link will take you to the download page but if you're reading this blog, you can just go ahead and follow the link here.
It definitely saves the disappointment of finding the location (which can vary if you're on Windows XP versus Windows Vista/7).
If you're a CAD Manager or IT in charge of getting the files, you can also download them and put them on a server instead of hunting for them when you're asked. Then you get kudos for being proactive!
 The download page
(click to enlarge)
That's it for this weekend, just a small tip today, but don't worry. I'm thinking of what to do next already!
Monday, July 05, 2010
A Stroll Down Memory Lane - Level of Detail
The memory of things gone is important to a jazz musician.
Louis Armstrong
It's been a long time since I visited this (the tool originally came out in Inventor R11), and I've never done it in a video format, and that's the use of Level of Detail (aka Load on Demand) inside of Inventor.
 Level of Detail inside Inventor
(click to enlarge)
We'd all dream of a monster machine with enough RAM to make a minor deity jealous, but we can't always get it. For example, if you're still running a 32 bit system, you're stuck with 4GB of RAM. You can't go any higher.
So when faced with this, Level of Detail can make a huge difference when your system starts hitting the wall.
So what exactly is Level of Detail, or LOD?
LOD allows you to unload unneeded components in an assembly from memory, freeing up RAM to work on the components you do need. It can be used to unload components after you open your assembly, and it can also be saved, and recalled when you open your assembly, allowing fora faster load time.
So without further adieu, here's the video!
So that's Level of Detail in a nutshell.
A few updates from my Plane's of Fame volunteer gig. This weekend the TBM Avenger flew. Unfortunatley, I forgot my good camera, so no aerial shots of the Avenger flying. But I did get a slick picture (at least I think so) of the WWII reenactors posing in front of it.
Open it up in Techsmith's Snagit, change the picture to monochrome and add an edge effect, and it almost looks like it could be from the 1940s! Granted, if you look carefully, you can bust it as being modern. But hey, I'm only an amateur!

The TBM Avenger
(click to enlarge)
Happy Inventing!
Subscribe to:
Posts (Atom)