Find us on Google+ February 2014 ~ Inventor Tales

Wednesday, February 26, 2014

Showing file extensions in Microsoft Windows - It can help a lot!

“When a thing is funny, search it for a hidden truth.”
George Bernard Shaw

It's a simple thing.  But it's a simple thing that is many times overlooked, I think. 

How can file extensions be shown in Microsoft Windows?  There are many out there who know how to do it, but it's also something that can easily get missed.  And it's not easy to find if you're the one who doesn't know how.

But first of all, why even bother to show the file extension?  The icons are often enough to tell someone what the file type is. 


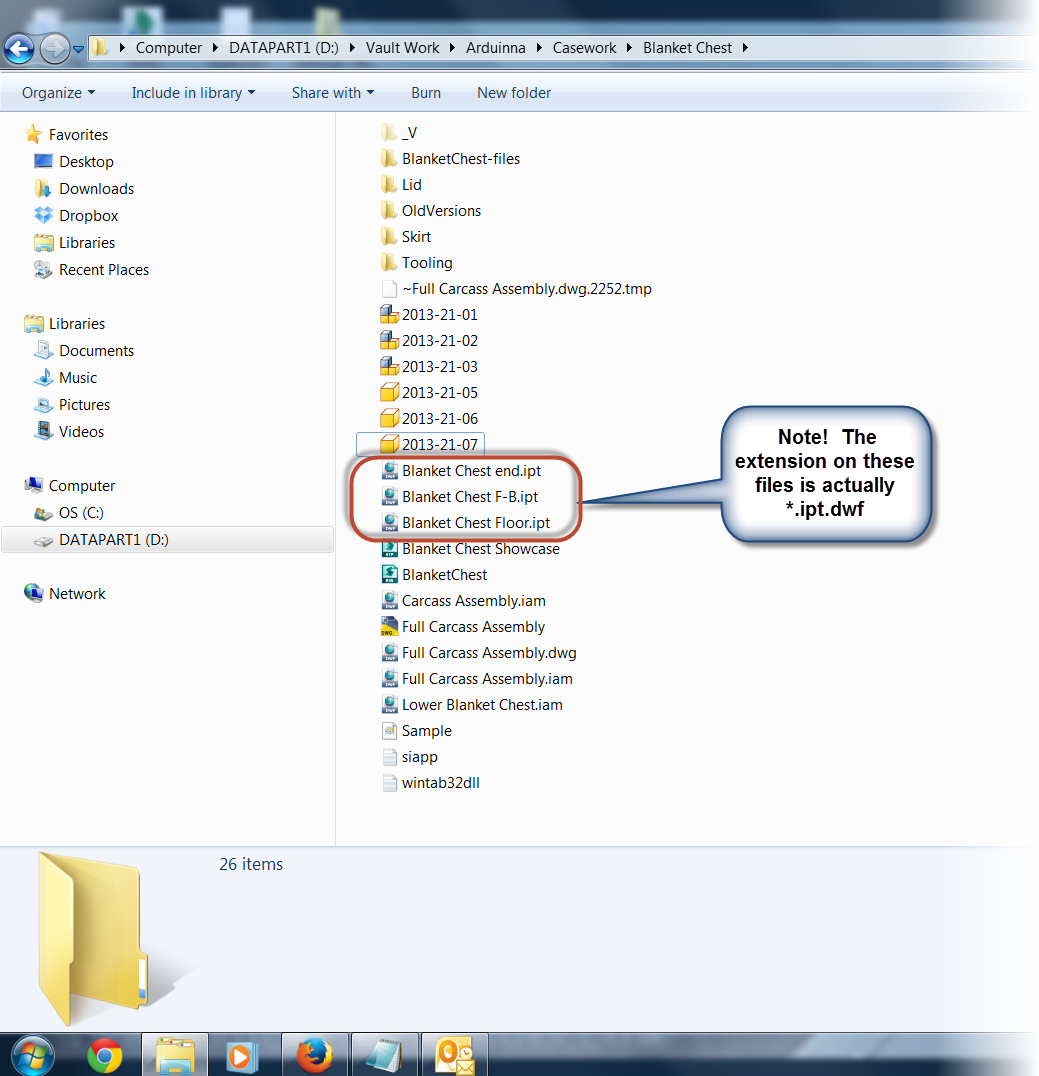
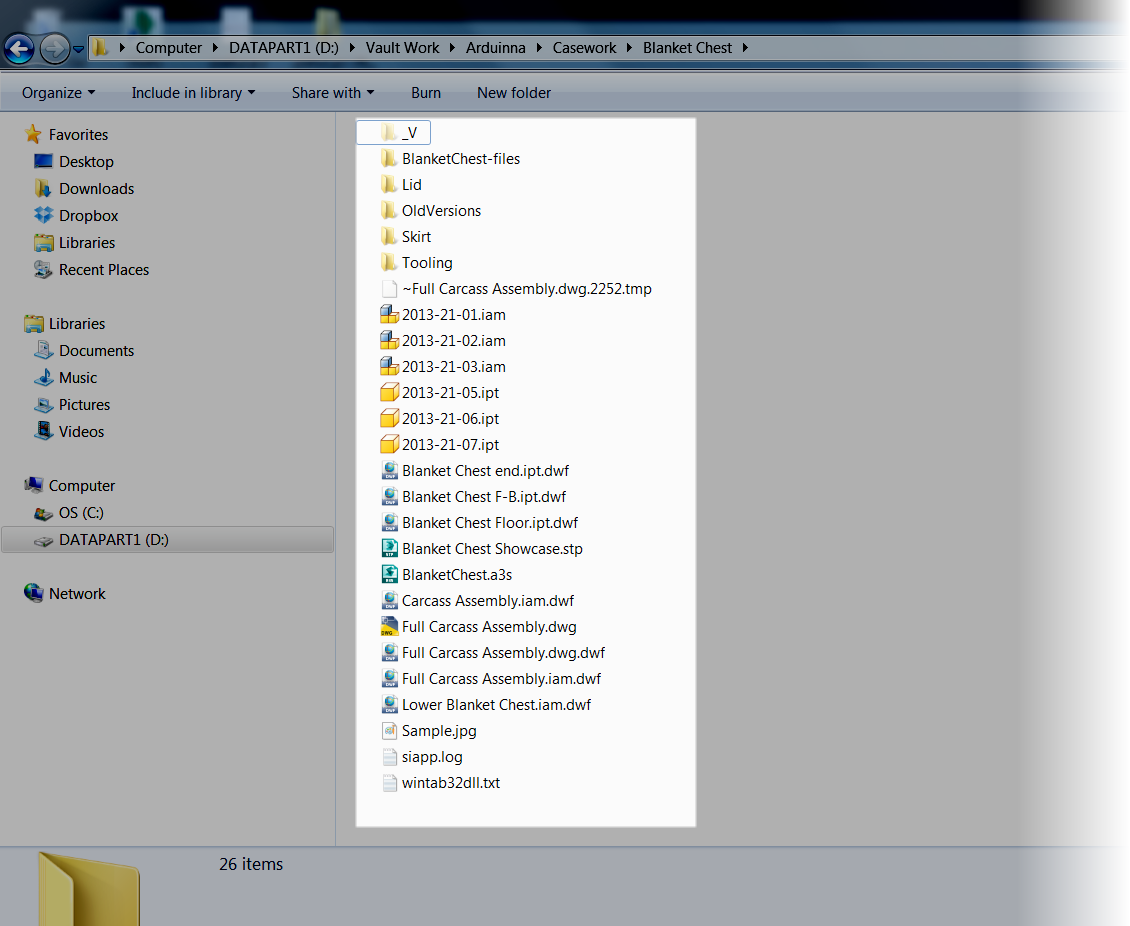
File extensions are currently hidden.  Note the dwf files with *.ipt.dwf extension!

Where I've found it helpful, is when a file needs to be renamed.  I have to do this a lot!  Because of this, I change setting right away. 

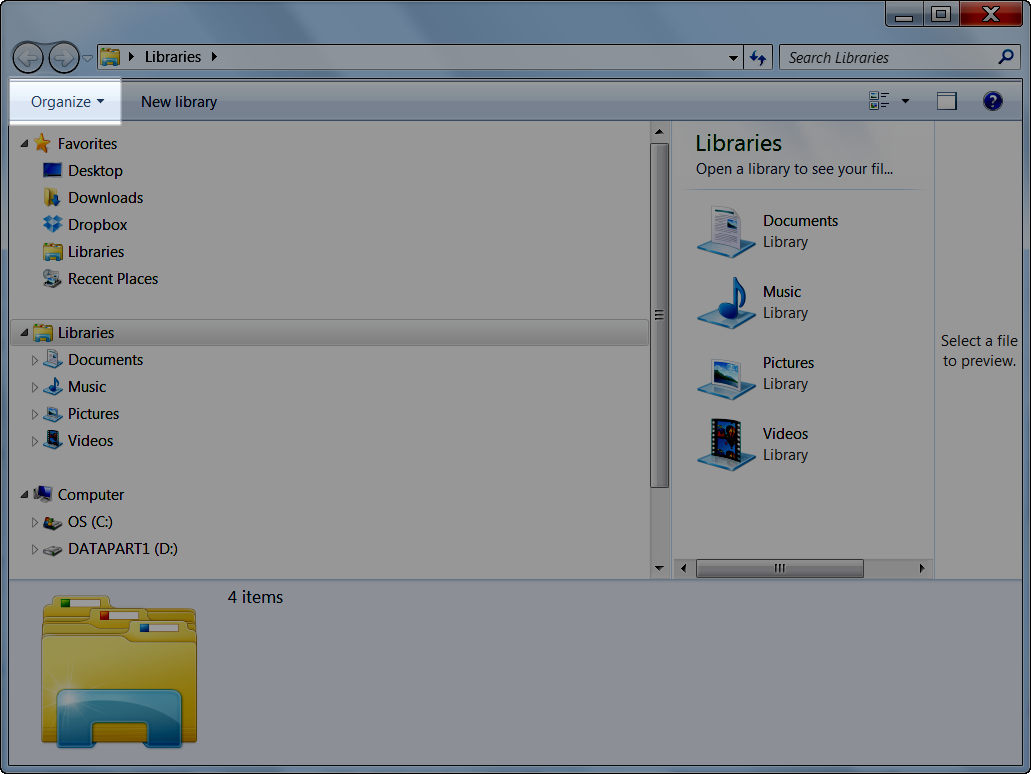
To make this change open up any Windows Explorer window, and choose the Organize icon.

Choose the "Organize" icon

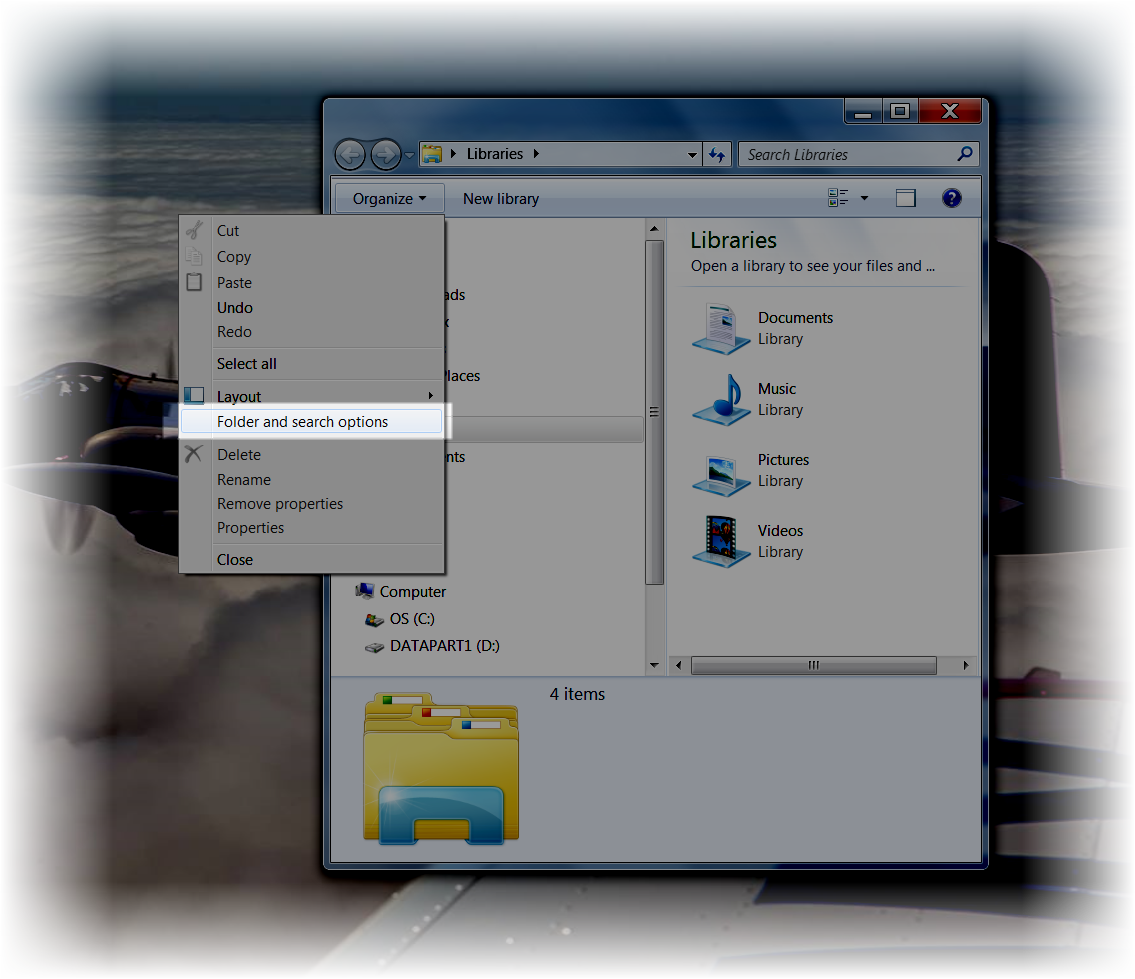
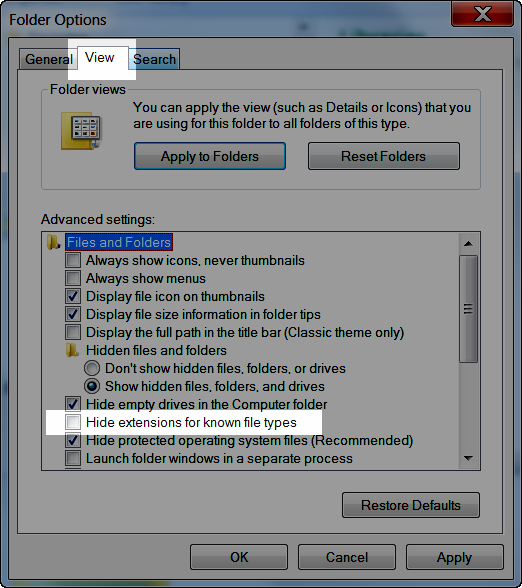
Choose Folder and Search Options from the pullout menu.


After choosing this option, a dialog box will appear.  Choose the View tab, and make sure the option to Hide extensions for known File types is unchecked.  Once this is done, extensions for all file types will be displayed.

\
 
So why bother?  As I said before, I change file extensions a lot, and if file extensions aren't shown, it can be done. 

Why?

Without showing file extensions, finding a *,bak file named "Drawing" and tagging "*.dwg" actually changes it to drawing.dwg.bak, due to the fact that the extension can't be seen.  As a result the file won't function correctly.

An example of file extensions shown. Now the dwf file extension is shown!

Only when the extension can be seen as "Drawing.bak" can the extension be changed to "Drawing.dwg" correctly. 

And I've found this to be true in any Windows file affected by this.

So if you need to change file extensions, change this setting!  It will make life a lot easier!

Monday, February 24, 2014

A Review - My Experience with My SpaceMouse Wireless

“The wireless telegraph is not difficult to understand. The ordinary telegraph is like a very long cat. You pull the tail in New York, and it meows in Los Angeles. The wireless is the same, only without the cat.”
Albert Einstein

*****************************EDIT 10-Mar-2014************************************


It appears that I have to perform the metaphorical act of eating crow.  However, I'm also happy to do so.  In my review, I stated that there wasn't a way to customize the buttons per mode in the 3Dconnexion SpaceMouse Wireless.

Thanks to this excellent post by Scott Moyse at Design and Motion, I've been proven guilty of "not looking deep enough".  There is in fact a way to do it!  And I encourage all to check that out!  I know I plan on it! 


My deepest apologies to anyone that I might have mislead.  I do feel a bit sheepish now that I can plainly see what I overlooked! 

And by the way, crow....  It tastes like chicken!


 ***********************************************************************************
A few months ago, I received my 3Dconnexion SpaceMouse Wireless.  And after having an opportunity to give it a good long trial, I'm ready to give it a review.

Having used wired 3Dconnexion devices for years, I'm quite used to them, and a huge fan of them.  I don't use Autodesk Inventor or Autodesk Showcase without it.

As always, I have to put in that disclaimer!  I didn't get compensated in any way for this.  I was just given a SpaceMouse Wireless, and then the freedom to use it as I always have.  Aside from the 3Dconnexion device, I was free to formulate my own opinions. 

First impressions

Out of the box, my SpaceMouse Wireless had the familiar heft that I've grown accustom to out of 3Dconnexion products.  They've never felt cheap to me.  There's a comfortable sturdiness to it.

Two buttons are placed in the "3 & 9 o'clock" positions.  Something I'm used to.

It reminded me of the SpaceNavigator's I've used in the past.  Just without the wire.  So I went ahead, charged it up, installed the driver, and gave it a test drive!

Here it is!  A handsome little devil!


Taking it for a spin

"Cutting the wire" is new for me.  So I wondered, how is it going to perform?  My biggest concern was lag without the wire.  Would it be as quick as the wired version?

I'm glad to say that if there was any slowdown, it was imperceptible to me.  It works just like the wired versions I use.  Performance was great.

Taking my SpaceMouse Wireless for a drive
One of the other things I wondered about was the battery life.  How would it be?  Would it be like my cell phone that only lasts a few hours of heavy use?

I'm pleased to say that the battery life is excellent. I don't use it every day for 8 hours, so I got a couple of months of use out of it.  Heavy users will see less time between charges, of course.

But even then, the charging cable doubles as a data cable, so even if the batter runs dead, the SpaceMouse Wireless will still work just fine as a "SpaceMouse Wired"

But there are a couple of things that I would put on the "wish list".

I do wish the driver provided the ability to program the buttons to perform different functions in different modes of Inventor.  For example, let it do one set of functions in a sketch mode, another in a 3D part mode, yet another in an assembly mode, and so on.

Another thing I would like is some sort of case that would make it easier to carry both the SpaceMouse Wireless and the antennae.

There is a small cardboard case that works nicely, but something, even aftermarket, would be a welcome addition. 

The antennae and charging cable in it's box.

Overall Impressions

The liked!
  • Performance is just like the wired devices!
  • Battery life is excellent!
I didn't like as much!
  • A better carrying case for both the SpaceMouse Wireless and antennae would be nice
  • Having the ability to program the buttons to do different functions in different modes of Inventor would be a great addition.
In Conclusion

I liked the SpaceMouse Wireless a lot.  I use it constantly, and have every intention of continuing to do so.  Sure, I think there are improvements that could be made with regard to the driver, and to the carrying case, but I tend to use my device for the orbiting functions, and less for the button functionality.

Naturally, many will have there own thoughts and ideas.  And these are just a few of mine!


 *****************************EDIT 26-Feb-2014************************************

I found out this morning that there may be a way to edit the contextual menus for the SpaceMouse Wireless.  Previously, I didn't think there was a way (and stated this in my review).

I'm currently revisiting this to find what the process is.  I'll post an update once I find out what it is!

*********************************************************************************


Thursday, February 20, 2014

Resolving the Error: "Cannot drop the database KnowledgeVaultMaster because it is being used for replication"

“More important than the quest for certainty is the quest for clarity”
Francois Gautier

One thing about working with Autodesk Vault, is it's always got a surprise for you.  There are so many possible configurations, that it can be hard to take all the considerations into account.

A case I encountered, showed me just that. 

The condition I was working in was a replicated environment, where the Vault database and filestore existed on a server in one location, and an additional filestore existed in a completely different location.

It's an environment where I'm constantly learning something from, and this day was no exception.

I was in the process of restoring a backup, after reconfiguring the installation, and this unusual error came up.


Cannot drop the database KnowledgeVaultMaster because it is being used for replication

I was puzzled.  Never in my life had I seen this error before.  But a quick Google search yielded the solution at the Autodesk blog linked here.

It shows the solution as follows:

USE [database]
EXEC sp_removedbreplication @dbname=[database]
GO

Unfortunately for me, I'm not sure where to put this solution into action.

But fortunately, for me, I know someone who likely does, and I "use my life line".

Mike Carlson, Vault Guru Extraordinaire gives me the tips that I'm looking for.  He filled the gaps that I needed filled. 

With his help, here are the steps that I was able to use.

First, I opened SQL Server Management Studio.

Starting SQL Server Management Studio


Once opened, I logged into my Vault.  The default login is SA, with a default password of AutodeskVault@26200 per the Autodesk Advanced Configuration Guide.

Logging into SQL Server Management Studio

Once logged in I was able to find what I needed in the interface.  First, I expand the database folder, find the KnowledgeVaultMaster database, right click, and choose Query.


Starting the Query

Once the Query window is open, I can paste in the following lines, and replace [database] with KnowledgeVaultMaster.


USE KnowledgeVaultMaster
EXEC sp_removedbreplication @dbname=KnowledgeVaultMaster
GO

The command ready to Execute
 Once the query is run, a message acknowledging a successful execution of the command will appear at the bottom of the screen.

The command after clicking the Execute button

After this, the restore ran perfectly fine, and I was back in business!   This seems like an obscure thing to come up, but I'm glad I found the solution, and someone with the knowledge to know what to do with it!

NOTE!

SQL Server Management Studio is needed to run this command.  It can be found on the SQL installation disk.  There is also an Express version that can be downloaded from Microsoft here.


Monday, February 17, 2014

A trip to Mammoth, and Technology Changes My Trip to the Auto Store

We're still in the first minutes of the first day of the Internet revolution.
Scott Cook

This Valentine's Day weekend, I was off in Mammoth enjoying some snowboarding with friends.  So blog posting, well, it just wasn't going to happen.

It was a great weekend, with a storm on the first day, and beautiful scenery the ncxt.4

First, the gondolas swinging in the winds.  It was on a "Weather Hold", due to high winds.


 But then it cleared out nicely the next day!


The views after a storm passed through

So instead, I offer an "Off Topic" observation on technology.

Technology is integrating into our lives every single day.  Sometimes, it sneaks up on me.

Last Sunday, I found myself at my local Pep Boys, looking for an air filter.  I was way in the back of the store, where men communicates in "manly nods" and the occasional grunt. 

For all my life, there was a gigantic "specifications book".  My Dad taught me how to look at the book, find the make, model, and year of our car.  Then you looked up the filter type (air, oil, etc), found a number, then looked at the shelf until I found the right filter.

But this Sunday, looking at the shelves, I saw something I never saw before. 

There was no book! 


So now what do I do?  I stand in the isle and look dumfounded for a while.  Why on earth would they take out the book?!?

But then my eyes fell on a small display that almost looked like an advertisement.  But on closer inspection, it wasn't. 

It was the new "specifications book"!

It was a plastic sign with instructions on how to find the filter I needed via text, internet, or a QR code....


The new "book"
For a moment, I feel like the theme to "2001 a Space Odyssey" should be playing as I stare, somewhat awestruck at the display.

Fortunately, I have a QR Code scanner on my smart phone, so I give it a try.

Soon, a my phone asks me for the make, model, and year of my car. 

I click through choose my options, and the website kicks out what choices I have for air filters.

There' my air filter!

Now, just like I did when Dad taught me how to look things up in the old paper book, I walk to the shelf, and grab my new air filter.


Mission accomplished!

But how, in the end, does this affect those of us sitting behind computers, driving our various CAD products with our mice?

It's technology.  And technology changes, it evolves, sometimes, quickly.

For decades, I've been comfortable with that old, paper specifications book.  I had built more than a comfort zone.  I had set up furniture, a television, and a refrigerator in this comfort zone.

For a moment, I wanted to shake my fist and yell "Why did you change it!"  

Why?  Change is difficult.  I don't always want to do it!

But the fact is, whether I shake my fists and rage, or quietly accept and move on, the paper book I've been so comfortable with is gone.  It's not likely to come back.

And in our world of CAD, change marches on too.  Sometimes it's slow, even glacial, other times, it's a wave that will pull you under if you don't get in front of it.

So as we face technology, and it's unyielding march forward, once again I'm reminded....

Am I ready to adapt to it? 

I think I'd better make sure I am!

Friday, February 07, 2014

Linking Presentation File Colors to Assembly Colors in Autodesk Inventor

“Our work is the presentation of our capabilities.”
Edward Gibbon


Every day, computer software gives me challenges.  Sometimes there small, simple things.

Sometimes they make me feel like Indiana Jones when he's getting chased by that giant boulder in Raiders of the Lost Ark...


This challenge probably fell somewhere in between.

What was the challenge?  How do you get Autodesk Inventor presentation file to match the colors in the assembly, even when the colors change? 

It's actually not very difficult, but there is a trick to it.

When creating the  presentation, make sure to click the Options button, pick a View Representation, and choose "Associative".

Locating the Options to link the views.


By choosing this option, the view in the presentation will now follow the view in the assembly!

If the option is left unchecked, the presentation file colors won't change as the assemblies colors change.  They will be independent.

For the full tour, check out the video here!


One thing I can't say I've found, is how to change it after the fact.  Once committed, it remains the way it is.

If those of you out in the 'Verse out there have found a way, throw out a comment below!

And one last note!

I used view representations I created in this post.  If you're interested in learning more about creating view representations, I have a post for that I created a few years back here.  Take a look! 


Wednesday, February 05, 2014

A Guest Video - Top Down Design from TheCADSetterout

“(The wins) give us a lot of momentum. We're on top right now, and nothing can bring us down.”
Jamee Juarez

This year, I wasn't able to make it to Autodesk University 2013.  Scheduling with class, work, and budget all conspired to keep me away this time.

I was very disappointed that I couldn't attend.  There was information I missed, and people I didn't get to see.

Fortunately, the classes are becoming available online, so I can at least get the information, if not raise a glass with my friends and colleagues!

One great class that I that is now offered online is MA2604: Drive Inventor with the Top Down: Alternative Assembly Modeling Techniques by Paul Munford of The CAD Setter Out

This video is very informative, and well worth watching.  I've already added it to my favorites!  Take a look at it below:


Be sure to check out the other classes that are available too!

Monday, February 03, 2014

Making Use of the OldVersions file in Autodesk Inventor

“Always be a 1st-rate version of yourself instead of a 2nd rate version of someone else.”

One thing that I think is little known about Autodesk Inventor is the OldVersions folder. 

For those of us that have used AutoCAD before, it's similar to the *.bak file in AutoCAD.  That is, every time a file is saved, a copy of the previous file is saved

In the case of Inventor, the file is placed in a subfolder of the source file's directory.  The subfolder is named "OldVersions", and the filename is Filname.XXXX.ipt, for example. 

The OldVersions folder creates backups of all Inventor file types, and it's done every time the user hits the save button.

Example of the OldVersions Folder

The XXXX part of the name is an number that increments up, starting from 0001.  By default, it only saves back one version.  Older versions are deleted (more on changing that later).

But what if the time comes to restore an old version of the file?  Maybe I've made a huge mistake, and it's easier to grab that old versions file than try to undo everything.  Or maybe, a file got corrupted and this may give a better shot at saving it? 

How do I employ that file from the OldVersions folder? 

I just open the file, and let Inventor take care of the rest.

Below is an example of a piston I created.  Let's imagine I've made a mistake, and the mistake is so dire, that it's easier to grab that old versions file than edit all the features.


I have an old version in my OldVersions folder, all I have to do is open it.

The previous version of the file, in the OldVersions Folder
When I open the file, a dialog box will appear asking what I want to do with the file.  In this case, I want to make the Old Version the Current Version.

Restoring the old version
Choosing OK opens the file, and it will now become the current version. I can now start using the file from that point in time.


The old version restored!
There's one other thing that's worth noting.  The number of OldVersions kept can be changed inside the project file. 

First edit the project file from the getting started tab.


Once in the Project Editor, locate the project in use.  In the Options section, there's a setting for Old Versions to Keep on Save.

Right Click to edit it, and it can be changed to any number I want!  If I change it to -1, it will keep all versions of the file.  It will never purge a single one!

So that's a tip on using old versions!  I hope you never need it, but it's a good resource to have if you do.

And for more, here's a video!