Once upon a time, I was asked, in reference to Autodesk Inventor and Autodesk Fusion 360, "Why would someone want to have a fillet feature with more than one radius in it?"
 |
| An example of two different fillet radii in Fusion 360 |
It's a fair question. It's likely we can pick a feature in just about any CAD tool and ask, "Why is that there?"
But to that end, I did have a reason one might want to combine two different fillet radii in one feature.

It's a matter of organization. In my design work, I often find myself modeling O-ring grooves, which nearly always have a different radius at the top and the bottom of the gland. Having the ability to combine the different radii in the same feature allows me to combine the fillets into a "O-ring Radius Feature", and maybe shave down the feature tree a little bit.
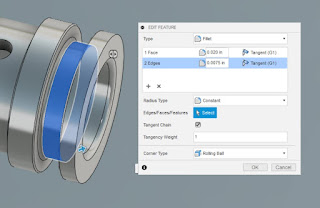
An O-ring groove using two different radii fillets in the gland.

 |
O-rings installed in the glands. Just to give some context to the first image. |
Another case I've used was way back when I was designing sheet metal tooling. I used it when "keying" a rectangular insert. In that example, the opening has 3 radii of one size, and the fourth is a different radius. The insert has chamfers of a similar size. This prevents the insert from being inserted in the wrong direction. Why fillets on the opening and chamfers on the insert? It was easier to machine with the tooling of the time!
 |
| An example of a sheet metal stamping insert |

The"keying" feature up close.
While you might not run into one of these particular examples I've described, maybe there will be something similar that you can use.

Is it life changing? Not very likely. But maybe it's a little food for thought as you make your way through the 3D CAD world.