Find us on Google+ May 2010 ~ Inventor Tales

Monday, May 31, 2010

Breakout Views. Detailing for Clarity.

“The man who has seen the rising moon break out of the clouds at midnight has been present like an archangel at the creation of light and of the world”

Ralph Waldo Emerson


When I was working in industry, I created a lot of cylindrical parts that had internal features. I created more O-Ring grooves than I want to think about!

That translated into having to create a ton of Breakout Views.

Inventor's Breakout Views are pretty easy in my opinion, but that doesn't mean there aren't a couple of places you can get tripped up.

The basic steps are:
  1. Select the view to breakout (don't miss this step!)
  2. Draw a closed profile
  3. Finish the sketch
  4. Choose 'Breakout View'
  5. Select Options
  6. Hit OK.
Everyone (including myself) tends to make a mistake on Step 1. If you don't select the view first. You'll get the following error:


This error isn't as scary as it looks. Just make sure to select the view first.
(click to enlarge)


If you see it, don't panic! Just make sure you pick the view you want to use first!

As always, a picture is worth a thousand words, so here's a video to go with it!


On a non-Inventor note....

For those in the United States, Happy Memorial Day.

At the Planes of Fame Museum I was lucky enough to sit in the top turret of a B-17 Flying Fortress that is currently under restoration.

It was very cool, but also pretty humbling when I considered the courage of the crews that were in there in combat. Thanks to all those who flew those for real, so I could sit in there for fun.


Here I am sitting in the top turret of a B-17 Flying Fortress. I know I look angry, but I'm really just squinting because of the sun.


The 'business end' of the B-17s top turret. The .50 caliber machine guns are non-functioning of course. That's a DC-3 in view of the turret.


Tuesday, May 25, 2010

Repeat Last Command. Sometimes it's About the Little Things.


“Enjoy the little things, for one day you may look back and realize they were the big things.”

Robert Brault quotes


As I was getting ready to train a class tomorrow, I came to realize a nice little trick that I've come to use all time time, and since it's introduction (in Inventor 2010, as I recall), I've come to take it for granted.

What is it?

Right click to repeat your last command.

The AutoCAD gurus know this one well. They've used it for years. Now, those of us on the Inventor side can make use of it!

The right click 'repeat command' option. In this case, allowing us to repeat 'Place Component'
(click to enlarge)

The option appears at the top of nearly every right click menu, allowing you to quickly reuse the previous command without having to go to a ribbon.

This is a great tool. I've taken to using it hand in hand with tools like the new Assemble tool.

It's easy to miss, but well worth giving a try to.

Oh, and if you're really an AutoCAD guru... You can hit the space bar to reactivate the last command too!

Sunday, May 23, 2010

Using the Assemble Tool to Put it All Together


It was exactly an assembly line. You could look into infinity down these rows of drawing tables.
Gil Kane


One of the new Inventor features that I've come to like the more and more I use it is the new Assemble tool.

The Assemble Tool in Action
(click to enlarge)

This tool let's you apply assembly constraints just by picking the correct geometry, and 'fine tuning' a bit with your direct manipulation tools. You don't have to activate the Constraint tool and tell Inventor which constraint you want.

I had to take some time to practice to get the nuances of it but now that I'm getting those down, all I can say is; 'Wow, I'm having fun now!'

Here's a video I put together. Notice how I use the 'Select Other' tool to cycle through different assembly constraint options.


Happy Inventing!

Monday, May 17, 2010

Finding Hidden Treasure - Degree of Freedom Analysis in Inventor

“Should not every apartment in which man dwells be lofty enough to create some obscurity overhead, where flickering shadows may play at evening about the rafters?”

Henry David Thoreau


While working with an assembly, I stumbled upon a tool that, in the 'fog of time' I'd quite frankly, forgotten about.

Degree of Freedom Analysis.

This slick little tool will show you a dialog box with the remaining translational and rotational degrees of freedom on the parts in an assembly, as well as letting you animate them.

After taking a few minutes to reacquaint myself with this little gem, I don't think I'll be forgetting about this one anytime soon.

The tool is located in the Assembly file in the Productivity section of the Assembly toolbar.


Finding the hidden treasure - Degree of Freedom Analysis
(click to enlarge)

Choosing this tool, you'll see a dialog box showing how many degrees of freedom remain for each component in the assembly. The columns will be split up into translational and rotational.

The degrees of freedom for this clamp
(click to enlarge)

Each component shows the number of rotational and translational degrees of freedom left for each component. If you select a component in the browser, the degrees of freedom will highlight on the corresponding part on the assembly model.

Selecting a component in the dialog box will display the Degree of Freedom indicator for that compononet
(click to enlarge)

One final note, checking the Animate Freedom check box will also animate the component, moving it any degrees of freedom that remain. This can make it a lot easier to find the degrees of freedom that remain, and which ones you may still need to remove to properly constrain the component.


A snapshot of the animation in action
(click to enlarge)

So there it is! A nice little gem that can really help find where new constraints need to be added.

I know now that Ive rediscovered that tool, I'll not soon forget it again!


Tuesday, May 11, 2010

Time for Some Maintenance! Update 1 for Autodesk Vault

“I was always able to see the defects in the design of an instrument which overlooked completely the need of its maintenance.”

Leo Fender


A few weeks ago Update 1 for the Autodesk Vault 2011 family was issued. If you've ready my previous posts, you know I'm a pretty big fan of updates. I'm quick to update my software.

But when I first looked at the update for Autodesk Vault. I saw something. Something that shook my geeky being down to it's very core....

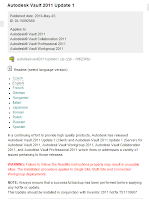
A screen capture from the Autodesk website. Note scary message in red.
(click to enlarge)

I copied it from the Autodesk Website and pasted it below.

WARNING: Failure to follow the ReadMe instructions properly may result in unusable sites. The installation procedure applies to Single Site, Multi Site and Connected Workgroup deployments.

The message was frightening. I didn't even get beyond :may result in unusable sites". For all I knew, the warning could have continued on to say.

"Side effects may include: extreme loss of data, cold sweating, insomnia, loss of social life, and spontaneous human combustion."

So I put my mouse down, and slowly stepped away. I thought about installing the update, but those warning letters would stare me down.

Finally, I had a slower day today, and decided that I would face those warning letters. I even did something that many geeks will only admit in hushed tones.

I read the readme file. That's right. I read the readme file.

But once I did take a few minute to read the file, I learned that the warnings, while important, aren't really all that difficult. As a matter of fact, they're things that I'd probably do anyway.

I'm not going to rewrite the Readme file here. You can see it for yourself HERE, straight from the source.

So what were those critical steps?

1. Make sure you have a backup. That's a given. I'm careful about using harsh language around the server unless there's a backup

2. Install the Inventor Hotfix found HERE.

3, Run an IISRESET before installing the hotfix. I'm not even sure it's necessary. But it takes about a minute, and for something that can be done that quickly, I see no reason to tempt fate.

4. If you're running multisite, install to ALL LOCATIONS before running ADMS. If this was the critical step. THIS IS IT.'

And one last thought that isn't in the readme. The migrations may take some time, so plan accordingly. Mine took about 15-20 minutes, mostly because I have a lot of libraries installed. But if you have a large database and filestore, you may want to consider installing the patch during a time when you can plan for taking Vault offline for awhile.

Those are the highlights. It wasn't as bad as it sounded when I first saw the warnings. I just let myself get too intimidated by those red letters that suddenly seemed 10 feet tall and screaming "YOU CAN'T DO THIS INSTALL! YOU ARE FOUND WANTING!"

So there's another lesson in technology. Be prudent, but don't be afraid.

And if you have to, check the readme file. You don't even have to admit it to anyone. :-)

P.S. I'm taking a couple of days off to do some volunteer time setting up for the Planes of Fame Airshow in Chino, Ca.

THere are giong to be some hectic days, while I quit geeking out over new tech to geek out over old tech. I probably won't be blogging for a couple of days, but I'll post a link to some pictures when it's all done!

Sunday, May 09, 2010

Hatches? We Don't Need New Stinkin' Hatches?


“The biggest difference between time and space is that you can't reuse time”

Merrick Furst quotes


I sometimes find that the coolest new stuff in Inventor is sometimes what appears to be the simplest.

One of those subtle tools is Inventor's ability to reuse hatches patterns from AutoCAD.

I've reused an AutoCAD hatch in the dovetails
(click to enlarge)

For background, AutoCAD stores it's hatch patterns as a file with a *.pat extension.

Now, all you have to do is browse from Inventor to one of those hatch files, and viola! You can reuse those hatches in Inventor! No trying to figure out how to recreate them, or opening an Inventor dwg in AutoCAD to reuse the hatches in AutoCAD

It's all there in one nice little package!

But enough writing about it! Here's a quick video on the actual doing!

Sunday, May 02, 2010

From Art to Part. New 3D Printing Export Options in Inventor 2011


“We now know a thousand ways not to build a light bulb”

Thomas Alva Edison


With the 2011 release of Autodesk Inventor, the pace picks up. I've been out migrating databases, testing hardware, and installing software. It definitely means a little less time to blog, but I do enjoy getting out there and learning new things.

On this Sunday evening, I took a few minutes to review the 'New Features Workshop' in Inventor, and see what new features that might be in there, but not getting lost among the other great features.

One of these is the export to 3D Print Service Option.

Back when I was in industry, we used Stereo Lithography models constantly for things like fit and function test, customer proposals, and in one instance, even to create a master for investment casting.

Even ten years later, I still have a huge appreciation for the technology, and I'm constantly amazed to see how much the technology has evolved in that time.

In this release of Inventor, Autodesk has added some settings that really embrace the technology. Here's a quick video I put together on exporting to an STL Model.


And if you want more information on 3D printing technology, here's a video I grabbed from Youtube that shows the process pretty well.


This particular video was created by OBJET, but there are many technologies to choose from, such as SLS (Stereo Laser Sintering), as well as machines using a variety of plastics and powders.

There are also companies that provide this as a service, such as Peak Solutions LLC. With service bureaus avaiable, you don't even need to invest in the machine!

So whether you've been using this technology for years, or just getting used to it, Inventor is more ready than ever to create the models!