Find us on Google+ September 2015 ~ Inventor Tales

Saturday, September 26, 2015

The (Bald) Eagle has Landed

I think I'm quite ready for another adventure."
Bilbo Baggins - Return of the King


Time to find out what's over that hill. 
This week is a short post to announce that I'm joining Can Lines Engineering as a Mechanical Engineer.

I'm looking forward to getting back into a design and manufacturing again.

I'm sure it's going to be a new adventure full of new challenges and learning experiences.

I'm hoping to "relaunch" InventorTales as a part of this, and share new tips and new experiences.

Stay tuned!


Photo Credit

photo credit: Nick via photopin (license)

Friday, September 18, 2015

A Visit to Westec 2015!

I've had some time on my hands while I've been on the job market, so I decided to take a drive to the Los Angeles Convention Center and spend a short time at Westec 2015.  

A little tech in action
There was some pretty cool technology there!   

The first machine I saw was a waterjet machine made by Flow Waterjet.  It's been a little while since I've had any interation with one, but the most interesting thing I learned was that the taper (caused by the waterjet spreading out as it cuts through the material) has been eliminated by automatically tapering the head.

I also made a trip to see if there were any 3D printing companies there.  I did find the 3D Systems booth.  Most of the things I have seen before.  But it's always an amazing technology to see.  There's a certain Zen I find watching the machine build,   And the things have gotten much more amazing since I last saw it in the early 2000s. 


And seeing how it's a show for machine tools, I had to see a few more "traditional" CNC machines.  I only call it traditional because they're probably the oldest technology there, but event that technology evolves constantly.  

I was able to get a pretty good video at the Datron booth of a machine running toolpaths.  I wish I had gotten there when it was cutting the part instead of repeating the path over a finished part, but I'm sure aluminum billet gets expensive after a while.  Not to mention cleanup!  


Finally, I did swing by the Autodesk booth where they were showing Autodesk Inventor HSM and HSM Works.   As a long time CAD jockey, I can say that it's strange to see Solidworks running in an Autodesk booth!   But this is life in the modern era.  Autodesk is a Solidworks supplier after all. 

The Autodesk booth was like this all day! 
They were making parts on a Haas CNC machine, and they were getting a lot of attention.  I could barely get room to get the video! 


I was really amazed at how crowded the show was.  It was a zoo!  Which is great for the vendors.  I'm glad they're busy.  It took me nearly 45 minutes and repeated flybys of the SolidCAM booth before I was able to talk to a friend for 10 minutes.

But all in all, it was a good show.  I just wish I'd been able to grab a few more pictures and videos! 

And by the way, if you ever have a chance to swing by a trade show in your industry, I encourage you to do it!  You don't have to spend all day, you don't have to become the "turtle person" who is weighed down by twelve bags full of t-shirts, pens, and squeezy stress balls.

But see what's out there, and see what you thought was state of the art, may have past into history while you were hunched over your desk in the cubicle farm.

Technology will march on!  And it won't wait for you to make sure you packed a lunch. 

Monday, September 07, 2015

When is it the Right Time to Buy the Right Tool?

Recently I had the experience of changing my own front brake pads again on my runabout, the 2007 PT Cruiser.

A typical caliper for disc brakes. 


In the last couple of years, my schedule has been busy enough where it's been easier to take it to the shop, and pay someone else to do it.  But I decided to do it myself this particular day, because I missed that certain Zen I get when I work with my hands.  

The steps to change brake pads isn't a hard one.  It's a matter of jacking up the car, taking a tire off, removing the caliper, swapping the brake pads, and reversing the steps.

You can find the basic steps here. 

But there's always one step that makes it a little tricky.  

The calipers, which press the pads against the rotor to slow the car, are extended because the old pads are worn down.

One of my old pads vs the new.  You can say I got my money's worth! 


That means that getting the new pads to fit around the rotors, which means compressing the caliper piston, which means using a tool, improvised or otherwise. 

Many years ago, when I was a broke college student and would spend hours working on my own car, I would wrangle a the calipers open using a combination wrench or a screwdriver as a pry bar.  This usually included a lot of grumbling as I balanced the caliper in my hand an tried to get leverage with whatever improvised tool I was using.

One day, I was having one of those "garage conversations" with an old mechanic laughing about opening calipers.  He reached into his toolbox and said "buy one of these".  And showed me a caliper opener.

I bought one that same day.

Although there different styles for this tool, the one I purchased nearly twenty years ago uses a screw and scissor mechanism.  Not unlike the scissor jacks included with most modern cars.

The piston compressing tool ready for action
By twisting the screw, the scissors open, and the caliper piston compresses.

It has reduced both the time, and aggravation of getting the calipers open.

You may have guessed that the moral of my story is "have the right tool for the job".  As a matter of fact, I've written a post on a very similar vein before.

But that's not always part of it.  Many times, there always a "better tool".  But in order to enjoy the savings of the tool, you have to spend the money on the tool.

I'm sure there are a few of you who are thinking, "that tool is a waste of money, an improvised pry bar will work just fine!"

Are they wrong?  I don't think they are.  It's a choice they've made based on their own unique experience.

The other question?  Is there enough benefit to having that tool to justify the investment?  

That's the big question that has to be answered.  Depending on your tool, ROI calculators may be available, but do they tell the entire story.

Some other things that might be worth considering.

  • How often will you use the tool?  Are you going to use the tool every day?  Every few months?  Or "Who knows when the next time will be?"  The more use you get out of the tool, the better off you'll be. 
  • How much time does it save? If it's saving you 5 minutes every 2 years, and costs thousands of dollars, it's not as wise of an investment as something that costs a few hundred dollars and saves thirty minutes every few weeks. 
  • How much frustration does it save you? Are you, or one of your coworkers cursing a blue streak while trying to "make it work"?  Someone who's frustrated can make other costly mistakes.  That frustration can even seep into other projects. 
  • There's never time to do it right, but there's always time to do it twice! In other words, how much does it cost *not* to have the right tool? Are you scrapping parts because it takes more than one try to do what the right tool could do once?  Scrap costs money too. 
The right tool can turn a frustrating job into a "cakewalk",  But at the same time, buying a tool "to have it" can get expensive quickly. 

Whether it's a caliper opener costing 15 US Dollars, a CNC machine costing 100,000 US Dollars, or a CAD Program costing 10,000 US Dollars, it's not always a simple decision.  

From the wrench to the CNC machine in the background, every tool has to
make more than it cost to make its purchase worth while.
Image courtesy KRF Machine
That's where consideration, analysis, and a large dose of experience have to combined to decide when the time is right to make that investment. 

Photo Credits:

photo credit: Primed Caliper via photopin (license)


Tuesday, September 01, 2015

My Test Drive of a 3Dconnexion CadMouse

The last few weeks I've had an opportunity to test drive the new CadMouse from 3Dconnexion.

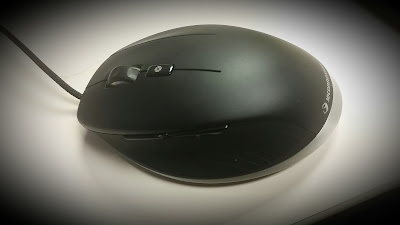
The guest of honor for this post. 
Color me impressed.   Very impressed. Here's why.

Initial Impressions

Naturally, I had to inspect the mouse when I first freed it from it's packaging.  The feel is nice and solid, and it fits comfortably in my hand.

It was much bigger than my current go to mouse, a Logitech Anywhere Mouse MX.  Which I am a big fan of, incidentally.

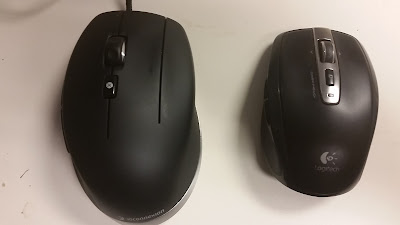
My CadMouse on the left, my Anywhere MX mouse on the right. 

As I inspected the buttons, I quickly noticed there are three mouse buttons, plus a wheel, plus a gesture button.  On top of that, there are two additional buttons on the side.


  1. Side buttons
  2. Left button
  3. Middle button
  4. Right button
  5. Scroll wheel
  6. Gesture Button


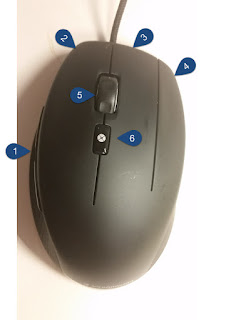
Each button has its purpose. And you can control that purpose
The Test Drive

Installing  the driver, was pretty easy.  Having my laptop recently go back for repairs, I had to reinstall my drivers. But after a quick download, a few clicks and a little waiting over a cup of coffee, and it's ready to go.

Next it's time for the rubber to meet the road.  Drive it!

I purposefully ran without my usual SpacePilot Pro.  I didn't want to use it as a crutch and skew my opinion of the CadMouse.

So in I dove into Autodesk Inventor with the CadMouse alone.

The first thing I fell in love with was the wheel.  As much as I love my Anywhere mouse, I hate the scroll wheel for panning.  It's great for non-CAD applications.  But for double clicking to "Zoom Extents" in Inventor with the Anywhere mouse?  Forget it.  I programmed the menu button to duplicate the middle mouse so I could zoom and pan with that.

The CadMouse on the other hand, works beautifully for scrolling and panning. That alone is a big winner for me. It's designed for CAD users, nuff said.

The rest of the buttons are smooth, and work nicely.  I customized the extra middle mouse button as the "F4" key, so I can use that as a shortcut to access my orbit tools.

The Gesture button is a nice tool.  It places commands on a "Heads Up Menu" that you can customize.  I haven't had a chance to really customize it, but I see it as a great way supplement the commands on Inventor's marking menus.

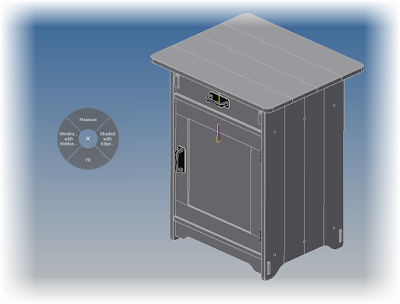
The gesture menu in Autodesk Inventor.  And it can be customized.


The "Side Buttons" are set to Zoom in and Out by default.  I've changed them to Undo and Redo.  Since those are tools I use often.  I'm content to scroll with the mouse wheel.

And as for that optional mouse pad.  It's not a necessity to use it with the mouse.  The CadMouse works great on the surfaces I've used.  This includes tables made out of plastic laminate and my mahogany coffee table.

3Dconnexion also included the optional mouse pad.  The first thing I noticed about this is it's about the size of a small helipad at 350mm x 250mm (13.75 inches x  9.875 inches).

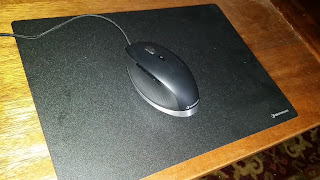
The mouse pad has plenty of room! 
While not required to use the CadMouse, the mouse pad makes the CadMouse just glide.  It's like having a great car on the urban freeway, versus having the right car on a wide open country road.

I do recommend the mouse pad for the desk at home, although it might be a little tough to travel with.

The "Drawbacks"

I really can't find much to say is "bad" about it.  I always feel I have to find "something" to have a proper review, but I'm really splitting hairs.  I had to try to find something.

The cord sometimes gets in my way. Due to the fact I'm very mobile and always have it connected to a laptop, I tend to have a lot of extra slack. Wireless might be nice, but in a few seconds, I can arrange the cord so it's not in my way.

And because it's corded.  No batteries to change!

.But that's a minor complaint, really.  If the cord is the best I can come up with, then I have a collection of nits I'd love for you to pick through.

At 100 US Dollars, it costs more than a many mice.  So sticker shock might be an issue.  But if much of your job is driving a CAD machine, this is an investment that will pay off quickly, especially with the ability to customize the buttons.

The Summary

The CadMouse is great.  That's all there is to it.  3Dconnexion put some thought into it, and it shows.  I've thoroughly enjoyed the time I've had with it so far, and I'm looking forward to getting some more time with it.

If you're in the market for a new mouse, I think you should seriously consider the CadMouse as an option.  You're doing yourself a disservice by not taking a look.

Next, I'll be customizing the buttons even further.  Not to mention connecting my SpacePilot again!