I once saw a graph that showed the cost of making a change in the CAD model vs further down in the product design cycle
 |
Spoiler alert! It gets more expensive as you move from design, to prototype, to production.
One need only to cases like the Takata airbag recall, or Boeing 737 Max grounding or the impact of the impact of a a production level design change in in money, company reputation, and tragically, in lives lost.
But I'm not here to write about such heavy topics. The example I'm choosing to document is a much lower stakes version of the same thing. It's just a basic hobbyist example that at worst, is inconvenient and marginally embarrassing.
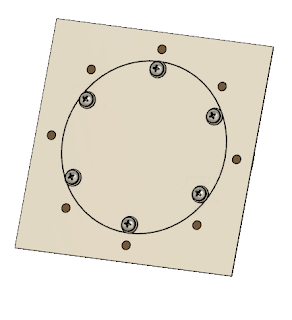
It's an access panel based on something you'd find on an aircraft. It's a concept for a potential future hobby project. I built one back when I was in school.
So I happily modeled away in Fusion 360, creating sheet metal parts and placing fasteners from McMaster Carr.
After spending a couple of evenings of casual modeling, I was done! I took that moment we all love, I leaned back, looked at my work proudly, then prepared one last check before I took my little victory lap.
 |
| The completed inspection hangar, or so I thought... |
And that's when I saw it.
The countersunk rivets I had installed were the wrong ones. I'm not sure how I missed it initially, but obviously I did.
So first, what's wrong with the rivet?
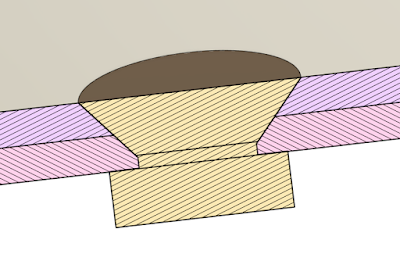
It's a rivet with a 78 degree countersink, which means the countersink extends to the second sheet of metal being riveted. This is a big no-no. When the countersink extends into the second piece of metal, the larger hole required in the first sheet of metal makes for a weaker joint.
 |
| The wrong rivet. I did match the countersink angle to match the rivet for clarification. |
 |
| The incorrect rivet for this application. The countersink angle is too steep |
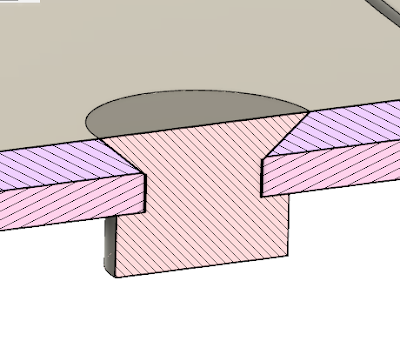
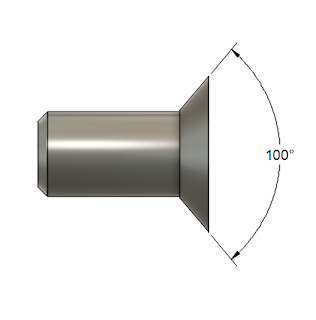
The correct rivet is a 100 degree rivet. The shallower angle prevents the head from punching into the second sheet of metal. That means a stronger, and safer joint.
 |
| The 100 degree rivet, the correct one for this application. I know in the model the rivet does appear to just clip the second sheet. But past experience has taught me that this combination does work. |
 |
| The shallower angle of the 100 degre countersink makes a stronger joint |
So that's the technical aspect of it, what's the other lesson?
I suppose the first lesson is make sure to check the hardware before you put it in. But we all make mistakes. That's where double checking comes in.
A final check can help prevent the last little "oops" from slipping through. Even though we can't eliminate them all, we can reduce them with a little time.
For those of us working in industry, a second set of eyes never hurts. In some places, multiple checks on a drawing are required. It's not a bad practice at all, one I think should be taken advantage of whenever possible.
Some may argue it takes time, but it takes much less time than undoing a costly mistake.
I've worked in maintenance shops where "second eyes" is a standard policy on items such as fuel system repairs. In other words, the person performing the work checks his work, and then a second technician or inspector checks it again. There often are even signatures required to prove that this step was performed.
But that's it for today's anecdote. I re-learned a few lessons in a safe environment where the only bruise was to my pride.
I hope you can take a few lessons from this musing, and keep making cool stuff!
About the Author:
Jonathan Landeros is a degreed Mechanical Engineer and certified Aircraft Maintenance Techncian. He designs in Autodesk Inventor, Siemens NX, at work, and Autodesk Fusion 360 for home projects.
For fun he cycles, snowboards, and turns wrenches on aircraft.
Additional Resources:
A nice rundown on different types of rivets by- Hanson Rivet and Supply
A wealth of knowledge on general airframe repairs (start at page 4-31 for the Riveting Section) -Aviation Maintenance Technician Handbook
Standard Parts Used on this Project.
.125 Diameter, 78 Degree Solid Rivet (The Wrong One) - McMaster Carr Part Number 97483A075
.125 Diameter, 100 Degree Solid Rivet (The Right One) - McMaster Carr Part Number 96685A170
10-32 Floating Nut Plate - McMaster Carr Part Number 90857A129
.094 Diameter Rivet (to Fasten Nut Plate) - McMaster Carr Part Number 96685A143
#10 Flat Washer - McMaster Carr Part Number 92141A011
10-32 Pan Head Phillips Screw - McMaster Carr Part Number 91772A826

