Find us on Google+ Inventor Tales: Humor in Technology
Showing posts with label Humor in Technology. Show all posts

Sunday, September 13, 2020

Double Checking Your Work and Subverting Mr. Murphy

I once saw a graph that showed the cost of making a change in the CAD model vs  further down in the product design cycle


Spoiler alert! It gets more expensive as you move from design, to prototype, to production.  

One need only to cases like the Takata airbag recall, or Boeing 737 Max grounding or the impact of the impact of a a production level design change in in money, company reputation, and tragically, in lives lost. 

But I'm not here to write about such heavy topics. The example I'm choosing to document is a much lower stakes version of the same thing.  It's just a basic hobbyist example that at worst, is inconvenient and marginally embarrassing.

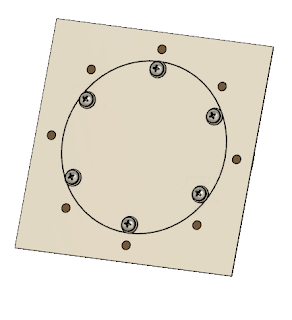
It's an access panel based on something you'd find on an aircraft. It's a concept for a potential future hobby project. I built one back when I was in school.

So I happily modeled away in Fusion 360, creating sheet metal parts and placing fasteners from McMaster Carr

After spending a couple of evenings of casual modeling, I was done! I took that moment we all love, I leaned back, looked at my work proudly, then prepared one last check before I took my little victory lap.

The completed inspection hangar, or so I thought...

And that's when I saw it. 

The countersunk rivets I had installed were the wrong ones. I'm not sure how I missed it initially, but obviously I did. 

So first, what's wrong with the rivet? 

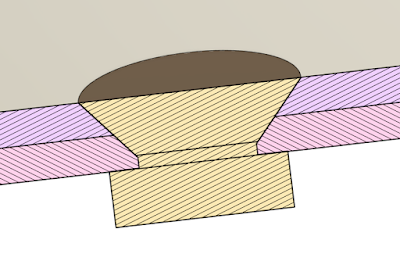
It's a rivet with a 78 degree countersink, which means the countersink extends to the second sheet of metal being riveted.  This is a big no-no. When the countersink extends into the second piece of metal, the larger hole required in the first sheet of metal makes for a weaker joint.

The wrong rivet. I did match the countersink angle to match the rivet for clarification.


The incorrect rivet for this application. The countersink angle is too steep


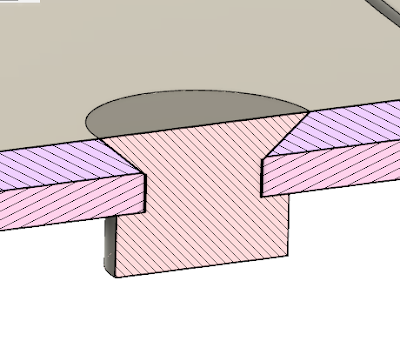
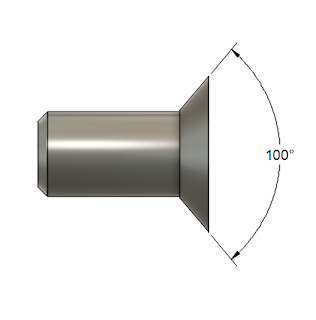
The correct rivet is a 100 degree rivet. The shallower angle prevents the head from punching into the second sheet of metal. That means a stronger, and safer joint.

The 100 degree rivet, the correct one for this application. 
I know in the model the rivet does appear to just clip the second sheet.
But past experience has taught me that this combination does work.

The shallower angle of the 100 degre countersink makes a stronger joint

So that's the technical aspect of it, what's the other lesson?

I suppose the first lesson is make sure to check the hardware before you put it in. But we all make mistakes. That's where double checking comes in. 

A final check can help prevent the last little "oops" from slipping through. Even though we can't eliminate them all, we can reduce them with a little time. 

For those of us working in industry, a second set of eyes never hurts. In some places, multiple checks on a drawing are required. It's not a bad practice at all, one I think should be taken advantage of whenever possible. 

Some may argue it takes time, but it takes much less time than undoing a costly mistake. 

I've worked in maintenance shops where "second eyes" is a standard policy on items such as fuel system repairs. In other words, the person performing the work checks his work, and then a second technician or inspector checks it again. There often are even signatures required to prove that this step was performed. 

But that's it for today's anecdote. I re-learned a few lessons in a safe environment where the only bruise was to my pride. 

I hope you can take a few lessons from this musing, and keep making cool stuff! 

About the Author:

Jonathan Landeros is a degreed Mechanical Engineer and certified Aircraft Maintenance Techncian. He designs in Autodesk Inventor, Siemens NX, at work, and Autodesk Fusion 360 for home projects. 

For fun he cycles, snowboards, and turns wrenches on aircraft. 


Additional Resources: 

A nice  rundown on different types of rivets by- Hanson Rivet and Supply

A wealth of knowledge on general airframe repairs (start at page 4-31 for the Riveting Section) -Aviation Maintenance Technician Handbook 

Standard Parts Used on this Project.

.125 Diameter, 78 Degree Solid Rivet (The Wrong One) - McMaster Carr Part Number 97483A075

.125 Diameter, 100 Degree Solid Rivet (The Right One) - McMaster Carr Part Number 96685A170

10-32 Floating Nut Plate - McMaster Carr Part Number 90857A129

.094 Diameter Rivet (to Fasten Nut Plate) - McMaster Carr Part Number 96685A143

#10 Flat Washer - McMaster Carr Part Number 92141A011

10-32 Pan Head Phillips Screw - McMaster Carr Part Number 91772A826


Wednesday, March 20, 2019

Thank Goodness for Fusion 360's Document Recovery!

I start work pretty early this morning, 6AM to be precise.  
Coffee..  The "Go-Juice to start
any day.

That means I usually get up around 4:30, get dressed, and make a little coffee to prime the pumps, so to speak. 

If I have time, I read a little news on the computer before jumping in the car and braving the Los Angeles traffic. 

This morning, I my laptop announced that Windows needed to install an update and restart.  Just as I was leaving for work, I told Windows to go ahead run through the update process. 

I knew I had saved all my documents... Including that Fusion 360 part I had been working on the night before.  Of course I saved....  right????  RIGHT???
Sure enough.  At lunch, I open up Fusion 360  to take a look at my part.  I'm going to bathe in the the power of the cloud and all the power of accessibility it grants me! 

And I see a blank screen when I open my document.  That part I was so sure I had saved???? I hadn't.  

I mentally shrug and accept that I'll have to redraw the part.  It wasn't complicated and it will only take a few minutes to recreate.  But still, the CAD version of "Groundhog Day" is never fun. 

Once I get home, I opened up Fusion 360, considering recreating my geometry, and with the voice of angels, the document recovery screen appears. 

And it includes the part I had forgotten to save! 

The File Recovery screen. Note this image doesn't contain
the filename for my recovered file. In my excitement, I had already recovered it.
I didn't have the courage to try to re-break it to see if it would recover again.
All I had to do was right click, choose open, and bask in the joyful joy-ness of File Recovery.  

File Recovery pops up when there are files auto-saved on your computer.  It's a handy reminder there is potential data that can be salvaged. 

It can also be manually by choosing the "Recover Documents" option from the File pulldown. 

Locating the "Recover Documents" screen manually

Regardless whether or not it's access at startup, or manually from the pulldown, it can be a great way to recover lost work in case of computer/software crash, or if, as in my case, a forgotten file save!

Boy am I glad I didn't have to rebuild this geometry!
(note the part name states its "Recovered"


Additional Photo Credits

photo credit: wuestenigel What's the worst thing that could happen? via photopin (license)

Sunday, December 10, 2017

Lessons from the Real World - The Folly of Ignoring the 7Ps

There's an old saying about the "7 Ps".  To put it bluntly, the 7 Ps are: " Proper, Prior, Planning, Prevents, Piss, Poor, Performance".  I remember my Father mention mentioning it in reference to his old U.S. Navy days.

But last week, I made the mistake of ignoring the "7 Ps".  I allowed myself to fall victim to the perfect storm of laziness and complacency.  The true frustration of the situation was that I was left with nobody to blame but myself. 

Unfortunately, there's no pony to blame this time.
It was simply: My. Own. Damn. Fault.

It started with my girlfriend's car due for an oil change.  It's automotive maintenance that I've done for about 30 years.  I can do it in my sleep.  Which introduces the first demon to the equation.  Complacency.

I had the oil, I had the filter, all I had to do was get my girlfriend to leave me her car so I could change the oil.  I can do it in about 20-30 minutes, and that's taking my time to make sure I do it right.

No problem, right?  Well, remember that demon of complacency I welcomed into my world?

My girlfriend takes my truck to work so I can work on her car, easy money, as they say.  So I grab  the oil, and grab a few tools out of my toolbox, and get started.

Sure, I grab the drain pan, and the required tools, I have the oil drained in no time.  Then I realize I left the oil in the house, so I go inside to get that.  While I'm at it , I grab a few extra paper towels, I don't have enough in the garage.

The second demon of laziness has joined the party, I was too lazy to gather up everything I needed ahead of time.

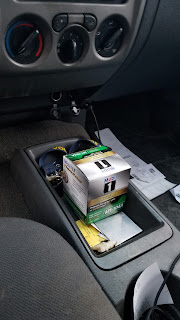
The oil filter, safe on the center
console of my truck
So I move on and remove the oil filter, and realize I need to go the the oil filter too.

And that's when it dawns on me, the oil filter is in the truck.  The truck that my girlfriend took to work!

So with the oil now drained out of my girlfriend's car, I ended up taking a lovely stroll to the nearby parts store to purchase another filter.   It was on that stroll through my fine town that I was able to contemplate my mistake.

Thankfully, it wasn't long before I had completed the job.  I had to take a moment to sit down and have a laugh at my own expense. 

So what was the lesson, and the point of writing this out?  What did I learn on my Hobbit like unexpected journey to the parts store?

I realized that I had become so intent on executing my plan, I didn't actually have a plan.  It was really more of a goal of changing oil, with the execution limited to "I'm going to do some "mechanic" stuff!" in the middle.

Normally, I lay everything out before I get started, should it be a tool, a filter, or fresh oil, it's right there when I needed it.

But this time, I broke that routine.  I still had oil in the house, not all the paper towels I needed, and fatefully, the filter in a car that wasn't there.  I found myself making extra trips to get supplies that I didn't have laid out.

Had I laid everything out like I normally do, I would have realized I didn't have the filter and could have easily fixed the problem before getting started.

But I didn't, I started before I had everything laid out, and paid the price.

I think that happens to many of us in our endeavors.  We want to see action and measurable progress, so we jump to the execution stage, neglecting the planning, or "laying out your tools and supplies".

And we end up seeing action alright!  We end up acting, and then we end up reacting as we redo our efforts and end up having to adapt to challenges that a little extra planning may have foreseen.  We "take that walk to the parts store".

I'll be sure not to let this mistake be made in vain.  The next oil change, I'll have everything right where I need it, like I have in the past.  It will be a final "sanity check" to make sure I'm truly ready to execute.

And I'll be taking that lessons to other projects in my life, making sure to put the extra effort into minding those "7Ps" next time!

Please learn from my mistake, don't fall into the trap I fell into!


Don't confuse action with progress!

Sunday, June 25, 2017

Aircraft Maintenance Class - A Milestone Reached... But Why?

The instructional airframes that taught me many lessons.
June 16th 2017 marked a big date for me.  I completed the airframe portion of my aircraft maintenance curriculum.  It's been a long time in coming for sure!

In the 750 hours the FAA required of me, I've covered everything from safety wire, to hydraulic to safety wire, and everything in between.

Now I'm not racing through 18 hour days between work and school, I have time to answer a few questions I seem to be asked.

"Why are you taking aircraft maintenance classes?"

I know I'm supposed to have some sort of awe inspiring, motivational answer.

But the truth of the matter is, I did it because I like airplanes, and when the time came to expand my skill set, I decided to accomplish that by jumping feet first into something I've always liked.

And what resulted was an ongoing journey that has been difficult, exhausting, frustrating, and most of all, rewarding.

I learned many lessons that I've been able to apply to my work as a mechanical designer.

So that's my story.  I'm hoping to find a little time to blog about my ongoing lessons, as well as dive back into Fusion 360 and share a few of those lessons there as well!

Sunday, February 19, 2017

When is "O" a "0"? - A Lesson Learned!

So here I am.  I've finished my course in aircraft electrical theory, now I have a week off before I start off into hydraulic and pneumatic systems.

My mentor and my nemesis.  The electrical trainer.
The instructor didn't let us use lights so we couldn't cheat! 
That gives me a little time to work  in Fusion 360 again, and I took the opportunity to build 3D model of a spar for a PT-17 Steerman biplane.

A PT-17 Steerman
By USN - scan from Robert L. Lawson (ed.): The History of US Naval Air Power. The Military Press, New York (USA), 1985. ISBN 0-517-414813, p. 72. US Navy cited as source., Public Domain, https://commons.wikimedia.org/w/index.php?curid=8046360

The modeling itself isn't very difficult, but my goal was to focus on the process of designing in Fusion 360, instead of focusing on the design itself.

I've purchased a subscription to a set of plans via my membership to AirCorps Library (A great resource BTW),.  They have a digitized copies of the spar, so I have a template to work from

The spar, being made of wood, has metal bushings pressed into it, and there lays the seeds of my error.

The spar modeled in Fusion 360, with the bushings assembled in.

The bushings are listed in tables, your typical "A" "B" columns with numbers.

But written in one of the columns was a suspicious looking "O".   It had to mean the number "0".  You know.  Zed. Naught.

An example of the "O" that got me. 
Confident in my conclusion of the figure's value, I modeled the bushing without a hole in it.

But as I my design progressed, I came to realize something.  That's not the number "0"!  That's the le letter "O".  As in a "letter O drill"!.

A letter "O" drill has a diameter of .316.  You can find it on any Imperial system drill chart.  Like this one here.

Fortunately, Fusion 360 did let me remedy that issue pretty fast.  But it did provide me a few moments of humor of what I saw, versus what the drawing meant.

Some of you may be thrown a mocking laugh, chuckle, or perhaps a guffaw in my general direction.  And I can't say I blame you.  Looking at the plans, the quotes around the letter should have implied it wasn't the number "0".

It also seemed odd to me that there would be a metal pin pressed into the wooden structure, but I shrugged it off as being a reinforcing pin.  It was only when I studied the assembly plans a little closer did I see that the bushing did have a hole in it.

I choose to blame it on the early hour of the morning (it was 5AM), and the coffee having yet to fully clear the fog in my brain.

So what have I learned?  And perhaps, what can you learn from my mistake?

  1. It pays to know how something is built.  Even though I missed the mark initially, it did finally dawn on me that the drawing called out a letter "O" drill.  Had I not drilled my own holes, and known that drills can be called out by letters, I may have shaken my fist and accused the drawing of being wrong. 
  2. Try to use your common sense.  I should have double checked the bushing against the assembly when I had my initial doubt.  It did clearly show the bushing as having a hole.  That might have tipped me off. 
  3. Try to understand how the drawing is meant to be interpreted.  This drawing was originally made in the 1930s.  It's format is much different than the drawings I use at work today.  Things considered obsolete in 2017, like fractions and certain styles of notes, were the standard when this drawing was created. 
  4. If you think that bullet 3 is a bit of a stretch, there are places that maintain drawings for decades.  Even at work we have drawings from the 1970s that look more like the drawing from the 1930s than the 2000s. 
  5. You're going to learn something new everyday.  Embrace it! 
So there are my lessons!  Thankfully, it's a small error, easily corrected, and with a lot to teach!   

Learn from my mistakes, and keep an open mind to the lessons our profession has to teach! 

Friday, January 03, 2014

WHAT DID I JUST DELETE?!? - Recovering a Deleted File from Dropbox

I am prepared for the worst, but hope for the best.
Benjamin Disraeli

Over a year ago, I created a "poor man's" Autodesk Vault backup scheme using my Dropbox account. 

In short, my Vault Data is backed up to a folder that syncs to my Dropbox account, creating a simple cloud backup. 

Information on how I did that are found in my post here.
 
I've been using it for a year, and it's worked great.  I've never had a problem with it.

That is until now....

First, this wasn't a problem with the scripts, my internet connection, or Dropbox. 

Each one of these tools worked flawlessly. 

It was the user (that's me!) who screwed this up!


So what did the user do? 

I had to restore a different Vault Database and Filestore for a customer test.  I ran the backup, which actually failed because I didn't have enough disk space. 

But that, is a separate issue.

The rub? I neglected to make sure I had a safe backup of my own Vault data in a safe place. 

So what happened?

My scripts ran just like they were set to.  They removed the data from my dropbox folder, in order to make it ready to be replaced by a new backup....

Which was never made due to the failed backup of customer data...

And my cloud Vault backup was destroyed.

Had I really just effectively killed all my personal Vault data? 

Thankfully, no.  Lucky for me, Dropbox has a way to restore lost data.

First, browse to the folder where the data was, and choose "Show Deleted Files"


A list of the deleted files will be displayed.  Now right click on the files to be restored, and choose "Restore"!


Now the files are resurrected, and all is good again! 

Needless to say, that backup is now residing in a safe, safe place!  

For the full instructions on recovering a file deleted from Dropbox, check out their help at the link HERE!  There's more than one way to do it!


Friday, March 08, 2013

3D Printing Meets High Fashion. A 3D Printed Gown

“The fashion of the time is changed”
William Shakespeare

I decided to close this weeks blog with something from the 3D printing world that I found pretty interesting, and not just because of the "high fashion" aspect.

The first time I saw a 3D printing machine was back in about 2000 or so.  The material was expensive, fragile, and by today's standards, difficult to work with. 

And although I haven't worked closely with a 3D printing machine in years, I'm still fascinated by the technology, and watch with bated breath as 3D printers become more mainstream, and accessible to the average person.  

Earlier this week, I ran across an article talking about how the model Dita Von Teese wore a gown that was actually printed on a 3D printing machine. 

The article can be read here

Go ahead and make your jokes about the article being intereting because of the super model angle........... Okay!

The subject matter aside, the idea that a wearable garment can be printed and worn by someone.  Just think of the possibilities. 

Need a splint, cast, or sling?  Print it! 

Does someone need a special harness, mount, or accessory?  Print it!  

True, the technology may have to mature some more, but it's come a long way already.  It's amazing what can be done today, I'm looking forward to what they might be able to do in the near future.


Friday, December 07, 2012

Autodesk Vault 2013 and Microsoft .Net 4.5 - Not Cool Together


“Never, never, never, never, never! Pray you, undo this button.”
William Shakespeare

Earlier this week, after attending Autodesk University 2012, I decided to install Visual Studio Express, so I could go ahead and try my hand at the Autodesk Inventor API.

The download went fine, and soon I was installing away.

As the progress bar cruised along, I noticed one message, "Installing Microsoft .NET Framework 4.5".

I wonder if that's a good idea?  I thought.  But I dismissed it.  I was going to lunch, and my mind was elsewhere. Like food.

When I returned to the office.  Visual Studio was merrily installed.  All was good in the Kingdom of Laptop.

I wasn't going to be able to work with Visual Studio, so I moved on and worked on other projects.

Eventually, that other project led me to look for some files out of my installation of Autodesk Vault 2013. 


These are my files, as last left.
I open up the folder where I know the files are, and......... Nothing.  No files appear.  NOTHING! 

Imagine the camera panning away from me as I scream: "NOOOOOOO!"

Now all I see is this!

 I have that sinking feeling.  Did the files get deleted?  This my personal Vault.  Nobody else accesses it.  And I didn't delete them.

On a hunch, I change from Detail to Icon view.   My files appear!  They're still there!


But why won't they show in the Detail View?

Suddenly I remember.  .NET Framework 4.5.....  The tingle in the back of my neck was trying to tell me something.  I remember it's not a good idea to install it with Vault!
 
All is NOT well in the Kingdom of Laptop.

 Fortunately, I had a restore point and was able to "hit the eject button" and return to a state before Visual Studio.

Needless to say, if you're running Autodesk Vault 2013.  Stay away from .Microsoft .NET 4.5.

I don't know that .NET 4.5 is bad.  As a matter of fact I doubt it.  All I know is that it doesn't play well with Autodesk Vault 2013.  I wouldn't expect it's going to play well with earlier versions either.

So until Vault supports .NET 4.5, stay safe, stay away.  

Don't do what I did!

****EDIT 2-August-2013 ****

I'm a bit late in updating this, I'm afraid it slipped by me.  But Service Pack 1 for Autodesk Vault 2013 addes support for .Net 4.5!  So if you're seeing this issue, make sure Service Pack 1 is installed.

It a can be downloaded at the link here!

Friday, November 02, 2012

For a Little More Fun! - Modeling a 10 sided die!

“The dice of Zeus always fall luckily.”
Sophocles

After creating the 20 sided die in my post last week, I decided to embrace my inner geek even further and create another die of the standard gamers set.

This time I chose to create a model of the 10 sided die.

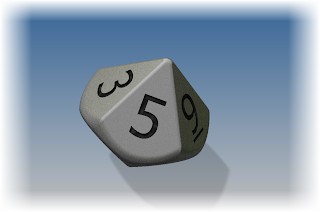
The finished 10 sided die
To add a little more fun, here's a new trick I'm trying.  Embedding a dwf of the die inside the webpage!  Try giving it a rotate and pan!


When I started to look at building this die, I found this model easier to create that the 20 sided die.  But even though I thought it was a little easier to create, I also found it had it's own set of challenges.  It took me a few tries before I got a result I was happy with.

I ended up using two lofts, and trimming the plane where they met to get the result.  I then added fillets to clean up the edges and get the result I was looking for. 

But, without further adieu, here are the steps! 

  • The first step was to create a single line on a sketch plane.  I'm going to use each end of the line as one end of two lofts I'm going to create. I also made sure that the midpoint of the line was placed at the origin.  This will let me use the origin workplanes to create sketches in my next steps.

The first line defining the top and bottom of the die.

  • Next I created a sketch on my origin plane, added a pentagon, and dimensioned it.

The additional sketch added.
  • Now I'm ready to loft between the two.  I choose the loft tool, and loft between the pentagon and one of the line's endpoints. 

Creating the loft

The finished loft

  • Before I started modeling, I looked at an image of a real die, I realized that the upper and lower halves were offset, so I couldn't use the same loft.  So I created a second pentagon, rotated from the first, and repeated the steps above.

Creating the second loft.  Notice how it's offset from the first.
  • Now I was left with sharp overhangs on the die that weren't going to work at all. It was time to clean those up!


The die before cleaning up.  Not pretty at all!
  • To clean up the sharp corners, I created a sketch where the two pentagons meet.  (Note I used slice graphics, just like in my previous post here).  I sketched a circle, then used Extrude with the intersect option remove the sharp corners.
Creating the feature for the Extrude commad


Extruding using the intersect option
  • Now the hard work is done.  All that is left is the tedious work of adding the numbers.

Adding the numbers to the die
  • And finally, using the fillet tool to round off the sharp corners!
All done!

 A quick rendering, in Autodesk Showcase, and I'm ready to go!


 Just like with the 20 sided die, below are two links where you can download the model if you'd like.  And just like before, all I ask is that you give a me a little nod if you decide to use the model.  Enjoy!

Download from Autodesk 360 

Download from GrabCAD (login required)

Friday, October 26, 2012

All for Fun – Creating a 20 Sided Die

Death and the dice level all distinctions.
Samuel Foote

Many years ago, I friend asked me to create multi-sided die for a website he was creating.  You can still see the images on the banner of the website for DiceHouse Games here.

It was a tricky one to create.  It was a 20 sided die, a much used tool in role playing games like Dungeons and Dragons.

An Autodesk Showcase Rendering of the 20 sided die model

I also used it as an example in a blog post for using the “Change View Orientation”  tool inside of Autodesk Inventor drawings back in February 2012.  

***Edit 13-Nov-2012 : Added an embedded dwf of the 20 sided die***


A 3D dwf of the 20 sided die

*** End Edit***
Since that time I’ve started getting requests for how I built the die, as well as a location to download the actual *.ipt file.  

So here are the steps on how I built the 20 sided die!  


1. I found the definition of a Icosahedron (a 20 sided polygon) on Wikipedia.


The construction figure that started it all!

2. I created three sketches on the XY, YZ, and XZ origin planes in Inventor


The three rectangles on each plane to create the framework

 
3. Next, I used a 3D sketch to connect the vertices together, must like in the Wikipedia image.  If you’re wondering, this did take quite a bit of time. 


The process of creating the skeleton


4. This becomes the skeleton where I create several boundary patches.  The boundary patches create the surfaces of the die using the “sketch skeleton”.    This was also pretty laborious!

Boundary patches created close surface that could be stitched.


5. I then stitched the surface.  Since it’s “watertight” (completely sealed), it becomes a solid.

Stitching the surfaces make it a solid
6. Now it I had to add all the numbers (which were extrusions), and fillet the sharp corners. That’s it, I was done!


The completed die

So in conclusion, this was a satisfying little project took a little bit of research to figure out how to construct it.  Once I figured out the process, the steps weren’t difficult, but it did take time and patience to execute. 
 
Placing the 3D wires lines took a lot of time, and more than once I had to correct a line I misplaced.  The boundary patches took less time, but putting in all the numbers was an exercise in patience too.
 

So because of the requests, I’m uploading the file to a couple of sites for download.  However, before you go grabbing the file, I make only one request.
 

I spent several hours of a Saturday figuring this out.  All I ask is if you use this model, give me a nod and a little credit for the time I put into it.  
 

Now for the download sites!
 

The first is my Autodesk 360 site: Click here for Autodesk 360 download
 

If you use the GrabCAD file sharing website, you can also log in and get it here:  Click here for GrabCAD download


Wednesday, September 19, 2012

Backing Up Autodesk Vault - On a Budget

“Back up my hard drive? How do I put it in reverse?”

I would be the first to say that we should all be making backups of our CAD data!

Do you think I follow my own advice?

Pffft!  No! 

Of course I have my excuses!
  1. My CAD Data isn't use for production, so it's not critical.
  2. I work in a highly mobile environment, and everything runs on my laptop.   That means I 'm not connected to a good backup server much of the time
  3. I'm too lazy to take 15 minutes to plug in my portable hard drive and copy my Vault Backup over to the drive. 
  4. The most famous, used by many; (wait for it). "It hasn't failed yet!"
Are these good excuses? 

Pffft! No!  

So if  the The Oatmeal's Famous "Tumbeasts" made an appearance and at my hard drive, I was out of luck.


Try passing this excuse off at work.


One day, I had an epiphany that was worthy of MacGyver.

I implemented it, and thus far it's been working well! 

First I had to take stock of my assets.
  • I already have a script that backs up my Autodesk Vault database and filestore that contains my CAD data. 
  • I have a Dropbox account that has more than enough room to accommodate my current backup
  • At my home, I have an old retired computer that I use as a data server, which also has plenty of room for my Vault database and filestore.
That's enough for me!

I created a new script that moves my backup file to a Dropbox folder.  In turn, that folder syncs up with my online Dropbox account, which is stored in the cloud.

My Vault Backup in my Dropbox Folder


BOOM!  Backup! 

Then, I setup my old data server to sync with my Dropbox account, so now I have a backup at home, as well as on online! 

BOOM!  Redundancy!  

I've been running this system for about a week now, and it's been working pretty well.  I've restored from it once already successfully

But just like everything it's got good and bad. 

First the good!
  • It's a simple and effective backup strategy, especially for the budget minded. 
  • By using Dropbox, I can sync the backup to multiple machines, they just have to be syncing to the Dropbox account.
Now the not so good!
  • Since this is a cloud backup, there needs to be sufficient bandwidth to support uploading and downloading potentially gigabytes of data.
  • Online storage accounts, such as Dropbox, Autodesk 360, and SkyDrive have limited storage capacity (typically a few gigabytes until you purchase more).  So monitoring usage can be important, especially as data gets larger.
Fortunately, my Vault data is about 750MB, so I have more than enough room in my Dropbox account (over 6GB), and I upload across a fiber optic line, so bandwidth isn't an issue for me, so this is effective for me.

In summary, this system probably isn't good for everybody, but for a small environment, with limited resources to purchase hardware and infrastructure, it may be exactly the ticket.

P.S.  I'm sure there are those of you might be wondering why I didn't use my Autodesk 360 account.  The reasons are simple.  I tried my Dropbox account first, and I'm too busy (read too lazy) to switch it over.  I could just as easily have used my Autodesk 360 account!

I hope this is a tip you might be able to use in your own environment!

Have another idea to create a backup like this on a budget, check out the comment section! 

Saturday, August 11, 2012

New on Autodesk Labs - Augmented Reality for Autodesk Showcase

I reject your reality and substitute my own.
Adam Savage

Edit by Jonathan Landeros

As of May 2013, The Augmented Reality Plugin for Autodesk Showcase has been retired.  I liked this plugin, and the post does state that it may be back at a later date. 

My fingers are crossed!


Shame on me for not updating this sooner, but things sometimes go into the archives, and collect dust.

******************
This earlier this week, an email flew about the KETIV Technologies office with the subject:  "Watch Autodesk Showcase blow your freaking mind".

The body of the email just said: "Watch the video!"

So I follow the link to Autodesk Labs, where it shows me an "Augmented Reality Plugin" for Autodesk Showcase.

So what is this Augmented Reality thing


There's some text talking about "the ability to overlay semantically in context information", but my mind interprets this as "Blah Blah Blabbity Blah". 

I click the link, and immediately feel like I've just taken the red pill in The Matrix.

With a help of a webcam and the plugin, a Showcase scene can be overlaid into the real world, so it can be interacted with.

A "marker" board is held in front of the webcam, and Showcase projects takes reality, and uses it to create an environment for your scene. 

And it's all real time.

Now I feel like Neo in The Matrix when I say "Whoa."

Here's a link to the Autodesk Video.  Lets see if you say the same thing I did when I saw it.

And by the way.  It seems I may be in the market for a webcam soon.   So if you have any recommendations, leave a comment!  :-) 


Thursday, August 02, 2012

Blast from Electricity Past - For Fun & Interest

“I am what time, circumstance, history, have made of me, certainly, but I am also, much more than that. So are we all.”
 James Arthur Baldwin

Just a quick blog post for something I thought would interest my friends in the electrical world.

A very old electrical panel from the Baldwin Estate at the Tallac Historical Site in Lake Tahoe!

Here's something old school! 
I hope you find it interesting!

I'll be thinking of new blog posts when I get back from vacation!

Thursday, July 19, 2012

Anti-virus and Autodesk Vault - When Security is too Secure

“If you hack the Vatican server, have you tampered in God's domain?”
Aaron Allston

Not that long ago, I ran into a real head scratcher with Autodesk Vault.

A user was trying to start the ADMS Console, and recieved the following error.


Error starting service 'Autodesk Data Management Job Dispatch'onmachine 'SERVERNAME'.
This service is required for execution of the server console.

Apparently the Job Dispatch Service wasn't running. No problem!  The scary part was ADMS would not open.  That meant no backup could get made.

Even worse, this also meant the command line script wouldn't run, since all it's doing is starting ADMS sans the user interface.. 

No problem though! I can just open up the Windows Services and start that bad boy up!

Start 'er up!

Instead, I was created with this, disheartening error.

Windows could not start the Autodesk Data Management Job Dispatch service on SERVERNAME.Error 1053: The service did not respond to the start or control request in a timely fashion.

 Now what? 

No ADMS, no backup.  One rightfully worried end user.

My goal, we need a backup.  A new server is ready and and able to accept a Vault upgrade, but how do we get the backup to the server, when ADMS can't be opened.

I actually did find a way to copy the filestore and database over to the new machine and reattach them to a new Vault. 

But it's crazy,... just crazy enough to work.  

I feel like I'm about to hotwire the Starship Enterprise...

But just before we pull off the covers to the reactor and try to MacGyver something, the user tries "one more thing".

They were running Kaspersky Antivirus, and played a hunch that it was causing a problem.

So they uninstalled it.  

And ADMS started to the light from heaven and the voices of angels. 

So it was an overzealous anti-virus seeing the job dispatch and marking it as something bad.  I had never seen that happen before.

Now before everyone goes out and tears out your anti-virus software, an exception to the Job Dispatch Service will likely fix this. I found this on the Kaspersky site for adding this exception here.

In the interest of full disclosure, I didn't add the exception personally, nor can I speak for every anti-virus software out there.

But what I do hope, is that this experience I found helps someone else out there. 

When in doubt, turn off the anti-virus and give it a shot.  You never know when it's gone a bit too far!

Do you have an experience with anti-virus crossing up Vault, or any other Autodesk product? 

Throw in a comment and help a reader out!