Find us on Google+ June 2015 ~ Inventor Tales

Sunday, June 28, 2015

The Future of Making Things Roadshow at the California Science Center

Recently, I overheard an experienced designer say, " Design projects are like walking in fog.  You can only see a few steps ahead, but you have to take those steps to see what steps to take after that."

The fog of design

That fairly simple phrase stuck with me.  Design requirements change, customer requirements change, new information reveals itself.  Many times, this happens right in the middle of the design project.

These changes often come at the torment of the designers as they're faced with accommodating those changes.  These changes may not have even been considered during the initial concept phase.

As much as we as designers sigh, and then take a long walk in the parking lot saying things our mothers would be ashamed of, these changes will continue to come.  It's simply a part of the design process.

Flexibility is the key to counter the design change.  Designers must be ready to move quickly when the need to change direction comes.

Not all design changes can be foreseen,  but good designers can adapt.
Fortunately for frazzled and frustrated designers everywhere, new tools are emerging all the time to help navigate the changing topography of the design world.

But this begs a new questions.  What tools are out there?  Which tools are right for me?  Once I answer the first two questions, how do I implement the tools I've chosen?
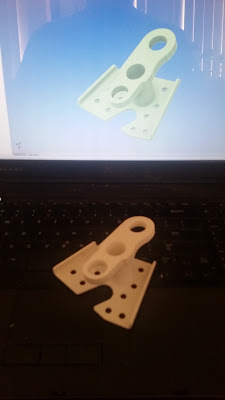
Additive Manufacturing, or 3D printing, is one way manufacturing is changing.


If you're in the Los Angeles area July 21st, join KETIV and Autodesk for the The Future Of Making Things roadshow at the California Science Center.

You'll have the opportunity to learn about how:

  1. Cloud and mobile applications are changing how products are manufactured.
  2. How new manufacturing technologies and techniques, like 3D Printing and crowd sourcing, allow "customization for the masses" and speed improving of those products. 
  3. Connected smart devices are changing how we use and interact with things.
During this event, hear from the keynote speaker, Andrew Anagnost, Ph.D., Senior VP of Autodesk for Industry Strategy and Marketing. As a leader at Autodesk, he is responsible for acquiring and developing the software tools that take advantage of these trends. 

As part of this initiative, he is leading the shift away from Perpetual to Term-based, Desktop Subscription licensing. He also realizes the importance of an integrated product development strategy so that teams can collaboratively and efficiently develop a concept successfully.

After lunch, enjoy the California Science Center, and find a little inspiration about the Future of Making things.

Sign up here!  I hope to see you there!

Jon Landeros

Acknowledgements:

photo credit: Fog! via photopin (license)

"Convair NC-131H TIFS lifting off" by U.S. Air Force photo/Ben Strasser - http://www.af.mil/shared/media/photodb/photos/081107-F-5381S-450.jpg. Licensed under Public Domain via Wikimedia Commons.

Sunday, June 14, 2015

Updating Custom Content to Autodesk Inventor 2016 from a Previous Version

If you've created your own content in Inventors content center, you'll have to update it when you move to your next version of Inventor.  Fortunately, this isn't really that difficult, but it's good to know the steps.

So in the interest of sharing, here are the steps that I used to update my own content center from Inventor 2015 to Inventor 2016.

In my setup, I'm using Desktop Content Libraries, which means they're not stored in Vault   These libraries are databases stored on my local drive.  These steps are particular to that setup. 

Also, I've already copied the files to their new locations.  So really all that's left to do is update the libraries.  This will make sure they're ready to be used by Inventor 2016.

Without further delay here's how I did it.  I hope this can help you too! 

Before anything, there's that little thing about having a backup.  Custom content can mean hours of work that's been collected over the years.  Do you want to lose that?  It's worth a few minutes to make a backup.

I've never lost content during an update.  But there's no reason to tempt fate.  

The first step is to open up Inventor, and on the Get Started tab, choose Projects.  

Starting up your project
When the projects screen opens, make sure the project your working with is active, and click on the Configure Libraries icon. 


This shows the libraries available to the project.  Any libraries that require migration have an exclamation point icon next to them. 

Only one library needs migrating
To start the process, click the Update icon. 

The update button means go! 
Next, Inventor is going to ask you if you've made a backup.  If you haven't, this is your second, and last chance.  


Once you've made that backup, click next, and go to the next step.  Inventor will ask which libraries you'd like to update.  In my case, I only have one.  So that makes my job easy. 


After the update is done, You'll see a confirmation screen, Inventor will ask you if you want to create a log, if you'd like.  


After this, you're library is updated, and it's ready to start using.

No exclamation point.  It's ready to use!

Refreshing Current Content

This is great for new content that you're going to place, but what about older assemblies that have content from your previous versions?

There's a solution for that too. 

When you have an assembly that contains older content, go to the Manage tab, and look for the Refresh button on the Content Center panel. 

Refreshing content. 

A dialog box appears showing you which content is out of date.  Clicking the Refresh button will update any content in the assembly.  

Refreshing the Content


After a short update, the content will show that things have been successful.  


Congratulations, this content is updated! 

And on a couple of final thoughts, you can also update content via Inventor's Task Scheduler.  This let's you update several assemblies at once! 

Updating via Task Scheduler 

Another alternate, although I haven't used this one much personally, is to go into Application Options, and select Refresh out-of-date Standard parts on Placement.  Checking the box will refresh content as it's placed. 

Out-of-date content can be updated as it's placed.  
Use one, or use them in conjunction!  Either way, these all are here to help you make sure your content is up to date! 


Wednesday, June 10, 2015

Creating a Rivet Hole Chart in Autodesk Inventor.

In my adventures taking aircraft maintenance classes at Mount San Antonio College, I've learned a lot of things.  Not the least of which, is how much I have to learn!

Another piece of knowledge I'm grateful for, is how to drive and set solid rivets.  I'm not the best at it, but I can do it, and practice will make me better.

A sample rivet plate

One thing about riveting has been indelibly etched in my brain.  Rivets require precise holes to be properly fitted.  So much so, that a rivet is often referred to by the drill used to make the hole it fits in. 

For example, a "30" rivet is a 1/8 diameter rivet, and  uses a #30 drill for it's pilot.  A "40" rivet is 3/32 in diameter, and uses a #40 drill for it's pilot.  

A sample of the hole size for standard Imperial Rivets.
From EngineersEdge

If you're inclined to read about it in detail, you can find the specs at Engineer's Edge here, or in the Advisory Circular AC43.13 from the FAA here (start at page 4-14)

Merging that knowledge with my Autodesk Inventor knowledge, I found myself thinking, "How can I capture that knowledge?". 

My thoughts turned to the clearance hole table, which is maintained by an Excel file named Clearance.xls, can contain the new information I wanted to add.

I thought I'd share the steps I used for adding these holes.  Perhaps this is something you can use to adapt your own special clearance holes.

There are two types of clearance holes, the universal rivet, and countersunk rivet.  Basically, that means I need a countersunk hole, and a straight hole. I won't be using counterbores for rivets.

Universal Head Rivet
From Aircraft Spruce

A countersunk rivet
From Aircraft Spruce
So let's get started.

The first step?  Close Inventor.  This will make sure that when you place a hole, you're reading in the latest clearance table.  I also ran into errors when I tried placing holes with the clearance table open.  Something to do with Excel locking the file.

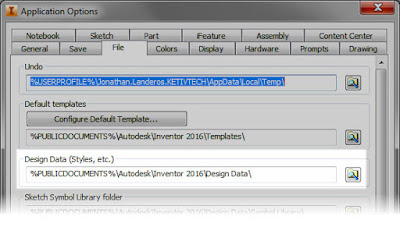
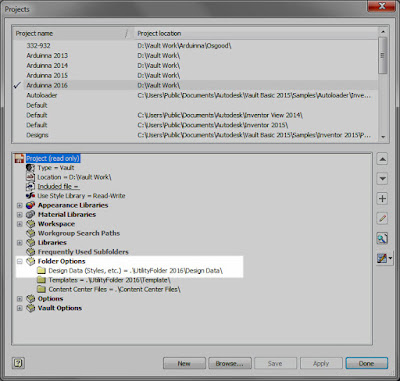
Locate the clearance.xls file.  It's location can vary, but it's set either in the Design Data location in Application Options, or Design Data in the Project.  Remember that if the path is set in the Project file, it will take precedence over the Application Option setting.

The Design Data location set in Application Options. 

The Design Data location set in the project. 


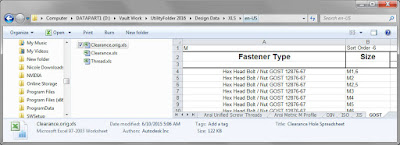
When you find the location, look for the ...Design Data\XLS\en-US sub directory.  It will have the Clearance.xls file you're looking for.

Before doing anything else, make backup of the original Clearance.xls file.  Just in case it gets go horribly wrong, the backup provides a safe haven to go back to and try again.

The location for Clearance.xls.  Notice I've also got a backup Clearance.orig.xls

Next, it's time to edit the Clearance.xls file and add in the new values.

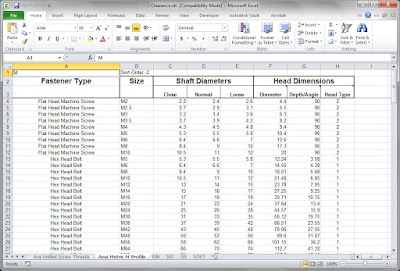
Looking at the sheet, there are several columns, and it goes without saying that each does something. Some will be more obvious than others.

A sample of one of the charts in the Clearance.xls chart.

From left to right, here they are.

  1. Fastener Type - This is a description of what type of fastener you're using the hole for.  This is the value you select in the hole dialog box. 
  2. Size - This can be called the "nominal' name for the clearance hole.  In other words, if you're describing this fastener or clearance "in the shop" what are you asking for?
  3. Shaft Diameters - This includes diameters for Loose, Normal, and Close fits.  Very typical diameters for many fasteners. 
  4. Head Dimensions - This is broken down in to three columns that require clarification on their own. 
    1. Diameter - The diameter to accommodate a fastener's head. 
    2. Depth/Angle - This is the depth required to clear the head, or if a countersunk fastener, the angle of the head. 
    3. Head Type - What type of fastener this is.  The number "2" designates a countersunk head.  A "1" designates a 'standard" head. 
Armed with that knowledge, it's time to setting things up!

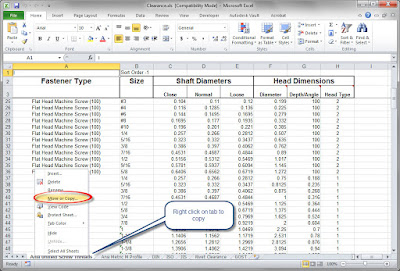
The easiest thing I found to do is copy one of the existing sheets.  It can serve as a template to create the new table.

Copying the Excel table

So now the table is copied, we understand what the columns do.  It's time to start editing.

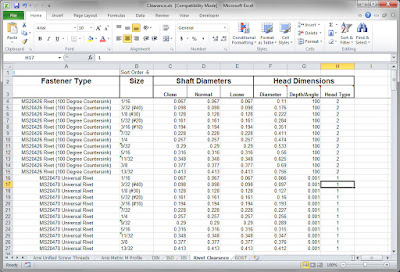
Most of this is just taking the values from the standards and copying them into the tables. But I am going to use a couple of tricks to get the table to do what I want.

For starters, rivets don't have close, normal, or loose fits, there's really just one proper nominal dimension.  So I'm going to set the the values to close, normal, and loose to the same thing.  That way, no matter which the end user chooses, they get the right one.

Also, I'm not using counterbores with my universal rivets. In order to make that "unselectable", I'm going to set the counterbore diameter to be smaller than the shaft diameter.

Making the counterbore diameter smaller than the shaft diameter will force the counterbore to "error out" if someone tries to use it.  It's not fancy, I know, but it will work.   I can always change it later too!

My creation. The rivet clearance chart for Inventor
That's the big part, but now there's a couple of more details left.

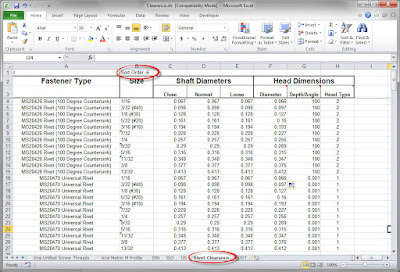
I'm going to set the "Sort Order" to make sure that the tab appears where I want it.  This affects the order in which the table appears in the hole dialog box.  Just like the name describes, 1 is first, 2 is second, etcetera, etcetera.  (A guy with my haircut has to use that reference!)

I'll also rename the sheet to something meaningful to someone using it.  You know, like "Rivet Clearance".  It took me a while to come up with that one!  (sarcastic grin).

Changing the Sort Order, and renaming the table.

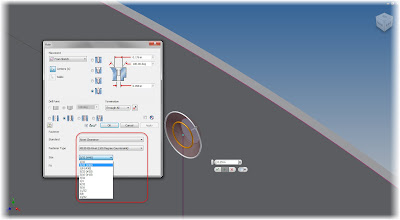
Once this is done, fire up Inventor, and test out your new table of date!  Now you're ready to go!  You can see where the Table Name, Fastener Type, and Size appear in the hole dialog box.

Placing the Rivet.  Notice how the names (circled) correspond to the Clearance.xls table.
Now, it's time to "serve and enjoy" your new chart.  And don't forget to make a backup of this data too!  There's nothing worse than doing it twice.

Even if you can't use it for rivets, perhaps you can adapt this for something else!


Tuesday, June 02, 2015

A Guest Post! Configure Open File Behaviors - New in Autodesk Vault 2016

So much has been added in the 2016 Autodesk releases, it's hard to keep track of them all.

That's where a great team comes into play.  I'm happy to share this post by Jonathan Kriek of KETIV  This post originally appeared on the KETIV blog, Side Note.

In this post, he discusses the Open File Behavior that's been added to Autodesk Vault 2016.  I'm looking forward to checking this one out myself!

So without further delay, here you go!

Configure Open File Behaviors - New in Autodesk Vault 2016
By Jonathan Kriek


A fair amount of users most likely have more than a couple versions of AutoCAD and/or Inventor installed on their system. This may be due to testing the latest version, while production requires the previous or having other business system requirements that force them to retain an older version.

My reasons are simple - providing all inclusive support to our customers by being able to troubleshoot multiple versions simultaneously. But regardless of why the fact remains that by default until now Autodesk Vault used MS Windows settings for determining which [version of a] program to open for a given file type (except 2015R2 for subscription customers which includes some early 2016 functionality).

Autodesk Vault 2016 now gives you greater flexibility in choosing which version of your Autodesk software to open.

What Autodesk software and file types are supported?

Currently "Open File Behaviors" support the following Autodesk software and file types:


  • Autodesk Inventor
    • IPT, IAM, IPN, and IDW
  • Autodesk AutoCAD
    • DWG and DXF
  • Autodesk Revit
    • RVT, RFA, and RTE


How do I access Open File Behaviors settings?

In the Vault Client, select Tools > Options.
Next to Open file behavior settings click "Settings".


Open File Behavior configuration options

Depending on the CAD application, you can determine whether CAD files are opened by the latest version, the last run version, or the version of the CAD Application that last saved the file.


  • Last Run Version (Inventor Only):
    • This option will open the CAD file with the last used version of the CAD application.
  • Latest Version (AutoCAD and Revit Only):
    • This option will open the CAD file with the newest version of the CAD application installed.
  • Saved by Version (AutoCAD and Revit Only):
    • This option will open the CAD file with the version of the CAD application that was last used to save the file.
  • Default
    • This option uses the current settings in Vault for opening a specified CAD file.
    • Autodesk Inventor files are opened with the default application specified by Windows.
    • AutoCAD files are opened with the latest version of Autodesk AutoCAD installed.
    • Revit files are opened with the latest version of Autodesk Revit installed.

Example scenarios

These settings are pretty straightforward and not all options are available for each CAD application, but let's take a look at a few examples.

If Revit 2015 and Revit 2016 are both installed on your machine, and you want files that were saved in RVT 2015 to always open with RVT 2016, you can configure Vault to always launch Revit 2016 for all .RVT, .RFA, and .RTE files by choosing "Latest Version".

If AutoCAD 2014 and AutoCAD 2015 are both installed on your machine, and you want files that were saved in ACAD 2015 to open with ACAD 2015, and files saved in ACAD 2014 to open with ACAD 2014, you can configure Vault to always launch the "Saved by Version" of AutoCAD for all .dwg and .dxf files.


Final Thoughts

The Open File behavior finally applies some adaptability to the process of opening files and determining whether CAD files are opened by the latest version, the last run version, or the version of the CAD Application that last saved the file. I hope you found this article and the new Vault 2016 Open File functionality useful!

Jonathan Kriek