Find us on Google+ July 2012 ~ Inventor Tales

Sunday, July 29, 2012

Using the Organizer in Autodesk Showcase

“A first-rate Organizer is never in a hurry. He is never late. He always keeps up his sleeve a margin for the unexpected.”
Arnold Bennett

This week is only a brief post, as I've taking this entire week for a holiday in Lake Tahoe.  This time I've brought my trusty mountain bike up with me, so I'm hoping to get some good riding in, even though I'm about 6000 ft (roughtly 2000 meters), higher than my usual riding altitude. 


My truck and my bike.  Both better prepared for working at this altitude than I am!

I hope I don't end up gasping like a landed fish.

But now, the post!

Most of the time when I'm using Autodesk Showcase, I can pick what on want by choosing the part, on screen, right in the scene.  It's there, it's simple, and it's easy.

But there are also those scenes that aren't so simple.  They have a lot of parts that aren't easy to find on screen, making working with the model a tedious and frustrating affair.

Not every component in this scene can be easily selected


But Showcase provides a tool that can help out with that. It's called the organizer, and it lists the parts by in a list type of format that you can use to, well, organize your information!

The Organizer can help  locate and organize your scene!

It's my personal belief that this tool doesn't get the credit it deserves, and is probably underused since I think many users get accustomed to picking on screen, which lets face it, probably covers most of our needs. 

By using the organizer, data can be moved into folders that make it easier to select, move, hide, change materials, etc.

But why describe it when I can show it.  Here's a quick video on using the organizer.

And by the way, have a suggestion on how you use the organizer?  Throw a comment (it's down at the bottom).


Sunday, July 22, 2012

Autodesk Showcase - Create New Faces for New Colors

“The hole and the patch should be commensurate”
Thomas Jefferson

There are times when I'm working in Autodesk Showcase that I find I need to change the color of a portion of a face, and I'm not able to do so.

For example, here's a model I built in Autodesk Inventor.  It has the KETIV logo on it, which I'd like to change it to red. When I select the model, the entire model highlights
I just want to select the letters!


Usually this is because the faces were imported as a single color, and Showcase "unified" them.

So what to do?  I could open the file in Autodesk Inventor, copy faces or change color there, and update the CAD model.  But Showcase has a tool that can do this for us, without having to fall back to a CAD tool.

Extract Patches as New Objects.  This tool copies faces and creates new ones that can have Showcase materials applied to them.

Extract Patches as New Objects will do the trick!
 Once the patches are selected, all that's left to do is select which patches to extract!

Extracting the patches
And these colors of these faces can be changed separately from the faces they were copied from!

Now the patches can be selected separately
For a little more detail, here's the video portion!  Enjoy!

And if you have a tip on how you might approach this challenge, leave a comment!

Thursday, July 19, 2012

Anti-virus and Autodesk Vault - When Security is too Secure

“If you hack the Vatican server, have you tampered in God's domain?”
Aaron Allston

Not that long ago, I ran into a real head scratcher with Autodesk Vault.

A user was trying to start the ADMS Console, and recieved the following error.


Error starting service 'Autodesk Data Management Job Dispatch'onmachine 'SERVERNAME'.
This service is required for execution of the server console.

Apparently the Job Dispatch Service wasn't running. No problem!  The scary part was ADMS would not open.  That meant no backup could get made.

Even worse, this also meant the command line script wouldn't run, since all it's doing is starting ADMS sans the user interface.. 

No problem though! I can just open up the Windows Services and start that bad boy up!

Start 'er up!

Instead, I was created with this, disheartening error.

Windows could not start the Autodesk Data Management Job Dispatch service on SERVERNAME.Error 1053: The service did not respond to the start or control request in a timely fashion.

 Now what? 

No ADMS, no backup.  One rightfully worried end user.

My goal, we need a backup.  A new server is ready and and able to accept a Vault upgrade, but how do we get the backup to the server, when ADMS can't be opened.

I actually did find a way to copy the filestore and database over to the new machine and reattach them to a new Vault. 

But it's crazy,... just crazy enough to work.  

I feel like I'm about to hotwire the Starship Enterprise...

But just before we pull off the covers to the reactor and try to MacGyver something, the user tries "one more thing".

They were running Kaspersky Antivirus, and played a hunch that it was causing a problem.

So they uninstalled it.  

And ADMS started to the light from heaven and the voices of angels. 

So it was an overzealous anti-virus seeing the job dispatch and marking it as something bad.  I had never seen that happen before.

Now before everyone goes out and tears out your anti-virus software, an exception to the Job Dispatch Service will likely fix this. I found this on the Kaspersky site for adding this exception here.

In the interest of full disclosure, I didn't add the exception personally, nor can I speak for every anti-virus software out there.

But what I do hope, is that this experience I found helps someone else out there. 

When in doubt, turn off the anti-virus and give it a shot.  You never know when it's gone a bit too far!

Do you have an experience with anti-virus crossing up Vault, or any other Autodesk product? 

Throw in a comment and help a reader out!

Sunday, July 15, 2012

Autodesk Vault - Using Groups to Set Permissions

“Never doubt that a small group of thoughtful, committed citizens can change the world; indeed, it's the only thing that ever does”

There isn't a video for this weeks blog.  I'm currently dog sitting for my sister and her husband while they're on vacation, so I'm away from my recording gear.

But it was good company this weekend!  

Smokey the incredible fetching mixed Chihuahua

Aretha.  Quite the diva, her name suits her.
So we'll revert to the written word for this post!

Here it goes!

One of Autodesk Vault's strengths is how it can handle user permissions and therefore, accessibility to the data in safeguards.  But there are two ways to grant user permissions in Vault, at the user, level, or via a Group.

When I first plunged into Vault basic in the back several years ago, I started by assigning user permissions.  It seemed easier at the time.  I also was working in Vault environments that only had a few users and relatively simple permission schemes.

When I first looked at Groups as a method of controlling user permissions, it seemed like an unnecessary level that was going to do nothing more than create a convoluted the system.  So I stayed far away from Groups.

But a few years of experience, and the wisdom of mentors has taught me the values of Groups, and what I thought was an extra layer of complexity is actually simplifying the task. 

Now, almost without exception, I look to Groups to set up Vault permissions.

So what caused my change of heart in my approach?

The Users have no permissions by themselves.  They are members of a Group, and the Group contains all the permissions they'll need.

In other words, you have to be a member of the "Vault Club" to get inside.  And if you're not on the "VIP list", you're not getting into the Administrator's lounge, and so on.

This approach began to really show it's strength when in environments with many users. 

Typically these environments have Users that lend themselves into being organized by groups, such as Administrators, CAD Users, CAD Viewers, and so on.  The Users in these Groups have the same permissions, and therefore, the Group can manage the permissions.

Now, Users permissions can quickly be moved from one group to another if their permissions changed.  And if an entire Groups permissions change, it can be changed in a single screen instead of clicking through several users and hoping you don't miss one.

With all that being said and done, how do you assign a user to groups?

First you need to be an Administrator, so if you're not on the "list" (that is Group), you're not getting past the bouncer.

  • But if you do have those privileges, you can go to Tools>Administration, and choose "Global Settings

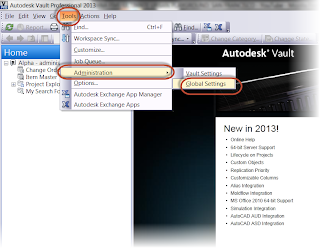
Accessing Global Settings in Vault Explorer

  • Once in the Global Securities dialog box, choose the "Groups" button

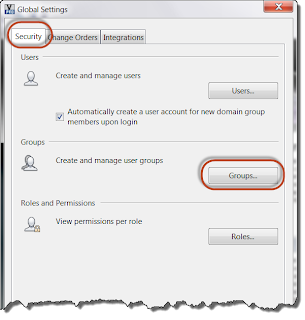
The Group button is on the Security Tab

  • Next,the Group Management Dialog opens up.  Here Groups can be created, and edited.  In this example, the Groups are already created, one of these Groups can be edited by right clicking , and choosing "Edit"


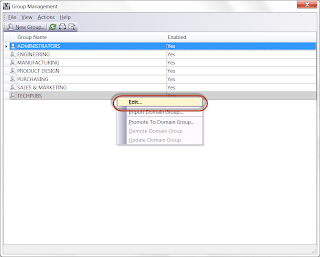
Right click and choose "Edit"

  • Now the heart of the matter.  Now Groups can be given roles, given access to specific Vaults, and even collect different groups under this group (although I haven't needed to do this yet.


So there it is.  Using Groups in Autodesk Vault.  It's definitely something that's worth a look if you're a Vault Administrator.

And if you access Vault through the ADMS Console, the same options are available through the Console as well.

  • In ADMS Console, got to Tools>Administration


  • On the Security Tab, choose the "Groups" icon.  From that point, it's like the steps above!

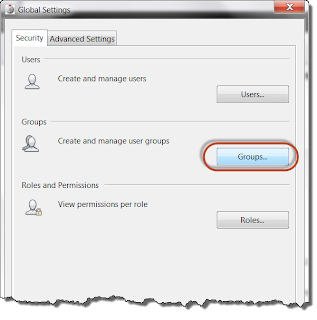
Choose the Groups icon, and you're off!
That's it for this post!  And I'll be adding some more video tips later on!


Sunday, July 08, 2012

Redefining a Sketch or Workplane in Autodesk Inventor

"If at first you don't succeed, redefine success."
Unknown

I've done it before.  I've been working on a part that is nearly symmetrical, but not quite.  I draw a profile on a face, extrude it, and it's then that I realize that I should have put it on a different face.  

Usually there's a bit of profanity at this point.

In cases like this, many of us would just redraw the profile on the new face, and carry on.  And  there are cases where this "cut bait approach is the fastest way to complete your task.

But if there's been a significant amount of work put in the sketch, this may be "less than appetizing", so to speak.

What to do if this was accidentally built on the wrong face.


In cases like this, there is another, little known tool that may be an option for you.

Redefine

So what makes this tool special?

Redefine is selected by right clicking on a sketch or workplane and choosing "Redfine".

Selecting Redefine to move the feature

After activating the tool, a new face can be selected, much like when a new sketch or workplane is created.

Moving the sketch and the feature.

The sketch or plane will attach to the new face, bringing nay geometry with it.  The sketch may have to be rotated and moved to get it correctly placed on the new face, so there may be a little bit of work involved on the "back end".

Some repositioning may be required.


That's why I say there will be cases where it's easier to rebuild the geometry.  Redefine won't necessarily "Redefine" how you approach ever sketch (pun intended).

But what it does do is give you another tool, when faced with having to get geometry from one face to another. 

So while there may be times when it's easier to recreate geometry, there may be those other times when redefine saves you the trouble of having to recreate a lot of geometry.

So keep keep it close, and use it wisely!

I've attached a video for redefine below, take a look! 

And if you have any suggestions, or places where you've used Redefine, leave a comment!

Sunday, July 01, 2012

Open the Right Door - Changing AutoCAD's Default Open Location

“What Romantic terminology called genius or talent or inspiration is nothing other than finding the right road empirically, following one's nose, taking shortcuts.”
Italo Calvino

As you might have noticed, I had a long trip out of the USA to Edmonton, Canada for work.  It was a great trip that I enjoyed, but I'm still playing a bit of catchup.

So this week's blog is a bit brief, but does contain a lesson that I've been wanting to share. Once I'm caught up again, I'll be looking to create some more "verbose" blog posts!

One thing I've always liked about Autodesk Inventor's project file is it's ability to set a Workspace that defines a root open and save location for all your Inventor files.   It's always helped me keep things a little more organized.

The Workspace helps organize your files

It's a bit of assistance I've always been grateful for.

Although I don't use AutoCAD as much as I did back in the days of R14, I did want a way to direct AutoCAD to do something similar.  Open in the directory I'd like.

Fortunately, there is a way to do it.  It's a two step process.

First take the AutoCAD shortcut, right click on it, and choose "Properties".

Choosing the shortcut.

The Properties screen for the shortcut appears.  Next, choose the "Shortcut" tab and change the "Start in" directory to the desired directory.

Setting the new open location

This tells AutoCAD to start in the folder you define.  But there's one more step.

Open up AutoCAD and type "REMEMBERFOLDERS" at the command line. If AutoCAD is set to default, the setting will be "1".  Change this to "0". 


Now when you start AutoCAD and choose the open or save command, it will open in the folder you set in the shortcut.


Have any suggestions on how you've approached this challenge?  Drop a comment below!