Find us on Google+ August 2017 ~ Inventor Tales

Thursday, August 31, 2017

I've Got Great Designs in Fusion 360! But How Do I Find Them?

A valve housing I built, I'd hate to lose this! 
Lately, I've been posting about building models in Fusion 360, especially with the addition of sheet metal tools.  (Yay!)

But the most stunning Fusion 360 file in the history of stunning Fusion 360 files does no good if you're not able to locate it in the sea of slightly less stunning Fusion 360 files.

As I've started accumulating models, I found myself thinking; "How to I find a given file as I create more designs?" or, "What happens, if I misplace one?!?"

I haven't yet misplaced a file yet.  But it will happen some day, and I'll have to make sure I can find it again when I do.

Thus, I was led to the Data Management side of Fusion 360, to try a little simple searching.

The first thing I had to do was log into my A360 hub here.  That opens up the A360 hub, where I was greeted with a list of the projects I've created over my time using Fusion 360.

From there, it was a fairly simple matter of locating the search icon, typing in a file name, and letting the search tools do their job.

In my case, I picked a valve housing I had worked on.

Searching for the housing


When the file opened in my dashboard, I could see a thumbnail, what other designs this housing used, and where this file was used.  In my case, I'm not yet using this design elsewhere.  I can also access drawings created from this part.


Now there's quite a bit that can be done from this screen, so I'm not going to go into it all in this post. I'd be typing forever!

But I will point out two icons that are well worth looking at.

The first, is the View icon, which will open up the file in a viewer, the other is the Edit icon, which will open the file in Fusion 360 desktop, and the browser if available.


Just these functions alone helped as I was exploring alone, and there are more functions in the viewer. But like I said, I'm going to save those for later!  It's getting late, and I have to sleep sometime.


But remember to take advantage of the hub if you're using Fusion 360!

I think it'll help you out!


Sunday, August 27, 2017

Restarting a Line in a Fusion 360 Sketch

My story of late has been building a few parts in Fusion 360 over the course of a few evenings.

Another sheet metal part I'm working on.
And with that practice, comes a few simpler tricks to help models get built a little bit more efficiently.


It's been a series of sketching, extruding, and now that Fusion 360 has a sheet metal module, it's included adding flanges.

Making these parts means drawing a lot of lines to build parts.  But part of drawing these lines sometimes means creating a line in one place, completing it, then creating another line in a different place on the sketch.

If I were using Inventor, I would right click and choose the "Restart".  That would finish the line being drawn, but remain in the command so another line could be started elsewhere.

It's a simple command, but one that I know I've found helpful.

But looking at Fusion 360 there is no repeat command.  At first blush, it would appear that it isn't possible.

But before wishing an overworked programmer a pox upon his soul, I thought I'd see if another tool might give me the behavior I was looking for.

And I found it!

All I had to do was right click and choose Repeat Line.  It's a slightly different command, but it did exactly what I was after.  It gave me the ability to finish the line command where it was, and restart it in a new spot.  And I didn't have to exit and restart the command.

It's a workflow in just about every CAD program that will allow me to use it.  I'm big on placing holes on lines and vertices of rectangles.

So if that's a workflow you're also used to, give it a try in Fusion 360!  It might be a way to make things run a little smoother!

Creating holes using lines, a trick I like using. 


Wednesday, August 23, 2017

A Few Minutes with Unfold & Refold in Fusion 360

The part for this blog.

My adventures with Fusion 360 continue.  Mostly, my tasks have been composed of taking 2D prints, and turning them into 3D Fusion models.  

These prints all hail from the 1940s, and it's fun, and educational to see how these prints adapt to new design tools that were beyond the science fiction of the day.

Naturally, with Fusion 360 introducing sheet metal, I've been jumping on the sheet metal portion of my self imposed task.

In creating the latest sheet metal part, I found a reason to try out the unfold/refold functions in Fusion 360.  It was exactly the right tool for what I needed.

The portion of the model in question is located on the end of the flange.  The channel is cut at an angle, and at first glance, that might not seem like much.  

But inspect the flange a little closer, and it can be seen that the angle was cut in the flat and then folded.  As a result, it follows around the bend of the flange.  

Thinking about it, that would seem to make sense from a "keep it simple, stupid" approach to manufacturing. 

But in Fusion, we design the finished sheet metal part.  The flat pattern is, in a sense, the result of the folded part we've designed.  

And the way I chose to design this part, was to create a C-Channel, and even though I tried to create the angle initially, it doesn't take long to see that I didn't get the result I wanted. 

The end of the incomplete channel.
That angle is all wrong
This is where the unfold and refold tools come into play.  Working in conjunction, they allow the part to be unfolded, a cut to be made, and then the part to be reloaded.

To get things started, choose the unfold tool from the sheet metal workspace.

Locating the Unfold Tool


This will bring up the unfold dialog box.  To unfold, choose the face that will remain stationary, then select the bends to unfold.  Alternately, the Unfold All Bends checkbox will unfold all the bends in the sheet metal part. I

In the case of my part, I'll need to unfold everything.

The Unfold tool in progress.  The bend in the lower part
of the image has already been selected to unfold, and is previewed.
The part will flatten out.  At this point, any features that need to be added can be added the part, in my case, I added the proper shape I wanted.


Once the cut is completed, it's a matter of refolding the part. All that's required is clicking the Refold Faces tool, and the part will be refolded

The Refold Faces Tool


Once refolded, you're free to continue working on your part! 


So give the Unfold and Refold tools a shot!  I've had pretty good luck so far, although admittedly my "seat time" isn't vast. 

But I have a lot more drawings to convert to 3D, so I expect I'll be testing it out quite a bit in the next few weeks! 

Sunday, August 20, 2017

Getting a Diameter Dimension when Sketching in Fusion 360

It's been a busy week working with a little Fusion 360, as well as doing a little studying for my Aircraft Maintenance classes.

Because of that, this post will be a little on the simpler side, but I still hope the material is something that you all find valuable.

In my work with Fusion, I've had to create a few sheet metal countersinks already.  Admittedly, some of these parts will never unfold.  In fact, the part on the right wasn't even made using sheet metal tools!

But the part has sheet metal countersinks, and that's where this blog starts. The countersinks are made by dimpling the metal, since cutting a countersink would leave too little material and compromise the material strength.

The sharp corners at the bottom of this countersink are, to put it mildly, bad.


A better countersink for thinner material

That being briefly discussed, the dimpled countersink is created by using the revolve tool.  That's easy enough, but when creating the dimension for the hole diameter, Fusion only gives you an option for a radius.

But this dimension is a radius!?!

But what if there was a way to get a diameter?

If I took time out of my Sunday afternoon to write the post, you can likely guess there is.  Here's how you do it.

While in the sketch, start the dimension tool.  Dimension the geometry that represents the edge of the diameter, and the center of rotation.  But before just clicking geometry, here's a trick that helped me.

Pick a point on the diameter, for example, for my countersink, I chose a vertex where two lines representing my countersink geometry intersect.

Even if you could choose a line, take the extra time to pick the point.  I think it's worth it.

Next, pick your axis of rotation, just like normal.  At this point, you may say; "Jon, I still see a radius.  Thanks for nothing jerkface!"

But if you do, I'm going to give you a smirk and say; "Try right clicking!"

Selecting the diameter dimension
Now the option for Diameter Dimension appears.  Click on that, and you're off and running!


You may also be wondering why I made such a big deal about picking a point for the edge of the diameter.  I've found that by picking a point, Fusion picks the correct diameter every time.

I hate it when this happens


If I try picking a line, I sometimes get the geometry backward if I pick the geometry in the wrong order.  The trick if you prefer this method, is to make sure you pick the axis of rotation first.

So give it a try!  And good luck!

Tuesday, August 15, 2017

Using Sheet Metal Styles - Fusion 360 Style

So I've had a little more time to work with Fusion 360's sheet metal, and things are beginning to run a lot smoother. as I'm getting more familiar with the tool.

One of the things I've put a little of time into is sheet metal styles.  While making parts is the goal, and my favorite part of using any CAD system.  A solid foundation of sheet metal styles can go a long way to making sure your sheet metal parts are accurate and consistent.

Most of all, a good set of styles can eliminate a lot of repetitive work and make sure you spend most of your time modeling, instead of creating the same sheet metal for the umpteenth time!

To set up a sheet metal style, the first trick is to locate the style.  In Fusion, you'll find that in the Sheet Metal Workspace, on the Modify menu.

Finding your Sheet Metal Styles
Opening up the Sheet Metal Styles dialog box, you'll see two sections, In this design, and Library.   The styles located in the design are stored inside the current document.  But the library, those styles are available to any documents you want.


The Sheet Metal Styles dialog box

Fusion provided some defaults, but they didn't match what I needed, which in the case of this part was .032 ALCLAD Aluminum.

While Fusion doesn't provide us with this as an option, I do have a Aluminum (in), a generic aluminum, which I can copy to create my material.

You may have noticed that I've also got .051 and .040 ALCLAD already created.  I could have easily copied those as well.  But let's, for a moment, pretend they don't exist, and we'll start like I did from scratch, without any ALCLAD.

All you have to do is right click on the material you want to start from, in this case, Aluminum (in).  Choose "New Rule".

Creating a new rule

A new dialog box will appear where the parameters for the new rule can be entered.

The sheet metal styles dialog box.
Save the style, and congratulations!  A new Sheet Metal Style in Fusion 360.

The new rule is added to the library! 
Notice that since the rule I started from was located in the library, the new rule was also created in the library.  It's already a part of my library, and available to other parts.

But What if I Copied a Material That's Only Local in the Design? 

If you copied a material that's local to the design, just right click on it, and there's an option to Copy to Library, and the material can quickly be placed in the library so it can be available to other designs.

Copying from the local cache to the library

That's Wonderful!  But Now I Need to Change Styles! 

I poked around Fusion a little bit before I found this, mostly because I refused to resort to reading the instructions!  But to switch to a different sheet metal style, locate the Sheet Metal Style in Fusion's browser, and locate the Switch Rule option.

Switching Sheet Metal Styles


By choosing this you can select a rule located in your document, or in your library!

So have at it, and keep learning!

Friday, August 11, 2017

Fusion 360 Sheet Metal - My First Impressions


So I've had a little time to work with Fusion 360's sheet metal tools.  And when I say "a little", I mean "A LITTLE".

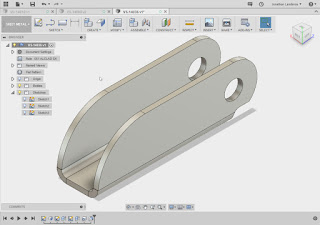
My first Fusion 360 sheet metal part
All I've had is a couple of evenings to create a few simple sheet metal parts.  They're no more than a couple of brackets, but they're also enough for me to start getting acquainted with the tools, even if it's sill a quick introduction.

But what I was able to do was to get a bit of an impression of how Fusion 360 works, and figure out where I need to learn a little more.

And when I say a "little more", I mean "a lot" more.

I've used sheet metal in Inventor on and off for around 17 years now, so it goes without saying that I approached Fusion from the perspective of using it like it was Inventor.

So I'll just cop to the fact that I can't help but compare it to Inventor.

What is the the kids say these days?  "Sorry.  Not sorry."

And while Inventor was similar to Fusion 360 in many ways, it was very different in others.

Here are just a few I've noticed so far.

Sheet Metal Rules

They're actually a lot like Inventor's sheet metal rules.  It's similar enough, that I could make the jump pretty easily.

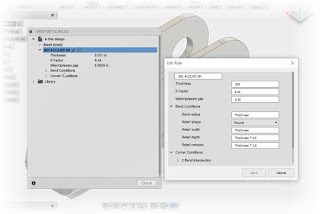
Fusion's Sheet Metal Rules.  I've created my own rule here.
I miss the thumbnail images that Inventor has in its sheet metal rules dialog, but I could navigate it pretty well based on the information provided by Fusion.

Bend tables and equations aren't in Fusion at this point, but even when they were available in Inventor, I never knew anyone who used them to generate flat patterns.

I'm sure there are that do use them, I just didn't encounter them in my travels.  This may be one of those "future update" items.

I was able to create a new sheet metal rule in a few minutes, all it takes is copying another, similar rule and changing it to meet my new requirements.

The Flange Tool

In Inventor, the Flange tool created flanges from existing faces, that's it.  if you wanted to create a C-channel in one step, you had to use "Contour Flange".  If you wanted a flat sheet metal face, you had to use the 'Face" tool.

Fusion 360 combines those three tools into one "Flange" tool.

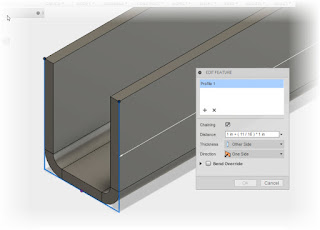
Using the Flange tool to create a channel

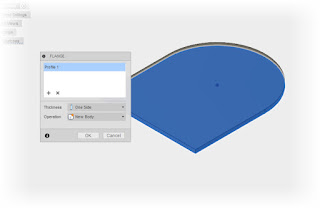
Using the Flange tool to create a sheet metal face.
The Flange tool creating a straight up flange.

Once I figured this out, I came to like it.  To me, it's a simple, easy to use approach, at least in my opinion.

After all, it's much harder to hit the wrong button when there's only one button!

I also like how Fusion implemented the grips to change the flange height and angle.  It felt like a natural way to form the part.

After a few minutes of figuring out how it ticked, I liked the way they went with it!

Unfolding

Creating a flat patter from a folded part was easy for me.  Fusion 360 asks for a stationary face.  In other words, which face the part will use as its "anchor" to unfold around.

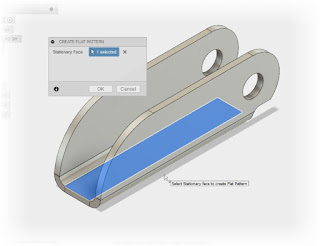
Selecting the stationary face for a flat pattern
Inventor did this as well, but to me, it didn't always seem obvious that you could provide Inventor with this information, especially to Inventor newcomers.  Although later releases of Inventor did address this with the "A" face tool.

In any, case, the functionality is essentially the same, just presented differently.

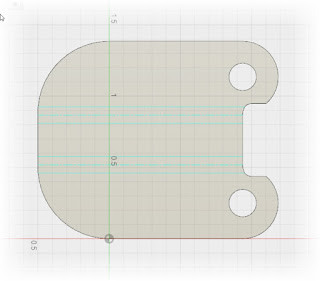
The flat patterned generated in Fusion 360


What Can be Unfolded?

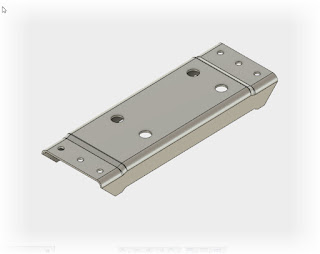
See this part?  You're not unfolding this one! 
The rule of thumb I was taught for Inventor was if you could bend the part in a sheet metal brake, Inventor could unfold it.  Formed parts with a lot of deformation, or flanges around bends, aren't going to unfold in Fusion 360.

The same seems to hold true in Fusion 360, based on my few minutes of testing.  But I expected that, so there really aren't any surprises here.  

I just had to see if maybe, just maybe, there was  the computer aided equivalent of the Holy Grail in the unfolding tools!

In conclusion.

After what was, at most, two hours of seat time, I was able to generate some pretty simple sheet metal parts pretty easily.

There's some room for growth to be sure, but I'm sure improvements will be made in future updates.

The functionality that I've seen so far, I like!

And I do have to reiterate that I have very little time with Fusion 360 sheet metal, so it's even possible there may be functions I haven't even discovered yet!

So at this point, I'll enjoy, and continue to learn the functionality I have, and look forward to those updates in the future.

Tuesday, August 08, 2017

Sheet Metal in Fusion 360 has Officially Arrived!

After much angst and waiting, sheet metal has finally been officially released in Fusion 360.  Previously it has been warming up in the bullpen known as "preview".
Upgrade in progress!

This evening, upon getting hope from work, I started Fusion 360 and was greeted by the "Updating Fusion 360" announcement in the Job Status.  

Once the update completed, Fusion 360 asked me for a restart, and once restarted, a shiny new Sheet Metal toolbar made itself available.

Now I have to confess, this is the first time that I've seen Sheet Metal in Fusion 360.  16 weeks worth of evening classes and a full time job prevented me from having the time to really do much with the sheet metal package except for the occasional wishful thought.

The sheet metal tools!
So the reality of the matter is, I can only serve to announce "HEY LOOK! SHEET METAL IN FUSION!"

Yeah, I know, not much good for much am I?

But I did take a few quick "who needs the instructions!" swipes at the tool, just to see how it compared to the Autodesk Inventor I'm used to.

All told, I probably had, about 15 minutes of  seat time with it, so it's easy to argue that I'm not at a place to talk about the tool confidently.

So I'm not going to go into the things I love or hate about the sheet metal tools at this time.

It just wouldn't be fair or proper, one way or the other.

What I will say is that it is similar to Inventor, with it's flanges, rules and flat patterns, but there are some differences as well, such as no face tool, or "cut across bend"  that I've found so far.

But what I do have is a list of parts that I'm going to make, and once I get a few parts done, I'll have a better idea of how Fusion 360's sheet metal tool sizes up!

Stay tuned!


Sunday, August 06, 2017

Using Extrusion Templates in Fusion 360 Using Insert into Current Design

An F4U Corsair at Planes of Fame in Chino Ca.
Photo is mine.
As part of my Fusion 360 experience, I've been building different parts for a WW2 era Vought F4U Corsair.

Why am I doing it?  It provides me an opportunity to learn how a machine like this was put together, it challenges me to find ways to use Fusion to find creative ways to solve design challenges, and I flat out enjoy it!

And what's the point of doing it if it's not a least a little bit fun!

The planes I've used came via my subscription to Aircorps Library, who has done a marvelous job scanning and sharing plans for WW2 era aircraft.

And before you ask, sorry, I'm not sharing the plans.  I pay for my subscription with them, and I'm happy to support their efforts.  To me, sharing their plans without proper compensation would be tantamount to stealing their hard work.

But with that being said, here's what I've learned about how the engineers of the 1930s and 1940s who designed the Corsair, and here's how I was able to get Fusion to help me with my "recreation" efforts.

Many parts were created from extrusions,  These extrusions were in turn, machined to create various parts for different parts of the aircraft.

The "Make From" reference in the
drawing's title block
Due to this fact, the finished parts had a note to "make from", the "from" part referencing the standard extrusion.

Well the last thing I want to do is redraw the exact same shape for multiple parts!

So here's how I was able to use Fusion to make the extrusion profile available, and reusable, to multiple drawings.

It's actually quite simple.  The first step is to create the cross section of the extrusion in a Fusion 360 part file.  I opted not to extrude the part at this point in time.

A sample of the extrusion template
This part becomes my template for future use.

The next step is to insert the template into a new model file so I can create new parts from the template.

The goal of this is to insert the previously created sketch into a new model, and extrude this sketch to create a new part.


First start a new Fusion 360 file.  Once the file is open, browse to the location of your template, and choose "Insert into Current Design".

Choosing  "Insert into Current Design" to use the
template for the extrusion

This function links the extrusion profile into the new file.  Once the sketch has been inserted, the sketch can be extruded just like it had been created right in the part, instead of being linked in.

The part being extruded using Fusions std. Extrusion tool
Once the extrusion is created, you can work on the part just like any other Fusion 360 part.  You can add and remove material as needed to meet your design requirements.


That's the basics  of creating an extrusion template in Fusion 360.   At least that's how I've approached it.

So what are the advantages I found that drew me to this conclusion?

Well, for starters, I don't have to drawing the same shape over and over again.  That alone is reason to chose that route, at least for me.

Second, any new parts created from the template are linked back to that original template.  So in the event any changes have to be made to the template, the parts generated from the template will also update.

In the event that happens, it can be a lot easier to update several parts than have to transfer the same dimension to several parts, and run the risk of missing that one odd part.

So in conclusion, this is why I approached this file in this way.  You may come at it completely differently, or maybe just vary this process just a little bit.

It's up to you!  If you find a different approach, feel free to share  in the comments.


Disclaimer: The views and opinions expressed in this article are those of the author and do not
necessarily reflect the official policy or position of Planes of Fame Air Museum or AirCorps Library.