Find us on Google+ 2007 ~ Inventor Tales

Monday, December 24, 2007

Going Out for a Joggle

Merry Xmas everyone! As I'm sitting here making my final preps for the holiday, I thought I'd put in a blog I've been intending to do for a while.

Joggles.

I've been ask a few times how to do them, and they are in there. Here's how you can do them.

1. I'm starting with a sheet metal face already created, and we'll add a joggle to that. Start by creating a sketch on the face where you want the joggle to be. (Click on the image to see a larger version).


2. Create your sketch, make sure you're colinear to an edge.


3. Create another face. But this time click on the edge button, select edge you want your joggle to start from. Make sure you set it to 45 degrees. You can use your offset to define the orientation of the joggle.


Voila! Happy Holidays!


Take this Christmas Icon
Christmas Icons
Myspace Icons

Thursday, December 20, 2007

Customizing Frame Generator

The elves at Autodesk Labs gave us a gift a little early this year (actually, it's been out for a few weeks), but for all of those who want to add custom profiles to Frame Generator, here's your tool!

Go to www.labs.autodesk.com, and check under the utilities page!

Happy Holidays!

Monday, December 17, 2007

More Vista Adventures

Well, I just ran into my first 'HUH?' feature in Windows Vista.

I was opening an Inventor assembly file, and got a 'No Error Message Available' message and the Inventor.

Now, I did think that maybe my files had been corrupted, that could happen. However, when I copied all the files to a Windows XP box, I didn't get the error!

At this point, I'm not sure what's caused the error (in Vista's defense, it may be something totally different).

But keep an eye out. This one could be hiding out there! I'll repost if I find something out on this strange one.

Wednesday, December 12, 2007

Living on the Edge! (Windows Vista)

Once again, I'm afraid that I haven't been good about blogging recently.

But my evenings have been filled with much frustration and blue language as I've been setting up my new laptop..... Which uses Windows Vista (Insert 'Psycho' theme here).

That's right! Instead of playing it safe in the comfy world of XP, I decided to go for broke and get the new OS! That's right fellow geeks! You can't stop me! I'm a man on the edge!

So far, it's been a bit of a challenge. My Inventor went in pretty easily, but my Autodesk Data Management Server install was quite a struggle. I had some problems with Port 80, which for some reason, wouldn't pass the prechecks.

I solved them by unplugging my network cable. Why that worked, I don't know.

But here's my honest assessment, after about 12 hours of 'real' use.

I like the look and feel. The 'cool' factor is definitely high, and I'm slowly getting used to the different layout of the OS.

Some of the networking is still driving me bonkers. I haven't figured out how to get it to talk to my XP boxes yet. I'm not sure if this is user error, or something in the OS, but for the moment, I've moved everything from one laptop to another using 'sneaker-net' (aka portable hard drive).

With respect to running Inventor...

You're only going to get 2008. I have my old reliable XP desktop for R11 and previous.

And don't forget! You have to install SP1 for R2008 for Inventor to work properly!

Aside from that, Inventor seems to be moving along without any issues that I've noticed, but I'll be keeping track!

In summary, if I were on a true production (making drawings all day) box, I'd probably wait a little longer before switching to Vista. But, since I'm pretty much pushing the envelope, I figured I'd go ahead and try Vista out.

Wish me luck! Something tells me that things are going to get a little more adventurous.

Wednesday, November 21, 2007

Time for a break.

No Inventor post today, I'm afraid. I do have something in mind, I just haven't had a chance to post it yet.

But I did want to wish the world a Happy Thanksgiving!

Next stop for me! Las Vegas, Nevada, and Autodesk University!


MySpaceGraphicsandAnimations.net

Happy Thanksgiving Animations provided by MySpaceGraphicsandAnimations.net

Saturday, November 17, 2007

Inventor Sheet Metal Book

For those of you who attended the webinar I posted (Thank you again, by the way!), I promised to post up the sheet metal book with the ISBN number one of the attendees was kind enough to share (thank you, I'm sorry, but I don't remember who it was!).

Here's a link to the book on Amazon.com here.

It doesn't look like there's been an update, but the basics are the same, and I've always personally, like the material that Travis Jones and Neil Munro have created (I've been fortunate enough to watch them both present at different times).

I hope everyone finds this helpful!

Tuesday, November 13, 2007

Opening for Import?

Here's a little something that I sometimes find myself getting tripped up by.

Since Inventor R2008 can open a dwg without importing it, how do I tell Inventor when to import, and when to open?

It's actually pretty straight forward. When you choose your AutoCAD dwg to open, there will be an 'Options' dialog box at the bottom of your screen.

Most of the time, these are the options file I ignore, knowing full well I do so at my own peril. I guess you can say that for a computer geek, I live on the edge. (I've been known to go crazy and cut the tags of my mattresses too).

In any case, click on that options button, and you'll be able to choose between opening the dwg, and importing the dwg.

Happy almost Thanksgiving!

Wednesday, October 31, 2007

Take the Short Cut!

On this Halloween, I thought I'd toss up a quick Projects tip; Frequently Used Subfolders.

Let's say you're working with files that are several levels deep in a project, and you're just getting tired of clicking through all this folders to finally get to your files.

The answer for this could be frequently used subfolders (I'm going to call this FUS from this point forward. I'm getting tired of typing the whole name).

In effect, the FUS is just a shortcut. You can create it for a certain folder, and go straight to that folder, no matter where it is in the project.

In this case, I want to create a shortcut to go to my G&G Coffee Table Folder, which is two steps below the default workspace.


In order to create a FUS, you have to edit your projects via the Project Editor (go to Files>Projects). Don't forget that you need to close all Inventor files to do this.


The next step is to right click on the 'Frequently Used Subfolders' header, and choose one of the options (usually add path).


Once this is done, you can click 'OK' and return to the Projects screen. Rename the shortcut title (so you can find it later!), and save the project.


Once you've saved the project, you can close everything down. Now when you go to open and save your files, the shortcut will appear and you can save the hassle of browsing!


By the way....

Happy Halloween!


Sunday, October 21, 2007

Autodesk University

It's on its way now. Only a little time to Autodesk University. I put up this counter to keep track.

I hope to see a few friends there!


MySpace Countdown

Friday, October 19, 2007

Copying Properties, Copy if you can.

As usual, it's been a busy time here at U.S. CAD, but I finally found a few minutes to post a little tip.

One of the features that sometimes gets missed is 'Copy Properties'. It works a little like 'Match Properties' in AutoCAD.

In my example here, I'm going to change the circle dimensions to match the '9.75' dimensions. In effect, we'll be matching dimension styles.


Step 1: Right click on the dimension who's properties you want to copy (the 9.75 in this case).


Step 2: Now just choose the dimensions that you want to match the first, and you're finished!


That's it. As simple as that! You just have to know where to look.

Happy weekend, everyone!

Monday, September 17, 2007

Strengthen Your Skeleton


It's been a little while since I put anything up, but finally, a little bit of time to get something blogged.

I had one of those 'A-HA!' moments a little while ago. You know, that one that makes you wonder why you didn't think of it sooner?

I was working with a friend, and they showed me this way of creating a skeleton for your frame generator.

Create a solid!

Here's a couple of quick steps on how it's done.

1) Create a solid, and drop it into an assembly. I changed the color to red so it would show better.


2) On your assembly panel, switch to the Frame Generator.


3) Now you can insert your frame members on the edge of the solid. You can also use the point to point tool to create diagonal bracing!


Have fun trying this out! There's a couple of places this definitely would have made my life easier.

Tuesday, September 04, 2007

PSA-Avoid quetchup

Nothing on the Inventor front right this second. But I do have some stuff in the works.

But I did want to put up a Public Service Announcement.

In short, avoid quetchup.com at all costs!

A friend invited me (I didn't know SHE a victim of the spammer), so I thought I'd check it out.

Sure enough, the next thing I know my friends are asking me what's up with this quetchup thing?

Turns out it got into my address book and started blasting my entire address book.

If you see the link, just kill it.

Saturday, August 25, 2007

Who's the emboss around here.

As promised to everyone who came out to the Southern California CAD Summit, here's how I created the emboss punch in Inventor 2008.

Step 1.

I created a flat piece of metal in Inventor's Sheet Metal tool. This serves as a 'generator' for my I-feature. I like to create parts who live only to create I-features for me. It allows me to go back and try again if I make a mistake the first time. Make sure you use a Point, Center Point in your sketch or the punch won't work!


Step 2.

Next I draw my 'Footprint' for my punch. In this example, this is also going to be the simplified representation for my punch. You'll also note that I set the circle's offset to be equal to the material thickness. This will allow the emboss thickness to adjust to different sheet metal thicknesses.


Step 3.

I'm going to use Inventor standard modeling tools to create my emboss, so I'm going to go to the Convert pulldown and switch to the Modeling environment.


Step 4.

With this done, I can now start embossing the outer portion of my emboss.

In my example, I've made the emboss's depth 3 times the material thickness, with a taper angle of 15 degrees. Of course your values may be different!


I've colored the partially completed punch blue in this picture.


Step 5.

Now we need to 'hollow out' the emboss. I'm going to reuse the sketch I created back in Step 2, but first I need to use the 'Share Sketch' tool so I can access it for the next step.


Step 6.

With the sketch available again, I can use the extrude tool to cut out the emboss. I use the same settings, but only cut 2 times the material thickness for the cut (so we don't cut out the bottom of our emboss).


Step 7.

With the Emboss nearly completed, we can break the sharp edges with the fillet tool. Notice that I used the Thickness parameter again to keep my emboss thickness consistent.


Step 8.

With this completed, I renamed my sketch to 'Footprint Sketch'. This isn't absolutely necessary, but it helps find the sketch when we need again a little later.


Step 9.

Finally, we get to go to Tools>Extract I-feature and create the I-feature!


Step 10.

Now that the Create I-feature dialog box is up, make sure to choose the punch option. Notice the following:

a) I added the diameter as one of my size parameters (so I can change the diameter of my emboss). You can add as many or as few parameters as you need.

b) I used the 'Footprint Sketch' in the foot print option.

c) Make sure you add all the features you need, in this case I have two extrustions and the fillets. You can also add the features by picking them from the browser. It may be easier that way.


Step 11.

Save the punch, and now your ready to go use your punch in your designs!


Happy Inventing! I hope everyone enjoyed the CAD Summit, and that this post is a useful extension to the event!

Monday, July 09, 2007

End of Evaluation when importing ACAD drawing

Well, for those of us who reuse AutoCAD data, there's been an interesting little glitch that's popped up.


Fortunately, we do have a hotfix out for this snag. It's available from Autodesk.
http://usa.autodesk.com/adsk/servlet/ps/dl/item?siteID=123112&id=9741651&linkID=9242019


Monday, June 18, 2007

Knowing Your Constraints

Just a little constraint tip from the 2008 camp. Some of us old (now I'm dating myself) MDT users might remember something a little like this. (For those of you who don't know what MDT is, it's Mechanical Desktop).

If you're wondering how many constraints are required to fully constrain your sketch, look in the lower right hand corner of your sketching screen in Inventor 2008. It will tell you!


Thursday, May 24, 2007

Inventor LT is here!

For those who may not have heard yet. Inventor LT was issued a bit ago.

Currently it's free. Its functionality is only composed of parts and assemblies, but for the price (did I mention free?) it can be a great translation/training/practice tool.

You can download it from Autodesk labs here!

As for me, I was busy geeking out at the Chino airshow by my home in So. Cal. There were a ton of WWII era airplanes there, and I was in my little slice of heaven.

Here's a couple of pics.


Wednesday, April 25, 2007

A new angle on dimensions....

Well here's another 'latest and greatest' 2008 option. Isometric dimensions. Not the fakey ones we did in the past. Honest to goodness true Iso dimensioning.

You place them like regular dimensions, but based on the points you pick, you can get the correct orientation on the page.


As always if you right click before you place the dimensions (when your still seeing the dimension preview), you can get additional options to use part workplanes to help 'adjust' the dimensions orientation.


I'm looking forward to finishing this side project so I can really use this feature!

Thursday, April 19, 2007

The first 2008 tip!

In between the usual schedule, here's the first tip for Inventor 2008.

I've noticed that Inventor is trying hard to be helpful, and when you first start it, will always want to bring up the help system.

That's all fine and dandy, and could be a really helpful feature. However, there comes a time when you'd probably want to turn it off.

If you go into your Tools>Application Options, and uncheck the 'Show Help on Startup' Option, you can disable this feature. It'll be on the general tab.

Monday, March 26, 2007

2008 is around the corner, (for Inventor at least)

Well, it's that time of year again. New release season.

Inventor 2008 is coming around the bend, and with it, all sorts of new bells, whistles, lions, tigers, and bears, with an added barrel of monkeys to boot.

But at least the what's new doc is out! Take a look here! (it's a *pdf file)

Friday, March 02, 2007

Microsoft Hotfix KB918118 fixed!

Autodesk has released a hotfix for Microsoft's hotfix.

It can be downloaded here.

Make sure you download the correct version for your product (there are different hotfixes for Inventor Series and Inventor Professional for example)!

Sunday, February 18, 2007

BIG problem with KB918118!

Well, it's been a while since I've had time to post, but here's a good reason to get one up there.

Late Friday we ran into an issue where the Microsoft hotfixKB918118 causes the Inventor drawings to have text disappear and become uneditable (see doc here).

Autodesk is working with Microsoft to fix the issue, but right now your best best is to uninstall that hotfix.

Tuesday, January 16, 2007

Putting the Parameter in Parametric

It's been a bit since I've posted, but with the holidays, and a one week snowboarding vacation in Mammoth, it's been pretty hectic.

So here it is, a bit late, but my first post for 2007!

We all have heard that Inventor is a 'parametric modeler', but how can that help us (other than making us sound REALLY smart in meetings)?

Inventor remembers all the dimensions currently used by a model, and because of that, we can use these dimensions to help make our models more intelligent.

In this example, I'm going to take a very simple block, and create a pocket that will always be half the blocks thickness. The advantage of parameters is I can get the computer to remember this instead of having to remember (and risk forgetting) myself.

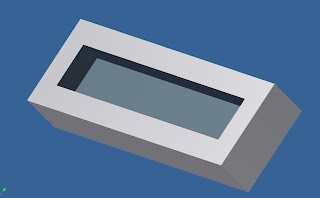
First will start with a simple, extruded rectangle, to make a brick.


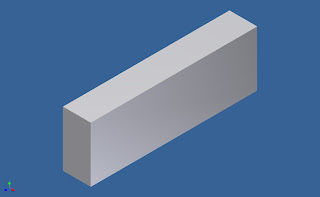
This part contains four parameters. Two parameters define the dimensions of the cross section, the third defines the extrusion distance. The last one, defines the taper of the extrusion (this one doesn't have to be renamed, but I've done so just for clarification).

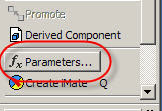
Your first step is to click on the parameters button on your panel bar.


This brings up your parameters screen, where you can change the names of the parameters to something more meaningful than their defaults (d0, d1, etc).

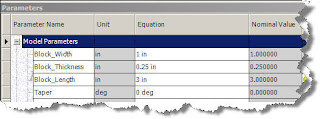
Note that I've used underscores instead of spaces. The parameters screen doesn't like 'special characters' such as %, &, etc. In the case of the parameters screen, spaces are considered special characters.

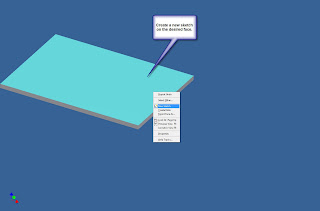
One you've finished renaming the parameters, you can create a new feature, and use these characters to help build the next feature.

In this case, I'm just going to draw a pocket. However, when I go to edit a dimension, I can right click in the window, and bring up a flyout screen that says 'List Parameters'.

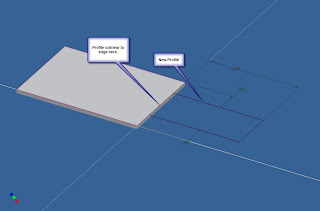
Inventor will list any parameters I've renamed (it will ignore any that I haven't renamed).


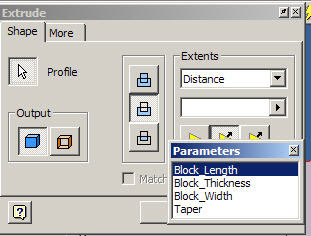
Here I've placed it in the extrusion screen, but it will work in any screen where Inventor will ask for a dimension.

Once you have your dimension linked to a named parameter, you can place a mathmatical operator (in this case I'm making the pocket half the Block_Thickness).


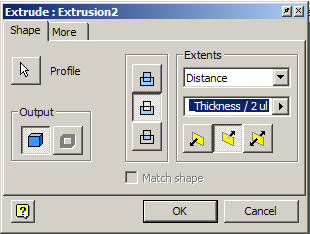
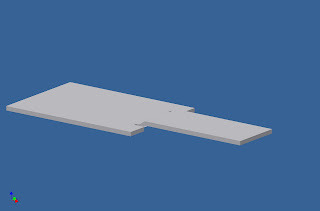
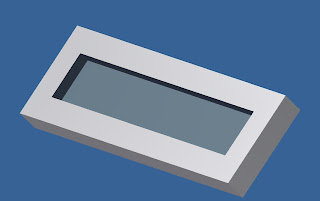
See the finished product below:


Next you can modify the Size of the part, and see that the pocket updates automatically, maintaining half the thickness.


Finally, you can reopen the parameters screen, and see the new relationships that have been created by Inventor.

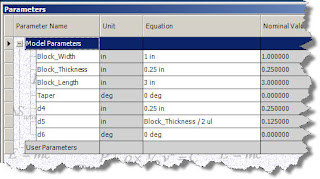
Note that the parameters display the relationship. Also, the new parameters aren't renamed (although I can keep right on going renaming and reusing if I'd like!)

Happy Inventing!

And by the way...... Mammoth was great! I already miss it!