Find us on Google+ Inventor Tales: General Inventor Topics
Showing posts with label General Inventor Topics. Show all posts

Friday, June 30, 2023

Why Combine Two Different Radii Fillets in One Feature? - Food for Thought for Autodesk Inventor and Fusion 360

 Once upon a time, I was asked, in reference to Autodesk Inventor and Autodesk Fusion 360, "Why would someone want to have a fillet feature with more than one radius in it?" 

An example of two different fillet radii in Fusion 360

It's a fair question. It's likely we can pick a feature in just about any CAD tool and ask, "Why is that there?"


But to that end, I did have a reason one might want to combine two different fillet radii in one feature. 

It's a matter of organization. In my design work, I often find myself modeling O-ring grooves, which nearly always have a different radius at the top and the bottom of the gland. Having the ability to combine the different radii in the same feature allows me to combine the fillets into a "O-ring Radius Feature", and maybe shave down the feature tree a little bit. 


An O-ring groove using two different radii fillets in the gland.


O-rings installed in the glands.
Just to give some context to the first image.

Another case I've used was way back when I was designing sheet metal tooling. I used it when "keying" a rectangular insert. In that example, the opening has 3 radii of one size, and the fourth is a different radius. The insert has chamfers of a similar size. This prevents the insert from being inserted in the wrong direction. Why fillets on the opening and chamfers on the insert? It was easier to machine with the tooling of the time!

An example of a sheet metal stamping insert


The"keying" feature up close.


Admittedly, these two example are very specific to my own design experience. But perhaps it might give someone food for thought.

While you might not run into one of these particular examples I've described, maybe there will be something similar that you can use.  

Is it life changing? Not very likely. But maybe it's a little food for thought as you make your way through the 3D CAD world. 

Tuesday, May 10, 2022

So Solidworks Happened at Work Today - A Musing

I've spent just over 20 years working with 3D CAD programs. That experience has been nearly exclusively with the Autodesk manufacturing product line, starting with Mechanical Desktop (shortly after the earth cooled), and followed by Autodesk Inventor. 

We've all seen the ubiquitous, 3D model, floating in space.

A couple of years ago, my company decided to experiment with switching to Siemens NX.

That experiment, unfortunately, failed. Siemens NX, while a good program, wasn't the right program for the needs of my employer. 

A few months ago, my company announced that we would be going to Solidworks. 

Other than dabbling in it a few times, I've never touched Solidworks. This could be an enormous change for me. 

Or not, perhaps? 

CAD Tools - Is it just
a Virtual Toolbox?

I completed an abridged "transfer training", where we were shown where all the buttons were and how Solidworks ticks. After that, we were released upon the world. 

And what did I find? Were my eyes opened to a brand new world? Was Solidworks so much better that I wondered what I was missing? 

Did I wail and gnash my teeth because Inventor was far better and I was being forced to use this inferior product?

No. I left that training and thought, "Wow! They're really similar." 

Sure, Solidworks has an Extrude and and Extrude Cut button, while Inventor has the same options combined within one Extrude command. But they both add and remove material in the end. 

There's functions where I think Inventor has it down better, and others where I have to give it to Solidworks. 

In the end, I see it as an opportunity to learn a new skill, enrichen myself, and be more marketable in a competitive world. I think that's going to take me further in the long run. 

So I suppose the point of my writing this is to muse about how CAD programs are tools. They're not the endgame, there the means to create our designs, drawings, and help us build our products. 

And there's nothing wrong with learning a new set of tools. It can only make me a more marketable designer. 

One Final Note

If you're using Fusion 360, you can change your Pan, Zoom, Orbit shortcuts to reflect Inventor or Solidworks, among other programs? 

I've switched mine to Solidworks, it may not be the same as having Solidworks at home, but it does makes it easier when I switch from one to the other at work! 

The Pan, Zoom, and Orbit options in Fusion 360


Thursday, May 06, 2021

A Musing on Modeling Safety Wire - How Much Detail is Necessary?

A question that was recently posed to me was; "How would you model safety wire in an assembly?" 

Safety wire on a fuel
divider on an 
aircraft engine
At first, I thought I'd write a post trying to summarize the standard, and how I've seen it approached in my travels over the years. But no matter how I tried to "summarize" the standard, it ended up too long, and so dry it put me to sleep.  So instead, I'm going to try writing this briefly, and hopefully to the point. 

First of all, Safety (aka lock-wire) is small diameter wire of various sizes that is used to prevent fasteners from loosening and ultimately falling out. It should always pull in a direction that tightens the fastener. It's usually twisted with 6-8 twists per inch. 

Of course there are more details, but they're covered by standards. In my aviation maintenance travels, that standard is AC43.13-1b, issued by the Federal Aviation Administration  (FAA). In my engineering travels, that standard is NASM33540.  I'm sure there are other standards.

That's important. The standards tell the installer how to secure the fasteners with safety wire.

So when it comes time to show safety wire on a model or drawing, is it normal to show the twisted wire?  Is it modeled exactly as shown in the
image to the right?

Heck no! That takes a lot of time and computer resources, which gets expensive fast. And having a standard to reference, there's little to be gained other than bragging rights for the designer. 

Instead, I've seen, and used, on of two alternatives. 

The first, is to use a sweep in the model, showing where the wire should go. This takes a little modeling time and dedication, but it will show up on the model, and propagate to the drawing when its created.

Safety wire shown in the model.
I've colored it in red here to make it stand out. 


The modeled sweep representing the safety wire on the drawing.
A leader references the standards in the notes
.

The other, is to use sketch geometry when the drawing is created. It takes a bit of time to sketch in the drawing, but the results do a good job of showing the desired result.


Sketches on the drawing calling out the safety wire
Circles and lines represent the wire's twists.

Which ever method is used, a note can call out the standard to be complied with.  So the wire shown on on the drawing and model show where the wire should go, the note calls out the standard to reference.

If the installer has any doubts, the standard should be readily available for reference. I know in many cases, it's probably even legally required to be available. 

The next logical question for a reader may be, "How does this apply to me?" After all, while safe wire isn't uncommon, there are plenty of users who live long, fulfilling lives without ever touching safety wire.

If you get anything out of this post, ponder if there's anything that can be streamlined by adding more or less detail? How detailed does the model of that purchased part need to be? Are you spending extra time showing model details that are covered by a standards that can just be shown by a note with a leader? 

Perhaps take a few minutes to think it over. You might find you save hours! 

Acknowledgements

Models created by me in Autodesk Fusion 360

McMaster Carr models used:
  • Round Head Screws (wire lockable) - P/N 90350A310 
  • Flat Washer: P/N 92141A011
  • 45 degree elbow (37 degree flare to NPT): P/N 50715K637
  • 90 degree elbow (37 degree flare to NPT): P/N 50715K413
FAA Reference for Safetying: AC43.13-1b (See page 7-19)

NASM33540: This document is only available for purchase, so I've added a link to the old standard, MS33540.  It's very similar to NASM33540, as well as AC43-13-1b

Thursday, October 12, 2017

I Can't Select Threads in Autodesk Inventor! - An Old Nemesis Rears its Head!

My threads! They don't work! 
Earlier this week, I noticed that I couldn't select threads in my installation of Autodesk Inventor 2015.  Knowing the solution, I shrugged, fixed it, and went about my day. 

I just chalked the incident up to a fluke.  You know, just "one of those things".

If you want to jump straight to the solution, here it is from my post about 3 years ago!  Fix your Inventor! 

But today, I stroll into work, and find out that several of our machines can't place threads, so I spend a chunk of my morning fixing machines, and making videos showing others how to fix their machines.

We'll, it seems there's something more to that.  The word on the street is that a Windows update to Windows 7 and Windows 10 caused the issue. It affects Inventor versions 2016 and earlier.

It makes sense to me!  Too many machines were knocked out at once! 

Thankfully, the fix is easy once you know how! 

Good luck!


Friday, January 27, 2017

Making up Miles by Measuring Inches - My 3DConnexion CADMouse Anecdote

***Disclaimer!***
The pictures I'm using for this blog post are of my home laptop running Autodesk Fusion 360 with a CADMouse and SpaceMouse, both made by 3DConnexion.  Security at work limits what I images I can share from my work station.

Better safe that jobless!

*** End Disclaimer!***


It's likely we've all heard the quote "A journey of a thousand miles begins with a single step".  And I'm just as sure that millions of "bar-stool philosophers" like myself have used it in some sort of discussion or debate.

Earlier this week, the microcosm of my CAD station gave me a moment to reflect on that quote again.

Since I started at my new position as a mechanical designer about a year ago, I've had a 3DConnexion SpaceMouse Pro and 3DConnexion CADMouse.  What can I say, work takes good care of me!

My laptop running Fusion 360.  I need to program buttons for this too. 
At one point, I had all the buttons mapped, and I was happily using radial menus and hotkeys.

But then, our CAD stations were upgraded, and all my settings were lost.

For most of that time, I keep telling myself.  "I need to rethink what commands I use most frequently, and start programming them into my devices."

And for most of that time, I've told myself.  "I really need to finalize what commands are really important to me.", or "I'll do it tomorrow.", or the infamous, "Once things slow down a bit."

That's how nearly a year passed with all my buttons set to their default settings.

My CADMouse menu in Fusion 360


Finally, I told myself, "Jon, just pick a command and program it!"

So I did.  I picked a few commands, and put them into my SpaceMouse Pro and CADMouse.

Programming the menus for my 3DConnexion CADMouse
And nearly instantly, I started wondering why I hadn't done it sooner!

What were the lessons I learned? 

  • Don't fall victim to "Analysis Paralysis".  I postponed making a decision until I had all the information.  The problem is, I had no hard stop to when I was done evaluating.  I could always "test a little longer". 
  • Just start already!  It's not like the path can't be changed while keeping the destination the same.  
  • We get so focused on the big goals, we forget the little steps.  Nobody knows that I customized my SpaceMouse Pro and CADMouse.  And there's really no need for them to.  But navigating my CAD system is much easier because I took a few minutes to do so.   


Conclusion?

Now, it's not like my 40 hour week suddenly turned into a 30 hour week, or that project that's going to take 18 months suddenly took twelve months because of my pre-programmed 3DConnexion devices.

But what did happen?

Things were just smoother, and dare I say a little more pleasant.  I wasn't reaching for my keyboard for commonly used hot keys, moving across a large monitor to get to an icon.

Now it didn't take my 40 hour week and make it into a 30 hour week, but it did make navigating my tools a little easier.

It's like having your favorite stations preprogrammed into your car radio.  It doesn't make a dramatic change in the lenght of your commute, but it does make the time you spend more pleasant.

Sometimes, it really is about the journey! 


Wednesday, August 17, 2016

10 Years! Unbelievable!

I can't believe it !  On this very day, in 2006, I created my first blog post for InventorTales.

It was under a different name then, it was actually about 8 years ago, that InventorTales took form.

The very first image posted to my blog. 

An Autodesk Fusion 360 rendering I created last night.
This product wasn't even a dream when I created my first post. 


But still, I'm stunned.  Has it really been that long?

10 years ago, I was;

  • I was younger! 
  • I had hair!
  • I was in better shape! 
  • I was single!
  • Inventor was't using years to reflect versions
  • Fusion 360 wan't a glimmer on the horizon yet! 
It's been an amazing 10 years!  The one thing I've learned is that things are always changing!

Thanks for an amazing decade!  I hope to keep things up for another ten years, even as times change!


Monday, August 08, 2016

The Art of Development - Give Your Content a Chance to Mature!


Today is a "5 minute" post.  Just a little idea I had while working in Autodesk Inventor. 

In my current engagement, I've taken on creating custom content in Autodesk Inventor's Content Center.  That means creating tables, upon tables of various hardware.  Mostly NAS and NASM hardware.  

It's not difficult, but it takes time, and it takes patience.  And that means there are times that I have to leave content incomplete, not ready to use, but it's still in the shared content database, exposed to the users. 

So that left me with a conundrum.  How do I make sure the users don't accidentally use the content before it's ready to release?  

I thought of the traditional route, which is to put "Do not use" or something similar in the family description, but then I had an idea I liked a lot better. 

I decided to use an image.  Just how graphical images are used to convey important information quickly

You can see the image I used in the screen capture below. 

Can you guess which one you shouldn't use?  


So enjoy the bit of humor I used to break up a long, tedious day.  And perhaps think of how you can use that in your daily projects, for both practical purposes, and maybe a little bit of humor! 

Sunday, March 06, 2016

Showing Trimmed Edges in an Inventor Model

My father had many a humorous saying.  One I remember came from his days as an aircraft mechanic for over 40 years.

"Mark it with a micrometer, mark it with a chalk, cut it with an axe."

It was a humorous reference to the futility we all encounter in our careers, whatever it may be.

I was reminded of this saying when I was reproducing a part that had a note indicating that a piece of standard extrusion was going to be "trimmed to fit.".

Technical translation?  "Here's extra material, so you can make it fit in the field".


An example of "Trim to Fit"

But how do we represent that in the print?

In truth, there are several ways you could accomplish this.  The one I present here, is just one idea.

First, offset a work plane the desired distance from the edge to be trimmed, in this case, I chose the maximum of .093 inches.

The first step is creating the work plane.
After the work plane is created, choose the Split command, and chose the "Split Bodies" option from the dialog box.

Make sure to choose the work plane as your split tool.

Splitting the bracket

Once that is done, create your drawing as you normally would.  But you'll notice there's a bold line where the solid representing your bracket was split.


Now comes the trick!  I'm going to make the lines representing the trimmed section dashed.  This can be done by right clicking on the lines, and choosing "Properties".

Changing the lines from solid, to dashed

Once this is done, the part to be trimmed can be clearly seen!


The indicated lines are dashed! 
There's the trick, but why use it over several other methods, such as creating sketch lines in the model, or drawing or perhaps only splitting a face?

Here are my reasons, I only ask you to consider them.

  1. Splitting the part doesn't create any extra files, this approach keeps everything in the part (*.ipt) file. 
  2. Changing the lines is easy to do, the split creates a "natural break", which prevents having to create any sketch "trickery".
  3. The split can be moved pretty easily, by changing the work plane's offset.  This let's you represent the geometry more accurately if you desire. 


So there are the reason I chose this method.  Feel free to see what you think, and use this tip should you ever need it!


Sunday, February 28, 2016

Embedding a PDF into a DWF file - I Did Not Know That!

I've been quiet on this blog the last couple of months, but life has been busy, and blogging had to take a low priority.

The last few months have felt a bit like this!  Without the fun!
But here I am, back to blogging!  This week's tip is short, but I think that it's something that might prove valuable!

During my current adventure, I saw a trick.  It's that trick that strikes so many of us.  The one that makes you say "Why didn't I try that!"

Well, at least I can share it!

Did you know that you can drag PDF documents into Autodesk Design Review and have them be accessed from the DWF file?

Here's a simple description.

Here I have a NAS (National Aerospace Standard) screw with an "offset cruciform" head.  I've exported the model from Inventor to a DWF file.

A DWF of an offset cruciform screw.


That part is well and good.  But where you hear the word "standard", there's bound to be some sort of data sheet.

The NAS standard for offset cruciform screws.
And sure enough, there is a standard available on all the sizes, part numbers, etc.  So what if you want to include this with the DWF?

Sure, you can attach both documents to an email, that will work just fine, and it's probably how most of us do it.

But what happens when the file will be downloaded, uploaded, file shared, and transported via USB?

There's always the chance that the files will become separated. 

Did you also know that you can drag and drop the PDF into the desired DWF?  All you have to do is drag it and drop the file into the browser.  The steps are simple, but there are a couple of important things to remember

1) Make sure you're on the "List View" or "Thumbnails" view in the browser.  If you don't, a new DWF file will be created from the PDF, instead of embedding the file in the current DWF.


Make sure you make the correct selections on the browser!

2) Now drag the PDF from Windows Explorer into the browser! That's it! 


Drag and drop into the browser!

3) Now you're ready!  the PDF will be converted and embedded into the DWF!

The DWF and PDF in one place!
So give it a try the next time a DWF is getting shared.  You might find it helpful!

One Last Note!

If you'd like the information on the offset cruciform screw in this blog, Coast Fabrication has a link for it here.   On the main page, you can find additional NAS standards here.

I have used this data to build a series of Inventor iParts for the fastener as well, you can find those at the GrabCAD link here

Enjoy!

Photo Credits

photo credit: Rebecca meets the puppies via photopin (license)

Wednesday, June 10, 2015

Creating a Rivet Hole Chart in Autodesk Inventor.

In my adventures taking aircraft maintenance classes at Mount San Antonio College, I've learned a lot of things.  Not the least of which, is how much I have to learn!

Another piece of knowledge I'm grateful for, is how to drive and set solid rivets.  I'm not the best at it, but I can do it, and practice will make me better.

A sample rivet plate

One thing about riveting has been indelibly etched in my brain.  Rivets require precise holes to be properly fitted.  So much so, that a rivet is often referred to by the drill used to make the hole it fits in. 

For example, a "30" rivet is a 1/8 diameter rivet, and  uses a #30 drill for it's pilot.  A "40" rivet is 3/32 in diameter, and uses a #40 drill for it's pilot.  

A sample of the hole size for standard Imperial Rivets.
From EngineersEdge

If you're inclined to read about it in detail, you can find the specs at Engineer's Edge here, or in the Advisory Circular AC43.13 from the FAA here (start at page 4-14)

Merging that knowledge with my Autodesk Inventor knowledge, I found myself thinking, "How can I capture that knowledge?". 

My thoughts turned to the clearance hole table, which is maintained by an Excel file named Clearance.xls, can contain the new information I wanted to add.

I thought I'd share the steps I used for adding these holes.  Perhaps this is something you can use to adapt your own special clearance holes.

There are two types of clearance holes, the universal rivet, and countersunk rivet.  Basically, that means I need a countersunk hole, and a straight hole. I won't be using counterbores for rivets.

Universal Head Rivet
From Aircraft Spruce

A countersunk rivet
From Aircraft Spruce
So let's get started.

The first step?  Close Inventor.  This will make sure that when you place a hole, you're reading in the latest clearance table.  I also ran into errors when I tried placing holes with the clearance table open.  Something to do with Excel locking the file.

Locate the clearance.xls file.  It's location can vary, but it's set either in the Design Data location in Application Options, or Design Data in the Project.  Remember that if the path is set in the Project file, it will take precedence over the Application Option setting.

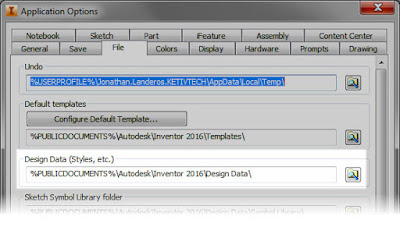
The Design Data location set in Application Options. 

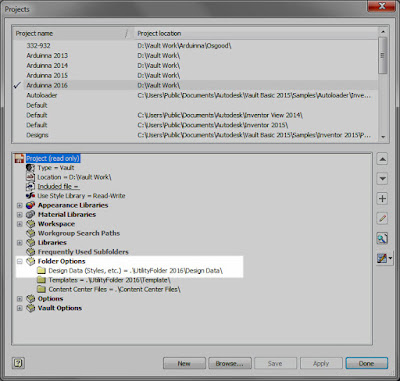
The Design Data location set in the project. 


When you find the location, look for the ...Design Data\XLS\en-US sub directory.  It will have the Clearance.xls file you're looking for.

Before doing anything else, make backup of the original Clearance.xls file.  Just in case it gets go horribly wrong, the backup provides a safe haven to go back to and try again.

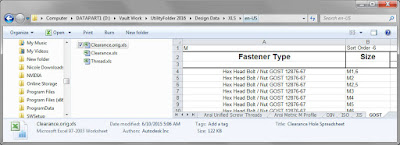
The location for Clearance.xls.  Notice I've also got a backup Clearance.orig.xls

Next, it's time to edit the Clearance.xls file and add in the new values.

Looking at the sheet, there are several columns, and it goes without saying that each does something. Some will be more obvious than others.

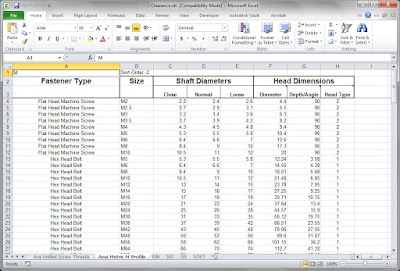
A sample of one of the charts in the Clearance.xls chart.

From left to right, here they are.

  1. Fastener Type - This is a description of what type of fastener you're using the hole for.  This is the value you select in the hole dialog box. 
  2. Size - This can be called the "nominal' name for the clearance hole.  In other words, if you're describing this fastener or clearance "in the shop" what are you asking for?
  3. Shaft Diameters - This includes diameters for Loose, Normal, and Close fits.  Very typical diameters for many fasteners. 
  4. Head Dimensions - This is broken down in to three columns that require clarification on their own. 
    1. Diameter - The diameter to accommodate a fastener's head. 
    2. Depth/Angle - This is the depth required to clear the head, or if a countersunk fastener, the angle of the head. 
    3. Head Type - What type of fastener this is.  The number "2" designates a countersunk head.  A "1" designates a 'standard" head. 
Armed with that knowledge, it's time to setting things up!

The easiest thing I found to do is copy one of the existing sheets.  It can serve as a template to create the new table.

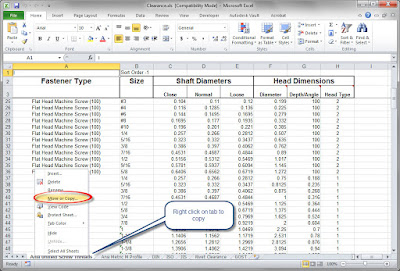
Copying the Excel table

So now the table is copied, we understand what the columns do.  It's time to start editing.

Most of this is just taking the values from the standards and copying them into the tables. But I am going to use a couple of tricks to get the table to do what I want.

For starters, rivets don't have close, normal, or loose fits, there's really just one proper nominal dimension.  So I'm going to set the the values to close, normal, and loose to the same thing.  That way, no matter which the end user chooses, they get the right one.

Also, I'm not using counterbores with my universal rivets. In order to make that "unselectable", I'm going to set the counterbore diameter to be smaller than the shaft diameter.

Making the counterbore diameter smaller than the shaft diameter will force the counterbore to "error out" if someone tries to use it.  It's not fancy, I know, but it will work.   I can always change it later too!

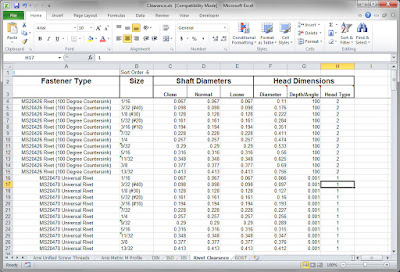
My creation. The rivet clearance chart for Inventor
That's the big part, but now there's a couple of more details left.

I'm going to set the "Sort Order" to make sure that the tab appears where I want it.  This affects the order in which the table appears in the hole dialog box.  Just like the name describes, 1 is first, 2 is second, etcetera, etcetera.  (A guy with my haircut has to use that reference!)

I'll also rename the sheet to something meaningful to someone using it.  You know, like "Rivet Clearance".  It took me a while to come up with that one!  (sarcastic grin).

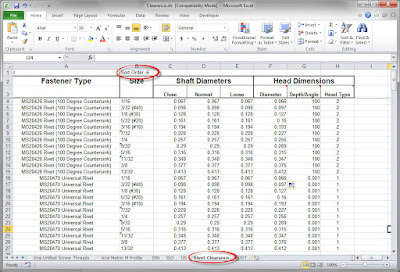
Changing the Sort Order, and renaming the table.

Once this is done, fire up Inventor, and test out your new table of date!  Now you're ready to go!  You can see where the Table Name, Fastener Type, and Size appear in the hole dialog box.

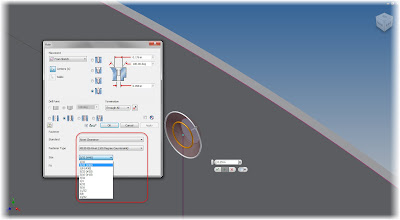
Placing the Rivet.  Notice how the names (circled) correspond to the Clearance.xls table.
Now, it's time to "serve and enjoy" your new chart.  And don't forget to make a backup of this data too!  There's nothing worse than doing it twice.

Even if you can't use it for rivets, perhaps you can adapt this for something else!


Saturday, May 30, 2015

Importing and Exporting Your Autodesk Inventor Settings

A few weeks ago, I had an opportunity to write for the CAD Setter Out.  In that post that you can find here, I wrote about some of the settings that I like to change in Inventor's Application Options.  These are settings I change on any new install of Inventor I'm going to use.

These are my settings of choice.

Not too long after writing the post, I found myself working offsite for a few weeks.  The computer I was using wasn't mine.  It was a loaner.

So I did what I always did, I set up my Inventor installation just the way I wanted.  All was good the first day. 

But when I returned the next day, after rebooting the computer, I found that my Inventor installation had returned to default.  I had to reset everything!  And while this too a few minutes, it was a nuisance. 

The IT department knew it was likely something in the windows profile, but they had their own set of challenges: 
  • They were in the middle of upgrading some of their own systems, so they had limited time for me
  • My issue only took a few minutes for me to fix, so it was far from a "show stopper". 
  • I was only going to be onsite for a short time.  
Given those factors, it's understandable why they didn't jump on my issue.  

That meant finding a way to do the best I could with what I had. 

Thankfully, I was able to draw on a trick that made this issue much less challenging.

I thought it might be worth sharing.  I hope you agree! 

All you have to do is export your settings to an XML file.

So let's get started! .

The first step is to setup your Application Options just the way you want them.  This is just like you've likely done before.

Remember, these are found on the Tools ribbon. 

Some of my preferred Application Option settings

But now, select the Export button.  Choose a location and save the XML file with your default settings to a safe place.   In my case, I just saved it to a folder on the desktop of my machine.

Exporting the settings to a preferred location


You might consider putting it on a USB stick, or on a cloud account like Dropbox, Copy, or A360 Drive.  You could even e-mail it to yourself.  As long as it's someplace you can find later.

After my computer had restarted, and Inventor had again returned to default, I was able to go back to my application options and import my preferred settings.  In a few minutes, Inventor was set back the way I liked it!

Importing the settings back into Inventor
What's the big benefit?   You can walk up to any machine and bring your settings with you.  It can make setting you machine up much easier.

In my case, it gave me a quick way to restore my settings until the IT department was able to tweak my user profile, rendering the issue moot.

I must add one disclaimer however, or else I'd be doing you a disservice.  I've not tempted this particular fate myself, but I have on good authority that this doesn't work well for migrating customizations.

In short, new tools, ribbons, and options may exist when a new version of Inventor is released.   A settings file from a previous version may not know how to address these new settings.  As a result, they may not work correctly.

So in other words, just use it across the same version, and all should be fine.

In any case, keep this in mind in your own uses.  Any time you need to bring in your preferred settings to Inventor, have this at the ready, and you can have your preferred settings at your finger tips!

Also, if you expand the flyout under the import button, you'll see Use AutoCAD Related Settings, which will set Inventor's appearance to mimic AutoCAD, such as having a black background in the modeling environment .

There's also Use Inventor settings.  This resets Inventor to its default settings.  Good things to know if you're experimenting with settings!

Inventor's alternate settings

So take these settings and see where you can use them!  Maybe it can help you! 

Tuesday, May 12, 2015

Installing Your Brand New 2016 Autodesk Suite

Work has been picking up again, which is good!  Being busy beats not being busy for sure!

But this weekend, I did find time to install my 2016 Suite, in this case, Factory Design Suite Ultimate.  I had the foresight to record the steps too! . 

But like so many things, the preparation can't be overlooked.   To make your steps go as smoothly as possible, make sure you've done the following before getting started. 

  1. Make sure you have Local Admin rights!  You won't get far without them! 
  2. Turn off your Antivirus.  I don't see too many AVs stop an install now, but I have seen cases where the antivirus will slow the install as it checks the install files. 
  3. Turn of User Account Control.  I've seen it cause issues, and I hate that thing on any Windows OS I've used. 
  4. If you're running a network licensed version, make sure you have your new license files.  Nothing is more frustrating than getting the install  finished, and realizing you haven't updated your licenses yet! 
  5. On that same vein, if your using Autodesk Vault, have you updated it yet?  Consider upgrading your server first!  You can't use your 2016 products with a 2015 Vault.  A little planning goes a long way.  Check out my post here for info on that! 
  6. Give yourself time! These installs take a while.  That's a fact.  You don't do it "in a few minutes".  I've had to leave my laptop at the office because it was only 50% done at 5:30PM.  Don't make that mistake, give yourself a few hours to get it done properly. 
  7. And if there's any doubt, as your admins, your cad manager, or check the Autodesk Inventor discussion groups!  A little clarification goes a long way! 
So you've done your planning, and now you're ready to install.  Go ahead and click on your Setup.exe and let the installation initialize. 

Soon you'll see the intro screen with the Deployments, Create Deployments, and Install buttons.  I'm going to just install my Factory Design Suite directly, so I'm just going to choose Install


The next page you'll see is the End User License Agreement (EULA), you have to accept it, or else your journey ends here.  Click yes, and click the Next key. 


Now, to choose a if you're using a Network, or Standalone license.  A Standalone (node locked) licenced machine hosts it's own license. This is often found on laptops that are aren't always connected to a network. 

Network licenses check out their licenses from a central server, like a book from a library.  

I won't go into the details of each, but it is important to know which one your installing right now . If your not sure, check with your CAD Manager, or your friendly neighborhood reseller.  

You'll also enter your serial number and product key here.  If you don't know what they are, there are instructions on how to locate them here.  Once you have everything you want, you guessed it, hit Next


There's one more screen before the big time! It's time to choose which products to install, assuming you want to pick and choose. 


There's several things you can do with this screen.  As indicated by the arrows...

  1. Click the arrow to expand the screen and choose options for a given products, such as configurations, settings, and to download and install additional updates.
  2. The arrows will display additional information.  For example, content center libraries are available to download now. 
  3. Finally, change in the install directory if you'd like to install somewhere other than default.  Such as a drive different than C:
Once you've set all these options, you can choose Install.  At last! 


This is the part that can take a while.  Give yourself a couple of hours for the install, more if you're going to remove old products.  It takes time, so be prepared. 

After waiting it out, you'll be rewarded with the sweet sight of success!   


Now, you're ready to migrate styles, and get your new suite ready to use! 

: