Find us on Google+ January 2012 ~ Inventor Tales

Monday, January 30, 2012

On Vacation Today!

Hey, everyone!

I'm pushing this weeks blog post back a few days. 

I'm on one of my winter holidays up to Mammoth Mountain, Ca. 

I hope everyone has a good Monday!  I know I will!

This was my weekend! How was yours?

Sunday, January 22, 2012

Creating Custom Content for Autodesk Inventor Content Center - Part 4 (Hint: Editing Family Tables)

“I won't deny there's some big changes coming down the road.”
Rick Higgins

In my last blog post on Content Center, I wrote about adding components to Content Center.  But just because the component is added, doesn't mean it's ready yet.

An image of the wood screw I placed into Content Center in my last blog

There may be fields to be added, removed, or changed.  You might want to add components to your tables, making more variations of your part available.


So this is a blog on how you can start making changes to your tables, expanding them and making them work for you .

In this video, I take the wood screw that I added to my Content Center in my last blog, and add some stainless steel variations, remove an unneeded column.

I'll also make one of the columns a "Key" column that will allow me to choose a Stainless Steel or Carbon Steel wood screw.

Placing the screw.  Nominal size, Total Length, & Material are my key columns.

I wish I could cover all the possible changes that could be made, but there's just too many to cover.  But the video should help get you started!

Thursday, January 19, 2012

KETIV's 2011 Autodesk Manufacturing Academy Recordings are Out!

“Nothing has really happened until it has been recorded”
Virginia Woolf

At long last!  After much hard work, the bow tie on the 2011 edition of KETIV's Autodesk Manufacturing Academy!

The videos!  They're all up and ready for download!

So if you've attended the classes presented by the the KETIV technical team, or even if you didn't attend, and want the benefits of the course materials.  Take a swing by the session archive and download all the materials!

Click HERE for the link to download the materials!  

Fire away and start eating up some bandwith!  ;-)  You can even download the 2010 and 2009 materials too!

I hope those who attended took some useful things away!  Go

I hope to see you all, (and a few more) at the next 2012 KETIV AMA!


And as a trailer for the movie, here's a sample of the classes on Autodesk Showcase, so you can get an idea of what's available!

Special thanks to Tolar Manufacturing for providing us with some great real world samples to use in the session!

Autodesk Showcase Part 1 - Importing Models


Autodesk Showcase Part 2 - Changing Environments


Autodesk Showcase Part 3 - Assigning Materials


Autodesk Showcase Part 4 - Changing Materials


Autodesk Showcase Part 5 - Adding Lights

Sunday, January 15, 2012

Creating Custom Content for Autodesk Inventor Content Center - Part 3

 “Then memorize it, practice it, personalize it and then you can easily customize it for success, ... The Boy Scouts have it right: Be prepared - always.”
Steve Walsh  

In my blog last week, I described how to setup Autodesk Inventor's Content Center Libraries so they could components could be written to it.

Now with the custom component created, I'll take the next step and show how you can publish an iPart to the read/write library that was created earlier.

An example of a part that's been published to Content Center


When published to Content Center, a custom component places into Inventor just like a component that shipped "in the box" with the product.


Placing a custom part into an Autodesk Inventor Assembly

This can help centralize components, keeping things manageable from one place instead of several.

Special thanks to Charlie Bliss's website.  Where I got the iPart I used for this example.

When creating these components, I would recommend one thing.  Make sure that you test the library out a couple of times before you "release it into the wild".  I've found that I'm never 100% happy with my first result, and make a couple of changes before I'm ready to let it go.

So double check, it's a lot easier to fix it before you let other designers get their grubby little hands on it!

And to get all the details, here's a video for you to check out the steps!

And don't forget to click here for the final part of this series, Part 4!


Wednesday, January 11, 2012

Creating Custom Content for Autodesk Inventor Content Center - Part 2

“I have always imagined that Paradise will be a kind of library.”
Jorge Luis Borges

In my last post, I talked about Content Center.  Mostly what Content Center is, particularly with respect to Desktop Content Center versus Content Center running through the Autodesk Data Management Server Console.

But the long term goal of this series of blog post is to publish content to a custom library of our own creation.

So for our next step, I'm going to create a short blog post on creating those custom libraries.

The libraries that come with Autodesk Inventor are Read Only.  So you can only use them, you can't modify them, or add to them. 

In order to be able to make additions and modifications, you need to create a Read/Write Library.

The first thing to know, is if you're using Desktop Content, or Vault Content.  The libraries are created in different places for each.

I'm using Desktop Content Center

With Desktop Content, go to the "Get Started" and choose "Projects".

Choose "Configure Content Center Libraries.  A new screen will appear that will allow you to configure the libraries for your project.

Now you're ready to create a Read/Write library

Select "Create Library", and a new Read/Write Library will be added with the name you enter

Creating the Read/Write Library
Important!  Make sure the new library is checked!  If it's not, the library won't be available to the project!  This, needless to say, makes the whole point of creating it moot.  

Custom Library Created.  Note that it's checked! This makes it available for the project to use!
I'm using the Autodesk Data Management Console (Server)

We'll need to access the server, and have administrative rights to the Autodesk Data Management Server, so be ready to bribe the I.T. staff or Cad Manager if necessary.

Once you've gained access to your server, right click on the Libraries folder and choose "Create Library".

Creating the Library Folder
A new Read/Write Library will be added with the name you enter.


New library selected!


Note that just like above (with Desktop Content), you'll need to make sure the library is checked in the project!  If not, it won't be available!

Make sure you make the libraries available! 

So that's getting the stage set to create the read/write library for your Content Center.  Now we're ready to start adding data to the Content Center!

That will be the next post here!  Creating Custom Content for Autodesk Inventor Content Center - Part 3


Sunday, January 08, 2012

Creating Custom Content for Autodesk Inventor Content Center - Part 1

“Our doubts are traitors and make us lose the good we oft might win, by fearing to attempt”

I haven't spent a lot of time with Content Center in Autodesk Inventor.  It's just one of those things I always told myself I'd get into, but like so many projects and intentions, it was set aside for more pressing matters.

But during the holiday break, I found the need to dive into Content Center, and start peeling back it's layers and start creating some custom content.

One of the things I found, was once I got into it, was it's not as intimidating as it might look at first glance.  Once I dug into it, I found that, dare I say, it began to make sense.

So I decided to start sharing what I've learned (and I'm still learning).  I hope you find it helpful.  These are just my thoughts on what I've seen so far.

Since there are so many facets to working  with Content Center, I found the prospect of doing it in one big blog post pretty daunting.  So I decided to break it up into smaller bits that might be easier to digest, and yes, it's going to be a lot easier for me to write! 

So for starters.  Let's talk about this Content Center thing.

To get started, what exactly is Content Center?  

Content Center is a series of libraries that generate standard components when you place them in an assembly inside of Inventor.

Now that's not to say that you can open up your Inventor media, and find a series of folders full of Inventor *.ipt files and copy them locally.

This is a misconception I sometimes hear.  That on that media, is a whole bunch of *.ipt files you can get to.

The files actually contain the databases that build the components.  So when you place a component in an Inventor assembly, Content Center builds that component and places it into the assembly for you.  The functional word is "building".

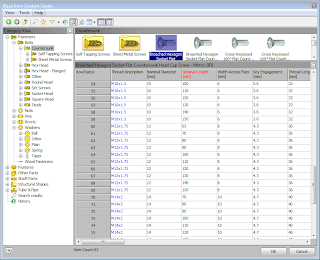
The Place from Content Center Screen.  This is what's talking to your libraries

Content Center using the following procedure to build the parts.

1) A part is requested from the Content Center databases
2) It checks to see if the part has been published already.
3) If the answer is yes, it retrieves the part and places it in your assembly
4) If the answer is no, it builds it and puts it your Content Center directories, so it will be available for the next time.

So that's what they are?  But where to we keep them? 

There are actually two different answers to this one.  There's the Content Center stored locally (Desktop Content Center) or Content Center managed via your Vault Server Console.

Desktop Content Center works great for single users, or users who don't want to install the Autodesk Data Management Server on a network server for some reason.

The advantage is that this is a pretty simple model to work with, since everything resides locally on your machine.

The disadvantage is that only the machine the Desktop Content is installed on can use the libraries.  There's no sharing across machines.

So if you have several machines that are using Content Center, and you want to use Desktop Content, each machine will need to have it's own copy of the libraries.  This may not be too bad, but what happens when you start customizing your libraries?

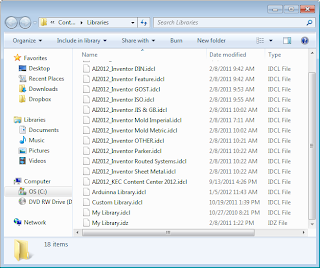
The Desktop Content Libraries in their folder.


It can be tricky to manage indeed!

Content running through your Vault Server is intended for a central Content Center shared among several users.  Even if you're not using Vault, you can run Content from the Vault server.  You just don't use the "Vaultiness" of Vault.

The advantage of this model, is your Content is managed from one location.  The bad side?  You now have a server, network connections, and possibly even I.T. to work with.  So it can be a little more involved getting started.  Although since everyone is now on the same set of libraries, it can be easier to maintain.

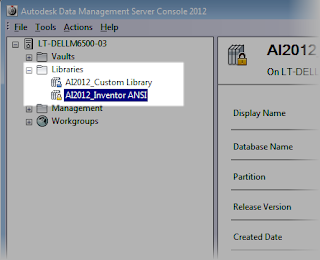
Vault content (I only have two libraries right now)
So these are the two options we have available to us.  You'll have to decide which to use in your own application and install the appropriate one.

In Inventor, you can tell Inventor which it's using by going to Tools>Application Options, and choosing the Content Center Tab.

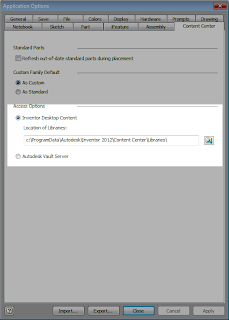
Selecting which content center your running.
That will choose where you're accessing Content Center from.  

Wow, that's a lot of writing!  So I'll save the rest for later.  Next, we'll talk about creating custom Content Center components!  

If you're wondering, I use Desktop Content.  Why?  It's actually, it's for a reason that is completely different than most will encounter. 

I'm constantly uninstalling and reinstalling Vaults.  Far more than the user in the "real world"  for that reason, I run a Desktop Content Vault.  That way I don't have to worry about which Vaults have what Content attached!  It's as simple as that!

Click here for Part 2: Creating Custom Content for Autodesk Inventor Content Center

ADDENDUM

Thanks to Paul Munford at The Cad Setter Out for pointing out that I overlooked a third way of using Desktop Content.

The third way would be to place the libraries on a server, and point the Desktop Content to that location in Application Options.  This would allow multiple users to access the same set of libraries, without having to install Vault on the server.

I've not used this way myself.  But this can be yet another way to organize your Content Center data! 

Sunday, January 01, 2012

Using View Representations on an Autodesk Inventor Drawing


“Drawing is like making an expressive gesture with the advantage of permanence.”
 Henri Matisse

First of all, Happy New Year and welcome to 2012 everyone!

Wow, another year over!  Where did 2011 go!

And now.... My first post of 2012!

In last week's post, I talked about how you can create and reuse a View Representation in Autodesk Inventor.

As a continuation of this, I decided to show how you can reuse those View Representations on a drawing.

Selecting the View Rep when placing the view


It's actually not that difficult.  There's just a few tricks to be aware of.

I like to use it when I need to consistently turn off certain parts, as well as bring colors from the assembly onto to the drawing.  Usually when I'm drawing up a woodworking project, where I want a reasonable facsimile of the wood grain.

I also used it on a project where an enclosure was having several internal components being made visible & invisible as design changes were being made.

I admit, it took some getting used to, but view representations made it much easier to control the visibility of components on several different drawing sheets.

View Reps Doing their thing


Personally, I think it's one of those items that can really help someone, but is often overlooked.

So here we go with the video that continues what we started last week!


And for us old timers out there!  Who remembers what a View Representation used to be called?  Place an answer in the comments!