Find us on Google+ June 2010 ~ Inventor Tales

Tuesday, June 29, 2010

I Don't Remember Having a Memory Problem! - The Inventor Memprobe Utility


“We cannot change our memories, but we can change their meaning and the power they have over us”

David Seamands


I'm a huge convert to the 64 Bit Windows 7 operating system. I've switched over, and never once looked over my shoulder to XP or Vista. I know there are those who will disagree with me, but personally, the Windows 7 transition has been the happiest transition I've ever made from one OS to another.

With respect to Inventor 2010 and 2011, I've been pleased with the performance. Time to tear off the proverbial review mirror, and not even look over my shoulder.

But I did have to give up my memory meter in the lower right had side of the screen. It doesn't show in 64 Bit systems. It was definitely a 'Nice to Have', although I wouldn't go back to a 32 bit OS to get the meter back.

However, there is one place you can still get a memory meter of a sort on your system. Thanks to Nicole Morris for showing me this trick. I'm afraid I can't take the credit for this one!

If you browse to the 'Bin' directorry in your installation directory, typically: C:\Program Files\Autodesk\Inventor 2011\Bin

This will bring up a memory monitor called Memprob that you can also use to keep track of your memory.
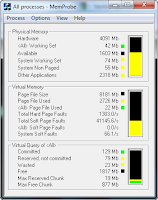

Memprobe running
(click to enlarge)


You can also use the pulldown to control the settings you want to record, to create log files, and so on.

Setting which processes to monitor
(click to enlarge)

Setting refresh speed, log files, etc.
(click to enlarge)

Control how you want to view Memprobe while it's running
(click to enlarge)

So here you are, a different way to skin the cat, it's definitely something I'll be using in the future!

Sunday, June 27, 2010

Getting Previous Versions from Autodesk Vault & the Shifting Sands of Workflow

A sudden bold and unexpected question doth many times surprise a man and lay him open.
Francis Bacon


If you've heard about Autodesk Vault, you've almost certainly heard that it will allow you to retrieve previous versions of a file. This is a definite advantage to having something like Vault, especially when you need to create several design iterations, or just need to recover from a mistake.

The blessed getting of the Previous Version
(click to enlarge)

Personally, I haven't used this feature in practice for a while, and it's not because I don't make mistakes, it's just because I haven't had a chance to get back in there and chew on Vault.

So last week I had to run a quick Vault update course. Nothing flashy, the basics.

So I made sure to be diligent. I ran through my exercises and made sure nothing changed in the workflow.

Everything is as I remember it. I'm ready to go to town!

But then, at the last moment, at the very last step, I can't get the older version to update and become the current versions. This is the last step in the retrieval, what's going on?!? Vault is forcing me to update the file, and bring back the version I'm trying to replace.

I actually appreciate what Vault is trying to do, prevent me from opening an old version, but NOT NOW! I WANT THE PREVIOUS VERSION!

I pour over things, I Google it. I scratch my head. Something has changed, or I'm losing my mind!

Finally, after a few trials and errors, plus a couple of Google searches, I realize theres been a slight workflow change. Nothing major, but enough to drive me nuts.

Lesson 1: Watch out for workflow changes.

Lesson 2: Don't assume ANYTHING!

Wednesday, June 23, 2010

What's Old is New Again. Sketch Blocks in Inventor.


“The wireless telegraph is not difficult to understand. The ordinary telegraph is like a very long cat. You pull the tail in New York, and it meows in Los Angeles. The wireless is the same, only without the cat.”

Albert Einstein


I too am sometimes guilty of not trying something new because the old way works 'just well enough to not change'.

A tool that fell into this category is sketch blocks in Inventor's sketching environments.


An example of sketch blocks in Inventor laying out the suspension
(click to enlarge)

I saw it once in a demo, and thought "Hey, that's cool! I should remember to take a closer look at.... LOOK A SHINY THING!"

Needless to say, it wasn't until just this week I had, what in marketing speak is referred to as a "Compelling Event' to revisit this.

Now that I have that compelling event, I can look back and think of my college senior project, the SAE Mini-Baja. We build a small off-road car for a competition way back when, in 1996.

Rolling something out of the 'if I knew then what I knew now' category, here's a video on how we might have done things differently, had we had Inventor then.


If only we'd had it then. I think we would have been done a lot quicker. But sometimes all we can do is wish.

Happy Inventing!

Monday, June 14, 2010

The Bill of Materials. Turn Your Hindsight into Foresight


Any problem can be solved using the materials in the room.
Edwin Land


First, a disclaimer. I was working on a customer site, so the files I'm using my own files to reproduce the challenge. It wouldn't do for me to use their files without their permission.

Think of this as the letters that say 'dramatization' at the bottom of those documentaries you see.

Today, was working on a drawing and we ran into a situation that is very common in the design world.

Change.

It turned out that the part we were using had the wrong number assigned to it, and it had to be changed to the correct number.


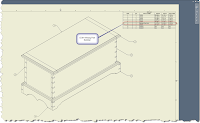
One wrong part number can ruin the recipe
(Click to Enlarge)

Normally, this is an easy operation, but the part was used in several drawings, and called out in the Bill of Materials for each one.

In the old days, that meant that going to each drawing and changing the part number was going to be tedious, and error prone.

Fortunately, there is a better way to do this.

Each assembly file has Bill of Materials information that can be edited. Best of all, this information gets published to both the part, and to all the drawings using that part.

First we access the Bill of Materials button in the assembly.


The Bill of Assembly button
(click to enlarge)

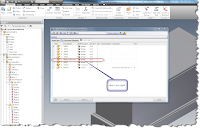
Now we see the Parts List info, including our suspect part.

Here's the field in the assembly Bill of Materials
(click to enlarge)

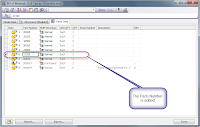
A couple of edits, and we have our corrected number

The number corrected. Now we're getting somewhere!
(click to enlarge)

Even better, the information can be saved back to the part, so when you use the part in the future, the correct information will go into the parts list.


(click to enlarge)

I've really grown to like this tool!

On a final note, while I used the part number in this example, you can change a number of fields. You can choose them via the Column Chooser.

The Column Chooser
(click to enlarge)

Happy Inventing!

Thursday, June 10, 2010

Hide, Seek, and Find in Autodesk Vault.


“The voyage of discovery is not in seeking new landscapes but in having new eyes.”

Marcel Proust


Unfortunately, I'm not going to put up the Inventor Fusion video I promised, partially due to my dog sitting commitment for my sister and brother in law this week, which caused me to leave my headset at home.

Meet Smokey, one of the little dogs I'm watching.
He does a mean job of holding the couch down.


Also, the schedule has indeed proved busy enough where I wouldn't have had the time to sit down.

But there is something to talk about.

This week I've been working daily inside of Autodesk Vault, hours on end, searching, finding, checking in, and checking out.

I've learned one thing about Vault that I've always thought was a great idea, but after using it for nearly a week straight, I've come to love it.

The Find button.

Autodesk Vault runs on a database, so when you're searching for files, you scan the database instead of a file search like we might do in a conventional folder system. Scanning the database is much quicker.

I like to think about it as going to the library and looking up a books location in the computer (the database), opposed to walking up and down the isles looking for the right book (the folder structure).

Assuming you're using Vault, an easy way to search the database is to choose the 'Open from Vault' button from the Vault Ribbon

Open from Vault
(click to enlarge)

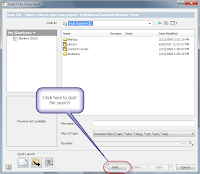
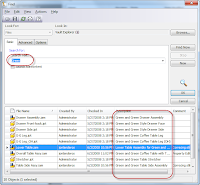
Once you click on the icon, the 'Open from Vault' dialog box opens up. Hit the find button, and you're ready to scan the database for those files, just like standing in front of that computer in the library.


Choose 'Find' to Start Searching
(click to enlarge)

Now I can enter the data I want to search on. One of the strengths of this tool is that several properties, such as part numbers, comments, and other data are search-able. You're not just limited to filename.

Get ready to search!
(click to enlarge)

I've entered the word 'Green', knowing that's something I want to search for. Then I tell Vault to start finding. I'll end up with all the files that meet that criteria.


All the files that are found in the search
(click to enlarge)

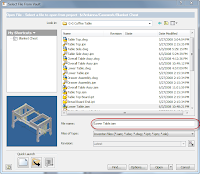
Now you can select a file, and hit OK. Vault plugs the file you choose into the Open Dialog box, and now you're off and running.

Ready to Go!
(click to enlarge)

The last week that I've been using Vault constantly, this find tool has become my best friend.

All I needed was a part number, and I could start rolling. I didn't need to know the folder structure, and I could search files a lot more quickly when we weren't sure which of several files was the one we were looking for.

It's definitely a tool that I've come to like.

Sunday, June 06, 2010

The Sum of Their Parts, Inventor and Inventor Fusion

We have such a mixture now, such a fusion of different genres.
Ryszard Kapuscinski

One of the new Features that''s often mentioned in Inventor 2011 is the ability to use Inventor Fusion to edit base (often referred to as 'dumb') solids for Inventor.

It's great that we know it can be done, but how about how it can be done!

First, you need to get Fusion. If you opted to recieve the DVDs in the mail, it'll be one of the DVDs in the box. (If you don't know how to request your media, there's a KETIV tech tip HERE.)

It's also available from the Autodesk Labs website HERE.

Finally, it's also available on the subscription website if you opted to download your 2011 software. Click HERE (login required).

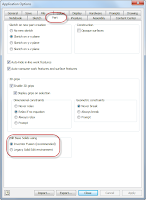
It's not hard if you know where to look. The first step, is to to go to Application Options, and on the Part tab, make sure you set Base Solid Editing to 'Inventor Fusion'.


Choose your settings
(click to enlarge)

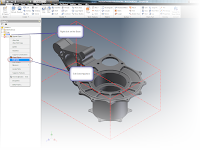
That's it. Now when you want to edit a base solid, just right click on the Base Solid, and choose 'Edit Solid'


Editing a Solid in Inventor
(click to enlarge)

Inventor will tell you it's switching to Inventor Fusion for it's solid editing functions.


Fusion Bound!
(click to enlarge)

Now Inventor will close and Inventor Fusion will open, allowing you to edit the part using all of Fusion's capabilities.

Ready to edit in Fusion
(click to enlarge)

When you're done, click the icon to return to Inventor, and the solid will be back into Inventor, ready to go.

Editing done! We're ready to go back to Inventor
(click to enlarge)


The changes now viewed in Inventor
(click to enlarge)

And that's it. Using Inventor Fusion to edit your solids. If you want more info on Fusion, look back to this blog. Schedule permitting (I have to put in that disclaimer), I hope to put some info on that later this week.

But you can also find info on Fusion from Rob Cohee's Youtube Channel! Check it out HERE!

Thats it for now. I have a new assignment to start working on tomorrow, so I want to be rested up!

Happy Inventing!