Find us on Google+ October 2015 ~ Inventor Tales

Wednesday, October 28, 2015

A Lesson in Technology - The Activated Roller Belt

My learning experience in material handling continues and continues.... and continues some more.  Many times faster than I can absorb it.

Learning.  It can be a bit like this!
One newly acquired bit of knowledge I thought I would share is something called the "Activated Roller Belt" made by Intralox.

This fascinating bit of technology has a conveyor chain, like you might expect on a conveyor line, but in addition to that, it has small rollers embedded in the belt at an angle to the belts direction of travel. 

By activating these rollers in a controlled manner, the direction of travel for anything on the belt can be changed.  This is accomplished without gates or any other (apparent) physical force. 

Instead of trying to describe it, I was able to find a video showing it in action.  It's an interesting little watch.

I hope you enjoy a sharing my little bit of insight into the material handling world!


Photo Credits:

photo credit: punch via photopin (license)

Sunday, October 25, 2015

Using the Refresh tool from Autodesk Vault

There's no better experience than real experience.  Especially when it comes to the nuances of things.

Some things you can learn by reading, others, like riveting, you must get out there and do!
One of the tools I've been using quite a bit in the last month is Refresh from Vault, particularly when I'm renaming or moving a file.

And I've found I do this a lot.  File names, which go part and parcel with our part numbers are always being tweaked in Vault.

With regard to moving files?  I have found that sometimes, I get in a hurry and hit that save button before I realize where I've saved to!

Fortunately, Vault's rename feature makes renaming files easy.  And it's just as easy to drag files from one folder to another in Vault  But there's always one rub.

I have the assembly containing the files open in Inventor at the same time.

Now I could always close Inventor, rename the assembly, and reopen the file, but that takes those few, precious, minutes I don't always have.

I could always wait to do it at the end of the day, just before I leave, but who am I kidding!  I'll never remember at the end of the day!

These don't often work for me...

I'll just keep repeating the remember/forget/repeat process in an engineering version of Groundhog Day!

But here's how you can use Refresh from Vault to quickly update files after a rename or move.

After files have been changed in Vault via Move or Rename, switch to your Vault browser in Inventor.  You may need to refresh the browser to make sure it's up to date.

You'll see a red symbol next to the files that need to be updated.

Files that need refreshing after a move or rename operation
All that's required is to right click on the file you need to update and choose, you may have guessed it, Refresh!

Right click to rename the files

Once that happens, the files will update!  If you've moved files, the locations will be updated, checking the files into the correct location in Vault, and the renamed files will be updated.

Files have been refreshed! 

It's a nice trick that saves a few minutes, makes my day a little smoother, but most of all, makes sure I do something that needs to be done, when it needs to be done, and makes sure it doesn't get "saved for a later that never comes".

Photo Credits:

photo credit: Riveting team working on the cockpit shell of a B-25 [i.e. C-47] bomber at the plant of North American Aviation, Inc., Inglewood [i.e. Douglas Aircraft Company, Long Beach], Calif.   (LOC) via photopin (license)

photo credit: Russell Building: Interior Design Studio via photopin (license)

Sunday, October 18, 2015

Getting Your Autodesk Inventor Threads to Stay on by Default

Foreword 

A couple of notes before you read the whole blog!

  • My tests were conducted with Autodesk Inventor 2015, the version I'm currently using at work. Other versions may behave differently!
  • If you're comfortable editing your registry, follow the instructions at Being Inventive here, and you won't need to follow the steps I describe.  

If you choose to read on... Welcome!

Thread solo! 
Relearning design engineering has been an eye opening experience, and there's no doubt it will continue to be.

I had forgotten, in the mad world of hustling drawings, every little thing you can do to make your life a little easier helps.  Something a little faster or a little more accurate can save you a lot of time.

One setting that got me on a drawing was the default thread behavior in Inventor.  It's unchecked by default, which means that threads won't display in a drawing.

It's not a big deal to check the box and turn it on.  The trick is remember into to check the box!

What would really be desirable, is to set it once, and have it stick that way.

Fortunately, there is a way!  Here are the steps.

The first thing to do is start a base view just like you would any view.


But before you place anything, make sure to check the "Thread Feature" option to turn on the hidden lines that represent threads.

This part is important.  Make sure to check the box before placing the view!

Check this box BEFORE placing the view.

Once the box is checked, place the view.  The threads will not only show, but the threads will "persist" and display by default the next time you place a view..

There are my threads!

There is a small downside though.  You'll have to do it for each file type.  That means doing this procedure for parts, sheet metal, assemblies, etc.

It's not difficult, it just takes a little bit of time.

Also, if you want Autodesk to change it, don't shake your fist in the air.  Let them know at the Autodesk Idea Station here!

I've placed my vote!

Photo Credits:

photo credit: The Backup Band via photopin (license)

Monday, October 12, 2015

Never, Ever, Stop Learning

This week's post isn't an Inventor related post, at least not directly.  The new job has been keeping me hopping.  But I do have a post in the works.  I'm hoping for something next week!

This particular weekend was consumed by attending a 15 hour avionics and electricity course with the Experimental Aircraft Association (EAA).

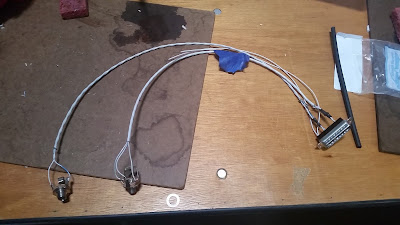
An example of a harness I learned to make! 
It was exhausting, but on so many levels, amazing and inspiring.

If you've read back to my post a few months ago, you know that electricity has intimidated me in the past.

In fact, it still does in some ways.

But there I was, on October 10th, 2015, facing electricity again.  And just like in my last class, I took a deep breath and told myself; "You can learn this!"


And.. I did!   How?

The instructor was amazing.  He had worked on aircraft for years, and had that rare gift of making the topic interesting, and easy to understand.

The examples contained both theory, and hands on exercises that reinforced the theory by application in the real world.

So I listened, I practiced stripping and crimping coax cable.

That making taking this.

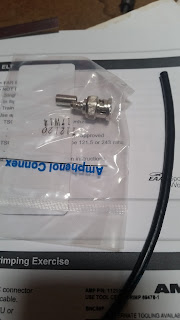
A journey starts with a single step.


And turning it into this!

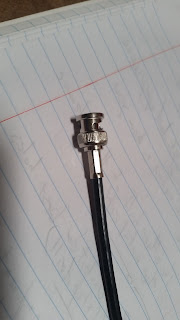
The end of one, small journey. 

I studied a chart that sized wires based on voltage, amperage, and wire length.

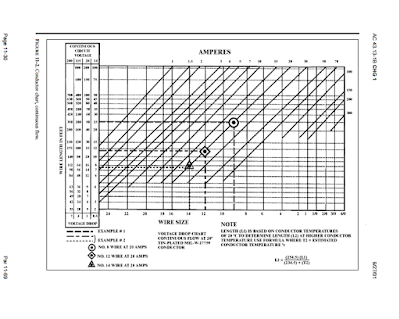
With a little work, I can interpret this chart now!
(From FAA AC43.13)
Finally, at the end of day two, I was given the following pile of components and a schematic


  • Power (AA battery)
  • Circuit Protection ( a fuse)
  • Switch
  • Light which was turned on by the switch
  • Dimmer
  • A light controlled by the dimmer
  • An aluminum chassis to mount it all in


I took a few minutes, to look at the schematic and components.   I had to use those components to make the schematic reality.


I traced schematics, I cut and stripped wire, I soldered wires to connections and crimped on round connectors.

Finally, it was time to test.

I flipped the switch... and the light turned on!

I twisted the dimmer... and the light dimmed and brightened.


I had actually done it!  Me, the man who hated electricity built a circuit that worked the first time!

It even looked reasonably clean!

So in the end, so what?  I soldered a grip of wires and components together.  There is no doubt that there are those of you out there who can outdo my work in your sleep.

Two words.....  Confidence.  Inspiration.

Not mine.  Yours.  Ponder that a moment, if you will.

The business types, the ones in the fancy offices and neatly pressed suits sometimes wag their fingers at me and say "there always has to be a call to action".

So here is your call to action.

Never stop learning.

I'll say it again.

Never.  Stop.  Learning.


Try.  Fail.  Even fail epically.

Ignore the peanut gallery mocking you from the safety of their couch.

Why? They're safe on the couch.  They aren't out there trying.

Go out there, and do what scares you a little.

Maybe learn a new software package, or learn how to run a 3D printer.  Learn how to change the oil on your car if that excites you!

It might be tough, it might be intimidating.  But if it inspires you, it's going to pay off.

It's worth it.

Now, go find it!

Photo Credits:

photo credit: Hello My Name Is a Student of Life via photopin (license)

Monday, October 05, 2015

An Application Engineer's Tale of Returning to Design

Last week, I accepted a job working as a design engineer again.

The engineer print.  It's been a while, my friend.
This meant leaving the world of being an applications engineer, or "AE", where my job functions included the support, training, and implementation of software such as Autodesk Inventor, AutoCAD, and Autodesk Vault.

Now, my function is to create designs for material handling equipment using those very same tools.  Conveyor lines, in a word or two.

My first steps to "learning the ropes" was helping another engineer create drawings for his project.

And I while I can't say that I was surprised at any one change in particular.  The experiences I saw were for the most part, what I expected. Yet, I still found myself reflecting on what I saw during week one.

Here are a few.

I have a desktop, not a laptop!

Well, this is different!
If there was a surprise, this was probably the one.

I've been running Inventor on laptops for over ten years.  I've gotten accustomed to just flipping open my laptop at home and running Inventor.  Now, when I leave work, I'm done with CAD until the next morning.

That also means that creating Inventor videos for InventorTales is on pause for the moment.  I don't currently have the gear.  But I am hoping to be able to do that again soon.  :)

Change is hard... For a reason.

Changing is one thing.  Making the right changes?  Another thing entirely. 
As an AE, running my own system, I could turn on a dime.  If I wanted to change how I maintained templates, for example, I just did it.

I could take a couple of hours to reinstall software if I needed to.  It just took a little planning.

Now, I'm exposed to the deeper ramifications to changing things.  How does this affect your fellow engineers? Will this "simple" change cause confusion on the shop floor that will cause delays and mistakes?

Change often requires the careful thought of a chess master, not the lightning fast reactions of a table tennis player.

Just because change is hard, it doesn't mean good people are unwilling to make changes.

One thing about change.  You can't avoid it.
My new coworkers have started asking me questions in Inventor.  I've gotten a couple of "how to's", and I'm more than happy to help.   If a new tool or process in Inventor makes sense, they're willing to adopt it.

Which brings me to my final point...

Know your product! 

Remember, tools are what make your product. Good tools should make a better product faster.
As an application engineer, my product was software, and the processes that surrounded it.  Software like Inventor and Vault, and their services were the product.

Now....  Surprise!  Material handling equipment is the product.  Software exists as a vehicle to get that equipment built.  It's a tool, just like the laser mill for cutting steel, and the router for cutting plastic.

No matter how cool the tool is, how pretty it works, if it doesn't help get the product made, then it's just a cool parlor trick.

In Conclusion?

First of all, there is no conclusion.  This story is still getting written and it will get written for some time to come.  I hope to be an asset to my new employer helping them make a better product, and I hope to learn a new set of skills myself.

In one week, I've only taken the very first steps.  I hope in the following weeks to keep taking those steps, and to share them with you out in the 'Verse.

Stay tuned!

Photo Credits

photo credit: Rolleiflex TLR on Rollei blueprint at Rollei/DHW factory Braunschweig Germany via photopin (license)

photo credit: Choose Your Direction Sign House Gainesville via photopin (license)

photo credit: Changes #2 (lock) via photopin (license)

photo credit: A Worker at Linread via photopin (license)