Find us on Google+ February 2012 ~ Inventor Tales

Wednesday, February 29, 2012

A Guest Video - Sketchbook Designer, to Alias Design, to Project Falcon

“In a market that has been void of quality offerings with quality names attached this will be welcome.”
 David Menlow

Today's post is a guest video created by KETIV Technologies own Mike Prom

Mike is quite a guru in Autodesk Sketchbook Designer, Autodesk Alias Design, and the Autodesk Project Falcon add-in for Alias.

Here he shows how t concept for a truck cab can start in Sketchbook Designer, expand in Alias, and finally, be analyzed in CFD (Computational Fluid Dynamics) to explore it's aerodynamic capabilities.

It's a great way to see how an idea can be conceived, and analyzed! 


Since Mr. Prom is the one bringing the knowledge, I'll step aside and like Mike take the virtual podium!

Thanks, Mike!


Sunday, February 26, 2012

Change View Orientation - A Drawing View from a New Perspetive

“Men and things have each their proper perspective; to judge rightly of some it is necessary to see them near, of others we can never judge rightly but at a distance.”
François de la Rochefoucauld

Most of the components I work with in Autodesk Inventor are prismatic.  Basically, they are cubic parts with faces that are aligned with the origin planes. 

When the time comes to make drawings in from these parts, it's a snap.  I just choose my base view, and one of the faces lines up perfectly to create the view I want.

But every once in a great while, I've found that I have a component that breaks this rule. Maybe it was imported from another 3D modeling package, or maybe it's just not the normal prismatic part that I usually work with.

I go and I create a view, and the component just doesn't line up.  None of my "principal" options work when I try to choose a base view. 

For example, here's a 20 sided die I created once for a website many years ago.  It's got plenty of sides, but not one lines up in such a way I can create a base view from it.

20 sides and not ONE aligned to an origin plane!

Well.  Now what?


So what do I do?  Is all lost, so to speak? 


Would I be writing this blog if it was?

Inventor provides for this with a nice tool called "Change View Orientation". 


Change View Orientation to the rescue!
When this tool is chosen, a view opens up that allows me to use any of the viewing tools available in my modeler to orient my component. 

This opens up the available options, and provides a lot more flexibility in creating views.

Naturally, I have to create a video to go with that.  So here it is! 


Tuesday, February 21, 2012

Engineering Lessons from a Vacation - An Observation in Snowboard Bindings


“In the roots of snowboarding, duct tape was a part of snowboard technology.”
Gwyn Howat

 If you don't know already, I'm a snowboarder.  More than once, I've postponed a blog post because I was off at Mammoth Mountain, dropping in off Cornice, seeing if I could carve "just a little bit higher up" this time.

This post, is dedicated to a real life engineering lesson I learned while riding the many trails up and down that big Sierra Nevada resort.

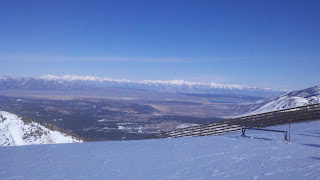
Taken from the top of Chair 3 at Mammoth Mountain.  What a view!

I currently have two different boards I use, and the lesson I learned was about the differences between the two different styles of bindings each board has.

One board came with the bindings as part of a "package deal".  The other, I chose based on the recommendations at the store where I bought them.

By first board has traditional, "two strap" bindings.  Two straps cross your foot, and are ratcheted tight with two small levers.  This is probably the most common binding you'll seen a snowboarder using.

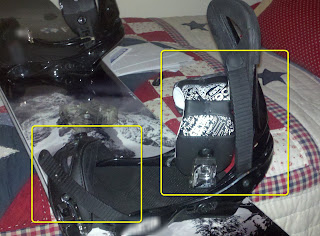
My "two strap" bindings.  The loose straps are circled in yellow


I like them because their easy to adjust.  If they're too loose, just reach down and crank the lever.   If their too tight, release the lever.

Of course there's a downside.  You may not have the exact same setting every time you get off the lift, based on how tight you lock them.  On top of that, they take a little time to get locked down.  So my skier friends are often waiting for me impatiently.   

The straps, circled in yellow, securing my boot.

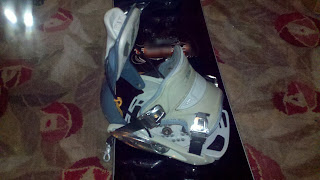
My second board, has "rear entry" bindings.  In this type of binding, the high back (rear portion of the binding) drops down and you literally "step into" the binding.  The binding is secured by securing a lever that locks the binding to the back of your foot.

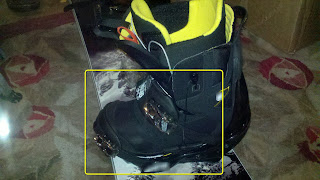
The rear entry binding in the "open" position.  Notice how the stiff back lays down so you can step into it.  The locking lever is circled in yellow

My skier friends (as well as myself), like this binding because it's quick.  I can get of the lift, step into the binding, throw the lock closed, and I'm ready to go.  No fussing with straps like in the traditional, two strap binding. 

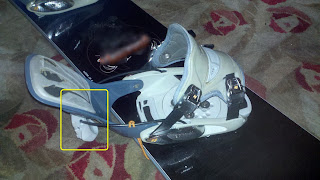
The rear entry binding in the locked position.
With that being said, would this be the better binding? 

Some would say.  But this binding isn't easy to adjust on the fly like my "two strap" style binding.  Because of the design of the "rear entry" style, adjusting the binding means taking off the board, tweaking the binding, and trying it again.

So why have I even taken the time to write this?  You may not like snowboarding.  Maybe the closest you come to the snow are the ice cubes in your favorite drink.

I'm not catering to tell snowboarders to go buy one type of binding over the other.   I'm not even going to tell you which ones I prefer.  That's not the point of this post. 

The point is how I relearned a lesson that experience has taught me before.

You don't get something for nothing.

My "easy to adjust" two strap bindings means more time getting ready after getting off the lift.  My "faster off the lift" rear entry bindings mean I have to take extra time setting everything up, which I'm still working on after purchasing new boots.

In other words, each design had to give up something to gain advantages somewhere else.

In this case, it was ease of adjustment versus speed.  But that's not the only things that could be facing off when designing a product there are a few examples of design "ying and yang".

It could be:
  • Gaining a technological edge but making a product more difficult to maintain
  • Increasing a product's longevity by using materials that are more expensive
  • Increasing product's capabilities but making it more difficult to use

That's the idea.  Of course this list goes on and on.

But the point is, design isn't always about making something better in every aspect.  Many times, something has to be sacrificed for a gain to be made elsewhere.

Is this bad?  Not necessarily.  It's just a fact of life.  As designers, we have to try to maximize the gains while minimizing the losses required to make those gains.  

As consumers, we need to recognize what capabilities are important, and which are not.

It's not always an easy answer, even as we face it every day.  For me it's which set of snowboard bindings.  But for others it could be a computer operating system, an economical car versus an SUV, the list goes on and on.

It's for each of us to decide, both when we design, and when we employ the design created by another.

I know for me, I'll think a little more carefully about which set of snowboard bindings I use!

Monday, February 20, 2012

Material Libraries and Error 1606. Not Friends at All

“From error to error, one discovers the entire truth.”
 Sigmund Freud

Once again, I've crept off to Mammoth Mountain to enjoy the long holiday weekend in the United States.  But true to my geeky nature.  I've still created a blog, albeit a short one. 

Looking at Crawley Lake from Chair 3.  Amazing view!
Last week I encountered an error I hadn't seen before.  An end-user was trying to install Autodesk Product Design Suite 2012 on their machine, but they were encountering the error below when trying to install Autodesk 3ds Max.

So what does this mean? 

The user, understandably frustrated, had also tried to install the Autodesk Showcase, and received the same error.

1606

So we tried running the installation again. It turned out that it wasn't 3ds Max that was having the problem.  It was the material libraries that were associated to 3ds Max were erroring out. 

That explains why Showcase would have the same problem.  It uses the same libraries.

So I resorted to any techies next weapon of choice.   I used Google.  That's right.  That Google. It's a great tool when casting a wide net.

What did I find?  There's a solution for this on the Autodesk website.  It looks like the material libraries had been installed before, than only partially uninstalled.

A quick trip to Add/Remove Programs, and we're up and running again!

So if you run into this error, double check those libraries.

It's a good trip to keep in your pocket as we maintain, and upgrade our Product Design Suite Products.

Wednesday, February 15, 2012

Pacific Design & Manufacturing Show 2012 & Something New!

Mobile blog #2:  Let's see how it goes!  :-)

Today was my day at the Pacific Design & Manufacturing Show in Anaheim.

It was a busy show, with lots going on with CAD software (like at the Autodesk booth) as well as with the 3D Prototyping booths around us.

My laptop ready to go.  Yep, I managed to sneak a warbird picture in there!


There was no shortage of 3D rapid prototyping available!   I love this stuff!

There was a lot of activity today.  I spent a lot if time talking about Autodesk Showcase, Autodesk 3ds Max, and of course Autodesk Inventor.  The whole time the Autodesk team was running presentations.

There was a lot of interest.  Most of all, it seemed like the black cloud of the Great Recession that had been hanging over us the last few years was but a memory.

Good news indeed! 

The team getting ready


And Mr. Mike Aubry goes on stage!
And in the middle of it all.... My Droid X chirps as an e-mail arrives in my inbox.

I open it up, quietly hoping its not disposed foreign royalty offering me untold millions to help them get their fortune out of "SouthNorthern Whatsitsplace". It's not. It's an announcement...

"Autodesk Design Review for the Android is now available". 

There's some other words in there. But it's those few that grab my attention.

With cat like reflexes I go to the Android market and begin downloading. After a few minutes of waiting, there's a glow & the sound of angels singing as the app installs.

There it is! In all its dwf-y glory!  Now you can view 2D and 3D files, as well as markup dwfs on the comfort of your Android based mobile device!

Oh.. .this is cool! 

Yep, pretty cool!

So if you've got an Android and you've been waiting for your own version of Design Review, wait no longer! 

Head over to the Android Market and get your copy!  It's free! 

A good show and a new app!  It's been a great day! 

Turn out the lights
The party's over!

Sunday, February 12, 2012

The Sum of its Parts - Adding Column Values in Autodesk Inventor

“Life is a series of collisions with the future; it is not the sum of what we have been, but what we yearn to be.”
Jose Ortega y Gasset

One of the questions that came up not that long ago was; "How do I add up the mass values for a component in a part list?  I want to show the total mass for several components,  instead of the mass for just one."

How to I get here?  Where the total mass of multiple components is shown.

It's not very difficult, but you do have to know where to look.  I still remember thinking, "That's it?!?" when I first saw. it.

But like so many things, you just have to know where to look.  So guess what I did?

If you're reading this, you probably can guess the answer. 

I created a video, and blogged about it.

So take a look at the video.  As always, I hope it's helpful.

And this tip doesn't just apply to Mass.  It applies to any field that might need summing up!

And before you take a look at the video, there's one more tip.  If you want to make this setting (or any parts list setting), part of your default, remember that you can add them to your Styles Library.

Perhaps I'll create a video for that as well, but that's for a later week.

Enjoy!


Saturday, February 11, 2012

Just for fun. The Random Warbird of the Weekend

I like warbirds... A lot.
Jonathan Landeros


If you've followed my Twitter account, you know I like posting random pictures of one of the warbirds at Planes of Fame, where I volunteer on my weekends.

Now that I'm trying the mobile application on my mobile device, I've decided to share them here.

I know it's not related to CAD in any way, but these airplanes are still marvels of engineering.

Not to mention the stories of those that flew and maintained them.

So here it is.  Something done for the passion of doing it.

The first picture is the P-26 Peashooter, with the N9MB Flying Wing in the background.  Both the only examples of their type still flying.

The next.  A Lockheed P-38 Lightening sitting in the hangar undergoing maintenance to keep her in flying form.

I hope you enjoy them!


The P-26 Peashooter & N9MB Flying Wing


The Lockheed P-38 Lightening.


Sunday, February 05, 2012

Using View Representations to Control Sketch Visibility in Autodesk Inventor

“We write frankly and freely but then we modify before we print”
Mark Twain

Last week, an interesting question was posed to me.  I want to show text on a part, but not on the assembly.  Can that be done inside Autodesk Inventor?

My first thought.....   O_o

My next thought?  How do we do that?

How to we turn off this sketch in the assembly, but keep it in the Part?


Then, I had an idea.  VIEW REPRESENTATIONS!

Will this work!  It sure will!

It works on camera views, component color, and visibility.....  visibility!  Why not sketch visibility! 

It's crazy..... Just crazy enough to work!

So I tried it.... And behold!  It works!

So here it is, a neat little trick that I hadn't even thought of trying!  Enjoy!

P.S.  If you'd like more information on Inventor's View Representations, check out my earlier blog posts.  It's in two parts.  So here is Part 1, and here is Part 2.

And at last, here's the video!


Friday, February 03, 2012

Copy Design in Autodesk Vault - Where I used it.

My hobby of not attending meetings about recycling saves more energy than your hobby of recycling.
John McCarthy

Over the course of the last few weeks of my copious spare time, I've been building up a chest of drawers in Autodesk Inventor.

As far as I've gotten so far.  The drawers are in blue.

In other words, a few minutes here, a few minutes there... 

Since I don't have a ton of time to devote to it, I have to make the best use of the time I have. 

So I use Autodesk Vault to manage the files that comprise this little side job.

It's almost like I'm working on a real project instead of just playing around with the tools! 

And, let me tell you, having those files in Vault came in handy!

The chest of drawers has three drawers that are are all very similar (the fourth opens as a desk, so it's quite different).  Only the height of the three drawers changes.  But they all have the same five basic components. 
  1. A front
  2. A back
  3. A left side
  4. A right side
  5. A bottom
Each of these five components has its own piece drawing, plus an assembled view, and an exploded view.

Alright, I know some of you might be saying, "Do you really need all that."

My answer?  "No, I don't.  But this is one of those cases where I just can' resist the urge to overdo it a little!"

Okay, maybe I'm overdoing it more than a little.

But now I have these parts, assemblies, explosions, and drawings for every drawer..... So do I really want to recreate each one of those two more times?

An example of some of the documentation

The answer to that rhetorical question is, of course, a resounding NO!

So what did I do?  I created the bottom drawer, in all it's glorious detail.  The components, the assemblies, the explosions the drawings.

Then, with all that checked into Vault, I fired up my copy design, and copied the components I needed, as well as the assemblies, explosions and drawings.  I even was able to make sure that I reused the drawer bottom for the other drawers.  Since it was the same component throughout.

Choosing the drawer parts to copy

So what's the big deal?  By using copy design, everything involved in creating the drawing was already done.

Sure, I had to resize parts, adjust some dovetails, and make sure my drawings still looked clean.  But I didn't have to recreate any assemblies, explosions, drawings, then dimension and annotate that drawing all over again.

So when all was said and done, the second and third drawer were finished in a fraction of the time it took me to create the first.

It ended up being a nice little time saver!  :-D

So if you need to duplicate similar components quickly, Copy Design might just be the right tool for the job!

So here's a video for Copy Design from back in the archives !  (Click here for the full post)


Wednesday, February 01, 2012

Tolar Manufacturing - Autodesk Inventor of the Month for January 2012

“Neither team has anything but pride to play for at this point, but our guys have got a lot of heart and they've shown me that all year.”
Jamie Keefe

Sometimes when you return from vacation, you find that something unpleasant has "hit the oscillating cooling device", and the day you took off is now getting made up in the overtime you're working to fix whatever has broken loose.

This time, when I returned from my snowboarding trip, I was greeted by something far more pleasant.

Tolar Manufacturing was announced as the Autodesk Inventor of the Month!

Tolar Manufacturing makes bus shelters for cities all over.  They're designed in Autodesk Inventor, and their presentations are shown in Autodesk Showcase.  They're storing all that CAD goodness inside of Autodesk Vault.

Example of a Tolar Bus Shelter rendered in Autodesk Showcase

Between using Inventor, Showcase, and Vault.  Tolar is able to design, present, store, and reuse all their data.  Inventor makes the data more robust, Vault allows the file to be tracked, located, and reused, and Showcase allows them to present the design intent to the cities that will be using their products.

It's a nice little engineering circle of life.

So why am I beaming with pride?  I helped set up their Vault, install their Inventor, and train them on Showcase.  It's really exciting for me to see where they've gone. 

Does that mean I was an indispensable part of the team?  That they "could have done it without me?" 

No, I just played my small part.  They took the tools, and ran with them.  The credit is truly all theirs.

I'm just happy that I got to play that little part!

So here's a video!  Not mine though.  This one is all about Tolar, and what they've been able to accomplish! 

Maybe it'll inspire all of us to look again and our tools, and make sure we're using them to their full potential!