Find us on Google+ March 2014 ~ Inventor Tales

Monday, March 31, 2014

Setting Component Materials Upon Import in Autodesk Inventor

“Finding the material wasn't a problem — remembering what to look for was.”
 Steven Severin

A question was posed to me earlier this week.  I'm importing files of different formats into Autodesk Inventor, but I need the material to be Mild Steel, instead of default.

Is that possible?

I wondered for a moment.  I looked around, and thought "what if I change the material in the standard.ipt template?"

It made sense.  Inventor starts with that template, what if the imported files made a pass through that template first?  There was only one thing left to do.


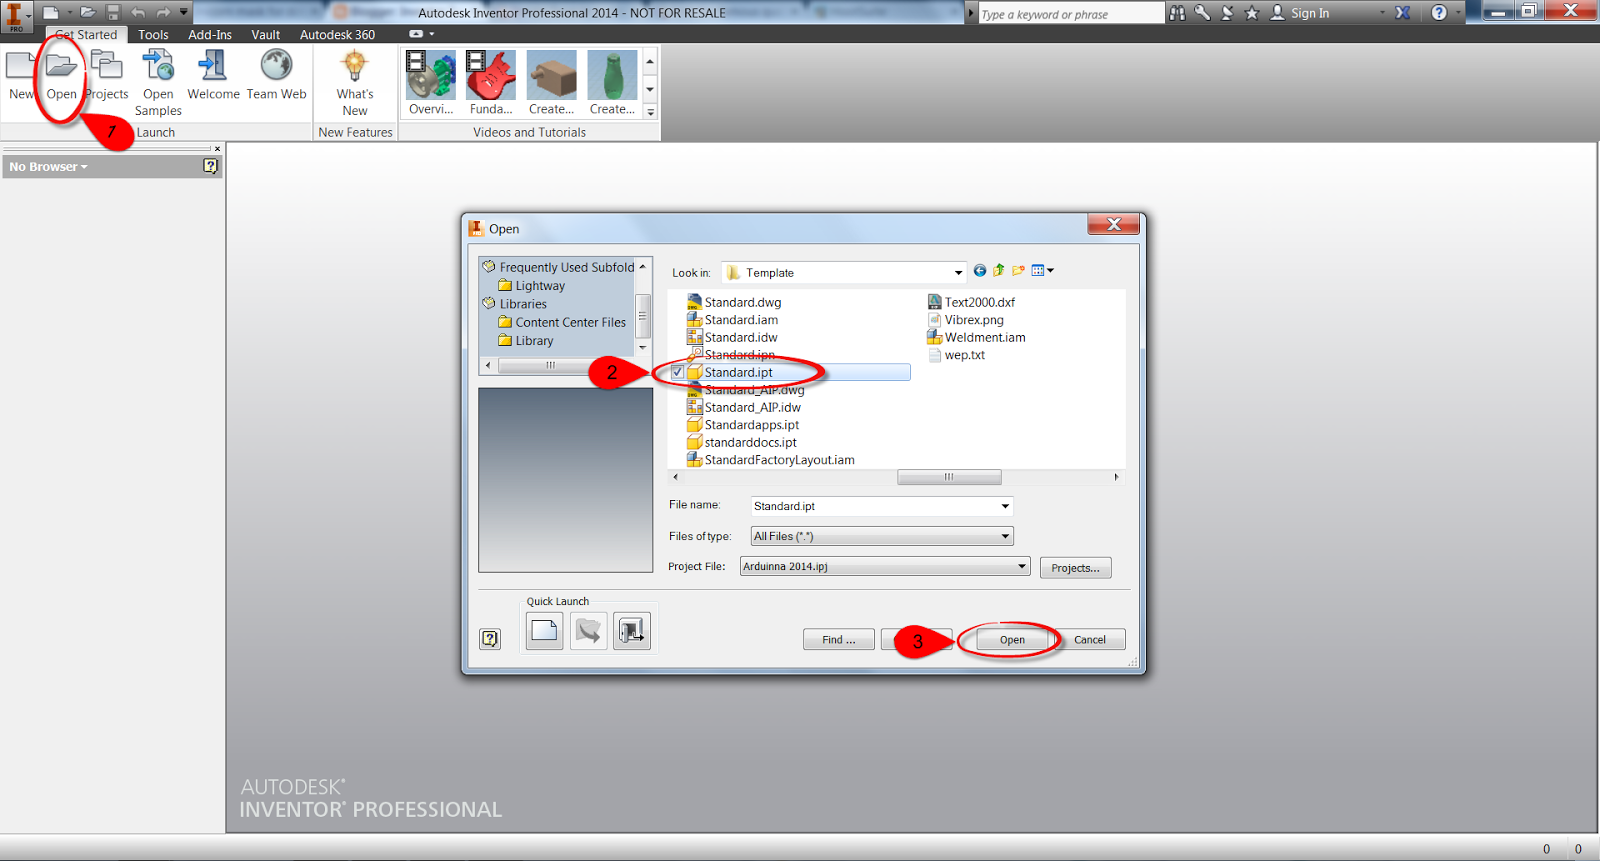
Try it! So the first thing I did was browse to the directory containing the standard.ipt template file, and open it directly. 


Make sure to open the file with the open command!  Do not create a new file from the template!  The material has to be changed in the template file, so when a new file is created from it, the material is already set.


Once the template file is open, it's time to choose.  In this case, I'm using Mild Steel.


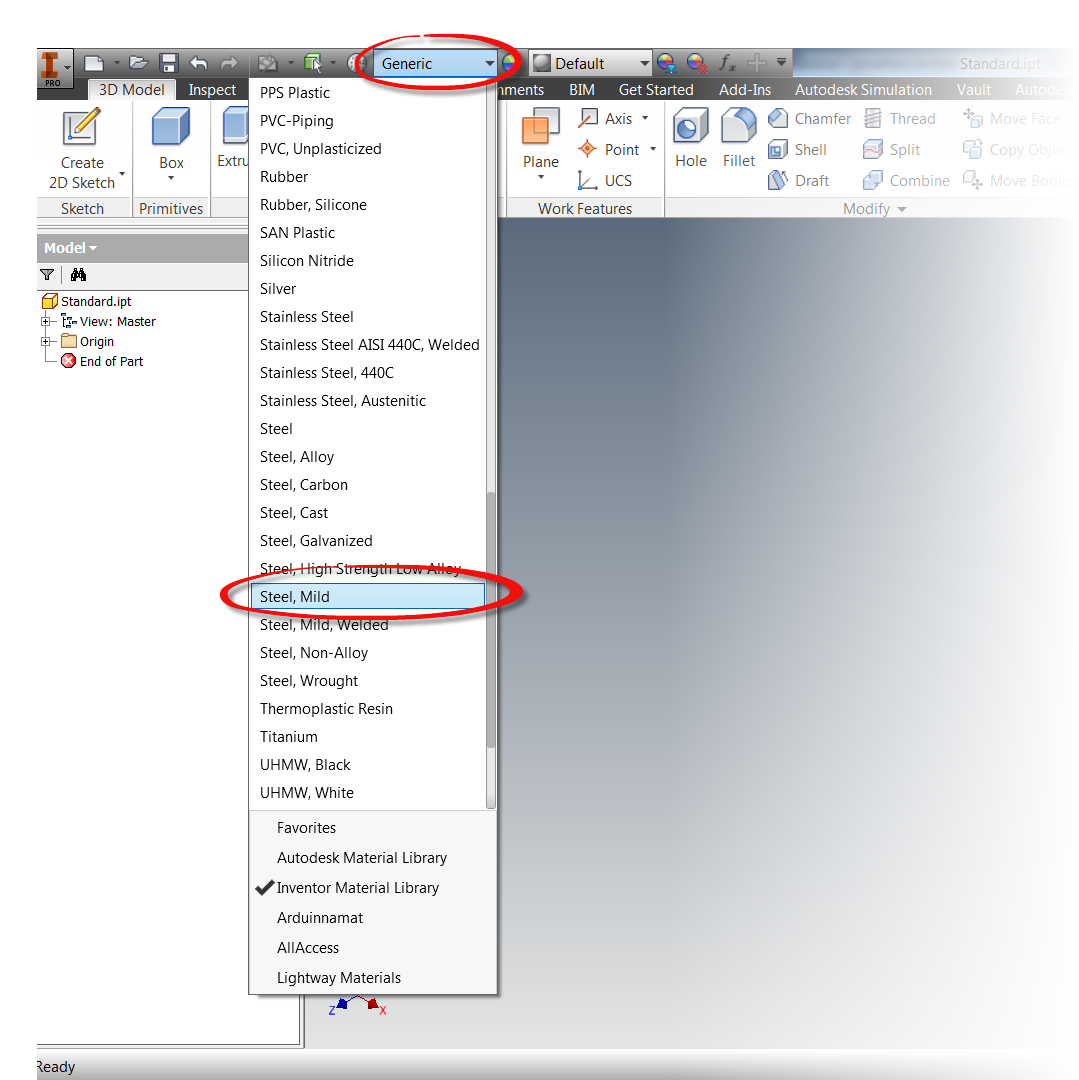
Once it's the active material, I save the file and close it. 


Now that my template has Mild Steel set as the material, I can import the files that I need.  In the example here, I'm using Solidworks files that I've downloaded from GrabCAD at the link here.


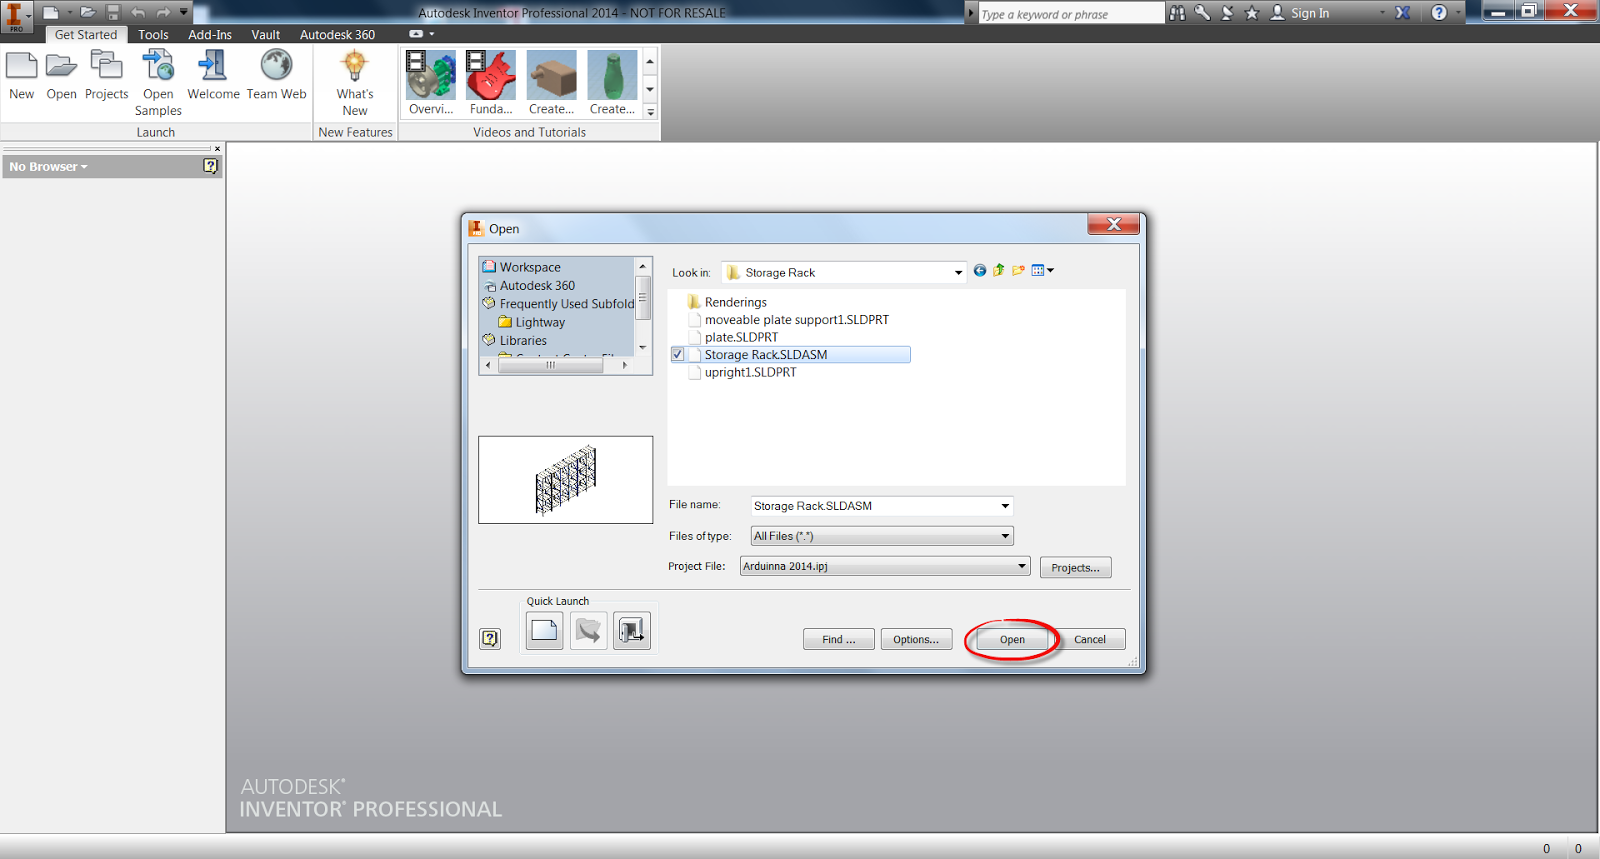
The files will translate, and Inventor will now use the template to apply Mild Steel to the Imported Parts.

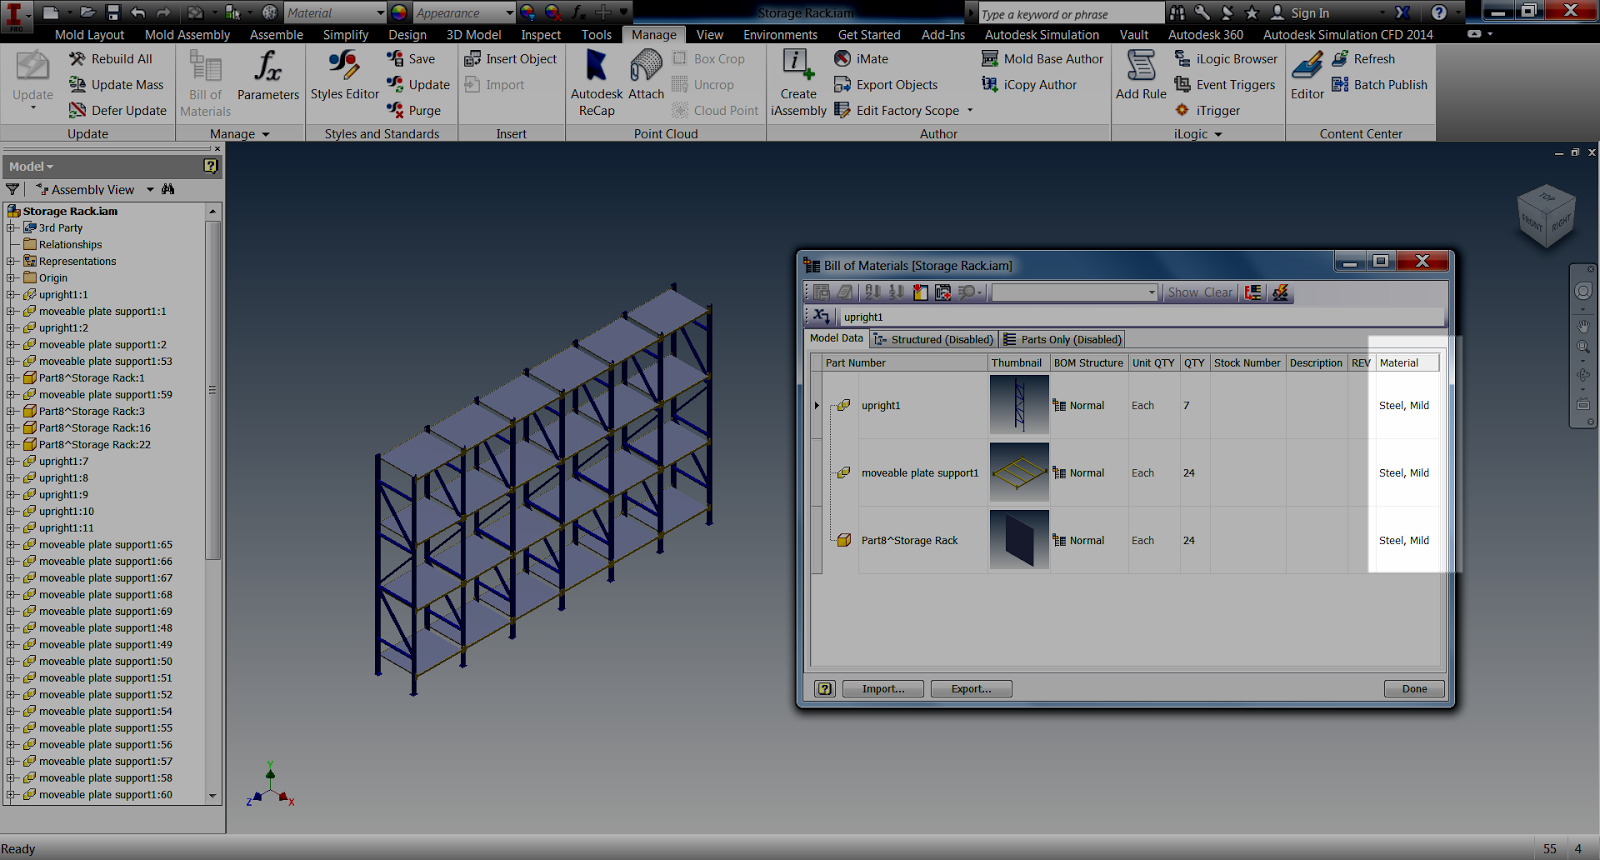
Checking the Bill of Materials screen in Inventor, I can see that indeed, all the materials are set to Mild Steel.


Now there are a couple of notes.

This option sets everything to Mild Steel.  Anything using this template will start with Mild Steel, so this may not be the perfect solution for everyone.

But it can be useful, and it's pretty quick to change.  So think about it, give it a try, and see what it can do for you!

And be sure to check out the video version below!


Monday, March 24, 2014

Uninstalling Your Autodesk Design Suite - Did You Know There's a Tool for it?

“Hopefully everything will be a clean slate here,”
 Koren Robinson

The 2015 releases of Autodesk software are approaching soon...

And I don't know release dates.  So please don't ask me.  :)

As part of that process, many of us may already be planning out how we're going to deploy new software.

For this post, I'm going to talk about one of the steps that I perform when I'm getting ready to upgrade my system.

First, some background on how my system is setup.  This is far from the only way, and your setup may be much different from mine.  As a result, your upgrade procedure may be different too!

My system is configured with a combination of Autodesk Factory Design Suite 2013 and 2014.  I'm also running Autodesk Vault Basic 2014 for my data management.

Time to move on from 2013!


I'll cover migrating Vault in a later post.

The first thing I do.  Is remove my oldest version of my suite.  I only keep one version back, and I like to make sure I have enough room available.

So in my case, the 2013 version of Factory Design Suite goes first.

Uninstalling all the programs in Factory Design Suite via the Control Panel is beyond daunting.  It's flat out frightening! 

Fortunately, Autodesk has a tool provided that can help with that situation.  It's called the "Uninstaller" and it can uninstall the suite much more easily than one program at a time via the Windows Control Panel. 

And it's installed with the Suites for 2012, 2013, and 2014!

The uninstaller can be located by going to Windows Start>All Programs>Autodesk, and finding the Autodesk Factory Design Suite Uninstaller 2013.


Selecting this tool will bring up a utility that let's me choose which products in the Suite to remove. 


It's important to point out that if the product is checked, it's getting uninstalled!  Make sure that if you intend to keep a product, uncheck it! 

With the proper programs selected, choose Uninstall, and let the Uninstaller do it's magic.  It might take a bit of time to uninstall, but it's time that you can spend doing something more productive! 

P.S.  There wasn't an uninstaller included with the 2011 version of the Autodesk software, but Autodesk did make one available for download at the link here!

Tuesday, March 18, 2014

Help! I've Lost My Autodesk Inventor Feature Browser!

“You affect the world by what you browse.”
Tim Berners-Lee

It can be easy to lose the browser in Autodesk Inventor sometimes.  Just click the "X", and poof!  It's gone!

One click is all it takes

All it take is one missed pick of the mouse, and Inventor looks like the picture below.


Inventor without its browser.  It's not fun!

Now that Inventor is broken.  How is it fixed?   That part is easy.

The first step is to go to Inventor's View Tab and locate the User Interface icon.

The User Interface icon.  The ticket to a solution


Click on the User Interface icon, and a fly-out appears.  One of the options will be, Browser.  This is the one we're after!

Find that Browser check box

Check that option, and the browser is back!  That's all there is to it!

Check the Browser checkbox, and celebrate

So that how the browser can be brought back in a matter of seconds.

P.S. Looking back at the options on the User Interface icon, other options can be turned on or off from this same screen.

These include the:

  • Viewcube
  • Navigation Bar
  • Browser
  • Status Bar
  • Document Tabs
  • Marking Menus
  • iLogic Browser

Several items can be controlled here

 These can be used to customize how Inventor looks and feels, and can tailor it to a given users preference.

It also makes for great April Fools jokes to users who don't know the trick of turning it back on.... 

Not that I'm encouraging that....

*** Update 13-November-2018 ***

It seems that somewhere along the line that somewhere in the newer releases of Inventor, the "Browser Bar" option has been replaced by "Model".  I'm not sure exactly when this happened, I'm currently using Inventor 2015 at work, and I haven't gone looking at the newer versions lately.

But if you don't see the "Browser Bar" option, look for the "Model" check box.  That should do it! 

Thursday, March 13, 2014

Can't Select Threads in Autodesk Inventor? Check the Registry!


“The stitch is lost unless the thread be knotted”
Italian Proverb

Every once in a while, I run into something that in all my years of using Autodesk Inventor, I've never seen before.

And I just recently ran into one of those cases.  I encountered an Inventor installation that was doing something I had never seen before.  Using Inventor for nearly 15 years, this one was totally new.

On this particular machine, threads couldn't be added.  The hole tool would start just fine, but when I tried to select threaded holes, nothing happened.  The radio button wouldn't select.  It was like the button wasn't there.

Threads cannot be selected!
Not having seen this before, I do what any self respecting geek would do.  I fired up Google and began a search!

Fortunately, my search paid off, and I found a link with a solution!  I can't take the credit for finding the solution, but what I can do, is share what I've discovered!

Credit goes to JD Mather who put up the solution originally!
  • The first thing I do, is shut down Inventor.  I don't think this is necessary, but it's a good practice, and I don't take chances.  
 
  • Next type REGEDIT in the Windows Search box.  This opens the Windows Registry Editor. 


  • Once the registry editor is opened, browse to the following key: HKEY_CURRENT_USER\Software\Autodesk\Inventor\RegistryVersion 1X.0\System\Preferences\Part  
    • Locate the key: UseExcelToReadThreadFile
    • Note! The value for 'X' varies based on which version of Inventor is being used.  (This example is Inventor 2014)


  • After locating the key, right click on it, and choose Modify


  • Change the value from 0 to 1


  • Once this value is changed, close the Registry Editor, and start up Inventor. 

After that was done, the computer could place threads just fine!


This was really an odd one, I've never seen it, but feel free to drop a comment if you have.  I'm curious to see if this has shown up for anyone else out there!

Acknowledgements!!!!

I'd love to say that I came up with this solution all on my own.  But I didn't.  Thanks again to JDMather.  He placed a great update at the following link on the Autodesk Discussion Group.

All I can say is that I updated some of the info, and added some updated images.

I definitely have to give credit where credit is due!