Find us on Google+ February 2011 ~ Inventor Tales

Sunday, February 27, 2011

No Blog Today! - Something Came Up!

Hoban 'Wash' Washburn: This landing is gonna get pretty interesting.
Capt. Malcolm Reynolds: Define "interesting".
Hoban 'Wash' Washburn: [deadpan] Oh God, oh God, we're all going to die?

Conversation between Wash & Captain Reynolds in "Serenity"

I know I promised a blog on Options Files today, but over the weekend, an installation required my attention.  A lot of it.  As a matter of fact it's still requiring my attention.

Sometimes you have to adapt to the unexpected.


So needless to say I'm working on that, and have to skip the promised. blog.  Once I get things resolved with this installation, I'll add the promised post on options files!  

Tuesday, February 22, 2011

Setting the Highlights - Controlling Selection Highlights in Autodesk Inventor

“For me, the proof of the pudding is always at the end of the season and how good the signings are will be highlighted then.”
Steve McClaren

I ran into one of those 'random' things today.

You may have seen it, one of those settings that you stumble upon while looking for something else and think "So that's where that is set!"

The little setting I ran across was "Enable Advanced Highlighting".  It's located in Applications Options, on the "Colors" tab.

The "Enable Advanced Highlighting" option
What does this setting do? When you select component, it controls how your selection highlight appears.

If you uncheck the option, the selection highlight will look like the image below:


Selected component with "Enable Advanced Highlight" option unchecked


If you check "Enable Advanced Highlighting":

Now the "Enabled Advanced Highlighting" option is checked
The selection highlighting now changes to this:

The preview now that the "Enable Advanced Highlighting" option is checked
 So which should you use?  That's up to you.  Inventor will function the same whichever option you choose.  It's all about what you prefer.

Personally, now that I've located the setting, I'll be enabling the advanced highlighting from now on!

Happy Inventing.


Sunday, February 20, 2011

FlexNET Publisher - A License to Network (Part 5) - Deploying the Deployment


Welcome to Part 5 of FlexNET Publishing.  In the  my last blog post, Part 4, we created a network deployment.  Now, we'll pull it to a client system.

The first step is to go to your client machine, and browse to the location where the network is stored.  


The location of my deployment


Browse down into the folders, and we'll find a shortcut with the same name we used when we created the deployment back in Part 4.


Double Click to start running the deployment.  Since we set this deployment to be non-silent, we'll see the same screens we saw in when we created the deployment, with the same settings we used when we created the deployment. 

We can accept these as defaults (which is the most common), or we can override them to different Serial Numbers, installation locations, etc. 


A sample of the screens you can change during the deployment.
Once you confirm your options, the deployment will run, and the installation will complete.  You'll see a screen similar to this one. 

Install complete!


That's it.  The install is finished, and you can start Inventor (or whatever product you're using).  


So before I close things out, I'll leave you with a couple of tips.


1) It pays to double check the settings the first couple of times you pull your deployments.   You never know when you might find that last little setting that needs to be changed.


2) Pull to one or two clients, then run the products to make sure they're working correctly.  It can be tempting to 'set it and forget it', and pull several deployments without spot checking.  But there's no worse feeling then finding out that something is wrong after you've pulled ten clients, then realizing you're going to have to uninstall them and do it all over.


3) If you realize you've made a mistake on your deployment, all is not lost.  You can go into the "Tools" location of deployment and choose the "Create & Modify a Deployment" option.  You can then go through and change your settings.  


Modifying your deployment


So there you go!  License installed, deployments built, and deployed!  


But we've really only scratched the surface of network licensing.  There is much more that can be done.  In our next blog, we'll talk about options files, and how you can use them to manage the use of your license files! 

Tuesday, February 15, 2011

Autodesk Inventor Drawings and the Raggedy Shaded View

So here is us, on the raggedy edge. Don't push me, and I won't push you. Dong le ma? 
Captain Malcolm Reynolds (Nathan Fillion) in "Serenity"

Every once in a while I run across one of those Inventor Settings that I rarely use.  I set it once, then forget it for a few releases.  Then, like a long lost relative, it shows up again when you least expect it.

The shaded view we'll work with in today's blog


One of those is the setting that controls how Inventor handles shaded views in its drawings.  You may notice, if you shade a view, then zoom in close, the edges of the shaded view look like they were painted in water color.....

By someone in a hurry.....

Who had just eaten a pound of sugar and washed it down with a gallon of coffee....

That's right, the shaded part of the imaged doesn't quite match up to the edges of the drawing.

Click to enlarge the image and see how rough it is
Most of the time, you have to zoom in pretty tight to even notice it, and in many cases, it doesn't really affect anything.  But if you're using a dwf or pdf file, you may run into cases where the 'raggedy' edge becomes visible. 

And it can be a little irritating.

Fortunately, it's not hard to fix it.  All you have to do is go to Tools>Document Settings, and pick the 'Drawing' tab. 

Once on the Drawing Tab, change the "Use Bitmap Setting" to from "Always" to "Offline Only".  Now you can zoom in tight on the view, and the edges will be clean and crisp!

Much better!
Remember, if you want to change this setting for all future drawings, make sure to set it in your template!

Happy Inventing!

All done!

Note:  The model is based on the Mission Candlestick found in the book:
"Mission Furniture - How to Make it" by H.H. Windsor

Sunday, February 13, 2011

FlexNET Publisher - A License to Network (Part 4) - Building the Deployment

“This is what people need: an easy-to-deploy, easy-to-use tool.”
Nat Friedman

Welcome to Part 4 of my network licensing series, building an Autodesk Network Deployment.  This is continued off of Part 3, last week.

So what is a network deployment? 

A network deployment is the installation copied to a shared location where it can be pulled to your clients from one location.  A network deployment can be a real timesaver when installing to several machines. 

So how do we create this network deployment I speak of?

In order to create a deployment, we'll need to create a shared folder on a the machine that's going to host the deployment. 

 Before we get started, create a folder on the machine hosting the deployment.  In my example, I've named it Deployment.  If you're not sure how to share a folder, here's a link with the steps to share a folder HERE.

   
My deployment folder created

1) Now pop in the disk for the Autodesk product you want to create your deployment for.  In this case, I'm using Autodesk Inventor, but the steps are similar for most Autodesk products.  Run the setup to begin the installation process.    Choose Create Deployments when the first screen comes up.

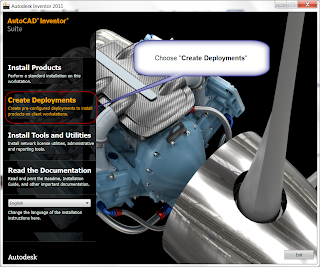
Choose "Create Deployments"
2) The next screen is the Installation Checklist.  It's worth glancing through.  In particular, make sure that you turn off the User Account Control (UAC) if you're using Windows Vista or Windows 7.  If you're not sure how, there's  a KETIV Tech Tip for that HERE.

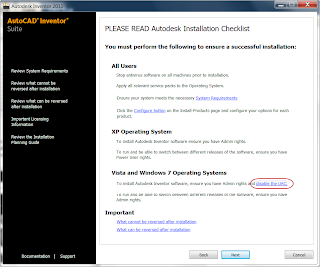
The Installation Checklist

3) Now, we have the opportunity to select the location of our deployment, and the name of the deployment.  You can browse to the location, or you can type the location in if you know it.  Note that  the deployment path is using the UNC naming convention.

You'll also have an opportunity to create a deployment for a 32 bit client, or a 64 bit client.  Choose the one you want.  If you're working in an environment with both 32 and 64 bit clients, you'll have to create two deployments.

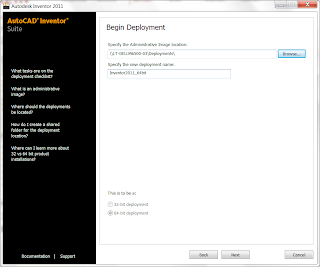
The Deployment Name and Location
4) Now, we'll choose what to install. This will vary depending on what product you're creating an deployment for.  In this example, we'll install Autodesk Inventor, AutoCAD Mechanical, and the Autodesk Vault Client.  Autodesk Design Review must be installed with the Autodesk Vault Client, so it 'checks itself' and greys out.

Choose what to install
5) Next, we'll see the End User License Agreement (EULA).  Accept it, and we'll move on to the next step.

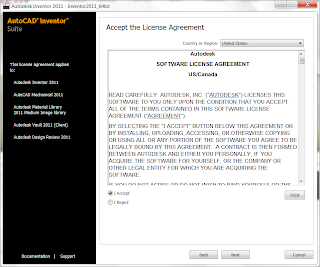
The EULA, accept it and carry on.
6) Now, we get to enter the user information and serial number.  Enter your info, and carry on.

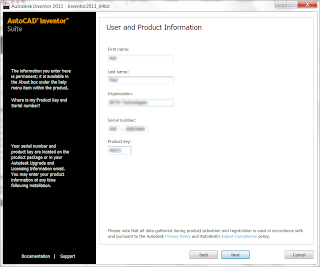
The Product Info (I have to blur out my info!)

7) Now a confirmation of which product we're deploying.  Double check to make sure the selections are right before moving forward!

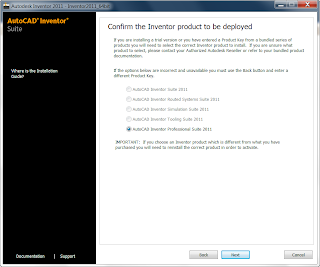
Double check the product is the one you want
8) Now we can select if we want to create log files, and were we want to create them.  We also get to choose whether or not we'll run our deployment silently when we run it. 

A silent deployment means there will be no dialog boxes, just progress bars.  The deployment will run with the settings created during the deployment. 

A non-silent deployment will still use the settings created in the deployment, but gives us the opportunity to change the settings if we want. 

Personally I prefer non-silent deployments.  I like having the ability to change the settings, and error messages tend to be more verbose in a non-silent deployment.  But the choice is yours!

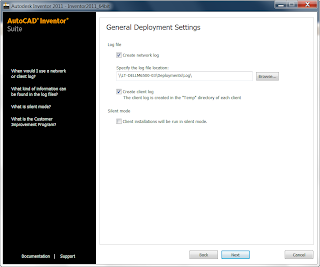
The deployment settings
9) Next comes the point where I see many make a HUGE mistake.  When you see this screen, click the configure button!  Trust me you won't regret it.
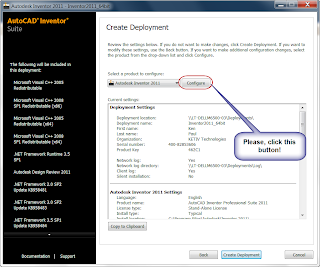
Check configure!

10) The first screen to come up will let you choose whether we're creating a deployment for a standalone (Node locked) or Network license.  In our case, we're creating a network license.  

The default is standalone, so make sure you check this for all products in this deployment.  If you install with the wrong license type, you'll have to modify the deployment, and then uninstall and reinstall any installations with the wrong license type!  
Trust me.  You don't want to be several deployments deep when you find out you've made a mistake!
This screen  also gives you the option to choose whether or not your installing a single license server, distributed license server, or redundant license servers.  Right now, I'll just choose single.  I'll describe distributed and redundant licensing schemes in future posts.
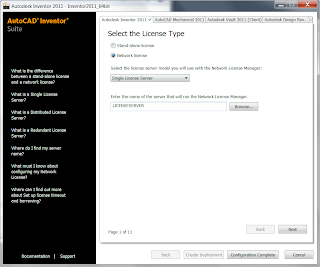
License Type, and Server Name
11) Click next to change other options for your installation.  These will be things like installation directory, default standards, as well as options and preferences.  These will vary for different products, and there's a lot of them, so I won't go into all of them here.  But I will make a recommendation.  

Double check all your settings.  The deployment is the template for all your installations.  It's worth making sure you have all the settings you want.  


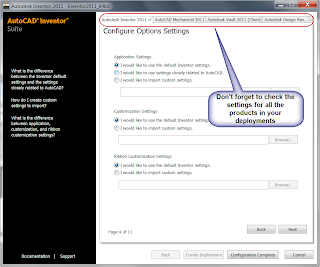
A sample of one of the settings screen


12)  You'll also have the chance to include service packs in your deployments, so when you install to your clients, any service packs can be installed with the deployment.  

Personally, I like to include the service pack in the deployment. 

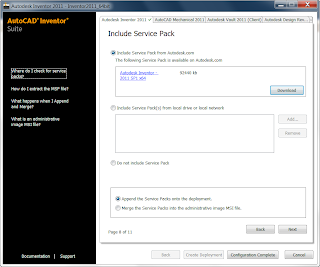
Adding a service pack to the deployment
13) Click on complete deployment, and we'll return to the screen from step 9.  Now we can view our deployment settings one more time, and click "Create Deployment".   At long last, the deployment begins building itself. 

This can take a while.  Monitor the deployments switching disks when the deployment asks you to.

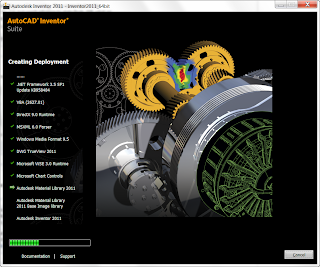
Deployment in progress

14) The deployment will finish after a while, and then you'll be ready to pull the deployment to your clients.  But that's a subject for next week!  

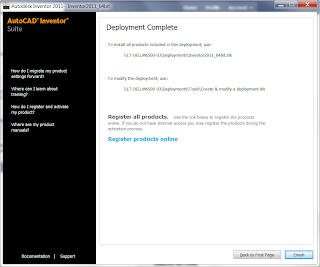
That's it, we're done.... for now!


Wednesday, February 09, 2011

Setting the Stage - Creating Backplates in Showcase

“I gave them the kind of backdrop to make them feel 'I really have arrived,'”
Morris Lapidus

While I was at the Pacific Design and Manufacturing Show in Anaheim today, I had the pleasure of watching Autodesk Solutions Engineer Extraordinaire, Paul Schmucker put on one heck of an amazing presentation.  (BTW, you can see Paul today at booth 3609!).

Paul in action
While I was watching his presentations, I was reminded why I like to watch others present products I know.

You always learn something new.

Paul took a picture of the attendees at the show, created a backplate in Showcase for use in his rendering.

Needless to say, my jaw hit the floor.  I knew it wasn't that difficult, but watching Paul create it really brought it home.

So what was the first thing I did when I got back to my laptop?  I brought one in myself! 

So before I go ahead and share what I learned from watching Paul, what exactly is a backplate?

A backplate is a flat image behind your model instead of the panoramic environment.  The big advantage is their quick, and you don't need to do a lot of processing to get it in the model!

It's great if you want to take a picture from the front of a building, conference room, etc, and put something in front of that.  And the best part, is it only takes a few minutes to do.

I did this at the show with a picture I'd taken a few months ago of the Planes of Fame P-38 Lightening

The New and the Classic

So here's the video of how I did it. 


And if you're interested in the actual Planes of Fame P-38 Lightening at Planes fo Fame.  Here's a picture of it taking to the air in February!

Sunday, February 06, 2011

FlexNET Publisher - A License to Network (Part 3) - Setting Up the License

“There is only one satisfying way to boot a computer.”
 J. H. Goldfuss

Welcome to Part 3 of my network licensing series, continued from Part 2, last week. 

So we've got the license from Autodesk, now we need to set it up.  The steps aren't that difficult, once you know them.

We'll need to set up the network license manager on the server, configure the license, and finally get the service started.

So let's get the license server.  You'll find it on any network enabled Autodesk product, in my case, I'm using Autodesk Inventor.  The other network enabled products will be similar.

First, start your installer setup.  Choose Install Tools and Utilities.

Choose "Install Tools & Utilities

Select Autodesk Network License Manager.  The other utilities are optional, and not required to setup a license.

Choose Autodesk Network License Manager
Continue to click through the screens.  You'll have to accept the End User License Agreement (Eula), and have the option to change the install directory, but that's really all there is to the actual installation of the License manager.


Now we've got the license manager installed, now we need to configure it.  I like to place my license file in the install directory in the installation directory, in a sub directory called "License", but the license can be placed anywhere.  While we're in here, I'm going to use Notepad to create a file named debug.log.  We'll need this file later.

The location of the license files

Now, start the license manager.   You can find it from Start>Programs>Autodesk Network License Manager, or by clicking LMTOOLS.EXE from the installation directory.

We'll start with the Service/License File tab, and make sure it's set to "Configuration Using Services".

Configure using Services
With that confirmed, we'll jump all the way to the Config Services tab.

The Config Services tab.  Where the magic happens.
We'll perform the following steps:
  1. Name the Service by typing a name over FlexLM Service 1.  This isn't necessary, but it's probably a good practice to.
  2. Browse to the LMGRD.EXE file (this is the service that waits for the license request)
  3. Browse to your license file (in the directory you've placed it in).
  4. Browse to the debug.log file (also in the directory you've placed it in)
  5. Check the Use Services, and Start Service at Power Up check boxes.
  6. Save the Service when it's all done.
The service configuration completed
You might think we're done, but there is still one more step we have to do, and it's an important one!

Go to the Start/Stop/Reread tab and hit Start Server.  It should say, "Server Start Successful".  Just like the name implies, this starts the service.

It's Ahhlive!
 Things should be running fine at this point, but it's a good idea to verify everything.

I usually double check on the Server Status tab (hit 'Perform Status Enquiry").  Scrolling through the screen should show you the service is started, as well as the number of licenses available, and how many are in use, if any.

Server up!  2 Licenses of Vault Professional available in this case.
Next, I jump to the Config Service tab, and hit the 'View Log' Button, and check the log file.  It should indicate the service is started, and that license are running.  If users started the appropriate programs, they may already be grabbing licenses!

The key lines will look similar to this:

15:02:07 (lmgrd) License file(s): C:\Program Files (x86)\Autodesk Network License Manager\License\Autodesk 2011 NW Licenses.lic

15:02:07 (lmgrd) lmgrd tcp-port 27000
15:02:07 (lmgrd) Starting vendor daemons ...
15:02:07 (lmgrd) Starting vendor daemon at port 2080
15:02:07 (lmgrd) Using vendor daemon port 2080 specified in license file
15:02:07 (lmgrd) Started adskflex (pid 2460)
15:02:07 (adskflex) Unable to initialize access to trusted storage: 1
15:02:07 (adskflex) FLEXnet Licensing version v11.7.0.1 build 79971 x64_n6
15:02:07 (adskflex) Server started on LT-DELLM6500-03 for:    85588VLTM_2011_0F
15:02:07 (adskflex) EXTERNAL FILTERS are OFF
15:02:07 (lmgrd) adskflex using TCP-port 2080


Checking the log
Click the Close Log button, and close LMTOOLS down.  The service is up and running, and we're ready to talk about creating deployments next week!

Tuesday, February 01, 2011

Tolerances - How Do They Stack Up?

“The role of art is to make a world which can be tolerated.”
 William Saroyan

I remember when I was in industry, I worked with a lot of parts that were exposed to moisture.  I would write down a lot of tolerances on a piece of paper, trying to figure out if if two parts would fit through their full range of those tight tolerances.

A representation of the type of parts I once worked on

I still remember one case, over a decade later.  I had carefully calculated my tolerances on a close tolerance part, and the list had been checked twice.  The parts were sent out, and we waited eagerly for the first samples.

A few weeks later my boss had called me into his office, and he said the words no designer wants to hear.

"The first samples are in, and you made a mistake." 

My heart sinks into my shoes.


"You added the Maximum Material Condition.... TWICE.  The print is wrong."

"Oh dear."  I answer.  (Okay those weren't my actual words).

My boss smiles.  "You lucked out."

My eyebrow raises.

My boss continues, "The manufacturers tooling cuts too much material, by the same value as your tolerance.  They're asking if we can accept the deviation.  I'm going to say after careful studying, we can accept it."

I smile.  I can't help it.  I've actually seen a case where two negatives made a positive!  I'VE DEFIED MURPHY!

Still, it cost me some grief, and likely contributed to the current aerodynamic haircut covered by my snowboard helmet.

So what's the moral of my story?  Inventor has a tool that would have helped me out a lot:  Model Tolerances! 

In short, it lets you set the  tolerances of the dimensions in your model, then set them to the maximum material condition (for example).  Then use the interference checker at those conditions.

It's a lot easier than my old piece of paper, and may have helped me stay away form my aerodynamic haircut a little bit longer!  So here's the video of how I might have done it if had today's tools way back when!