Find us on Google+ February 2015 ~ Inventor Tales

Sunday, February 22, 2015

Shimming Your Knowledge - Adding Parameters to Text in Autodesk Inventor

In my last post, I mentioned that I've been doing a lot of work with Autodesk Inventor drawings.

I've found that this week, the trend has continued.  And while this can be a bit monotonous, it has given me an opportunity to blow the dust off some old tricks I've learned over the years.

One common thing I've seen is inserting a certain value into a block of text, such as note text.  These values can be things like sheet metal thickness, bend radius, or any other value that needs to be stated in the body of the text. 

A typical example.  I've added the radius dimension for comparison.

\It's never hard to type these values in, but if the value is just typed, then it's static.  If the value is changed in the model, there's no way to make sure that value updates, short of using the good old Mark 1 memory and Mark 1 eyeball.  


So let's take a look at how to automate that process.  Let's make the bend radius note update automatically. 

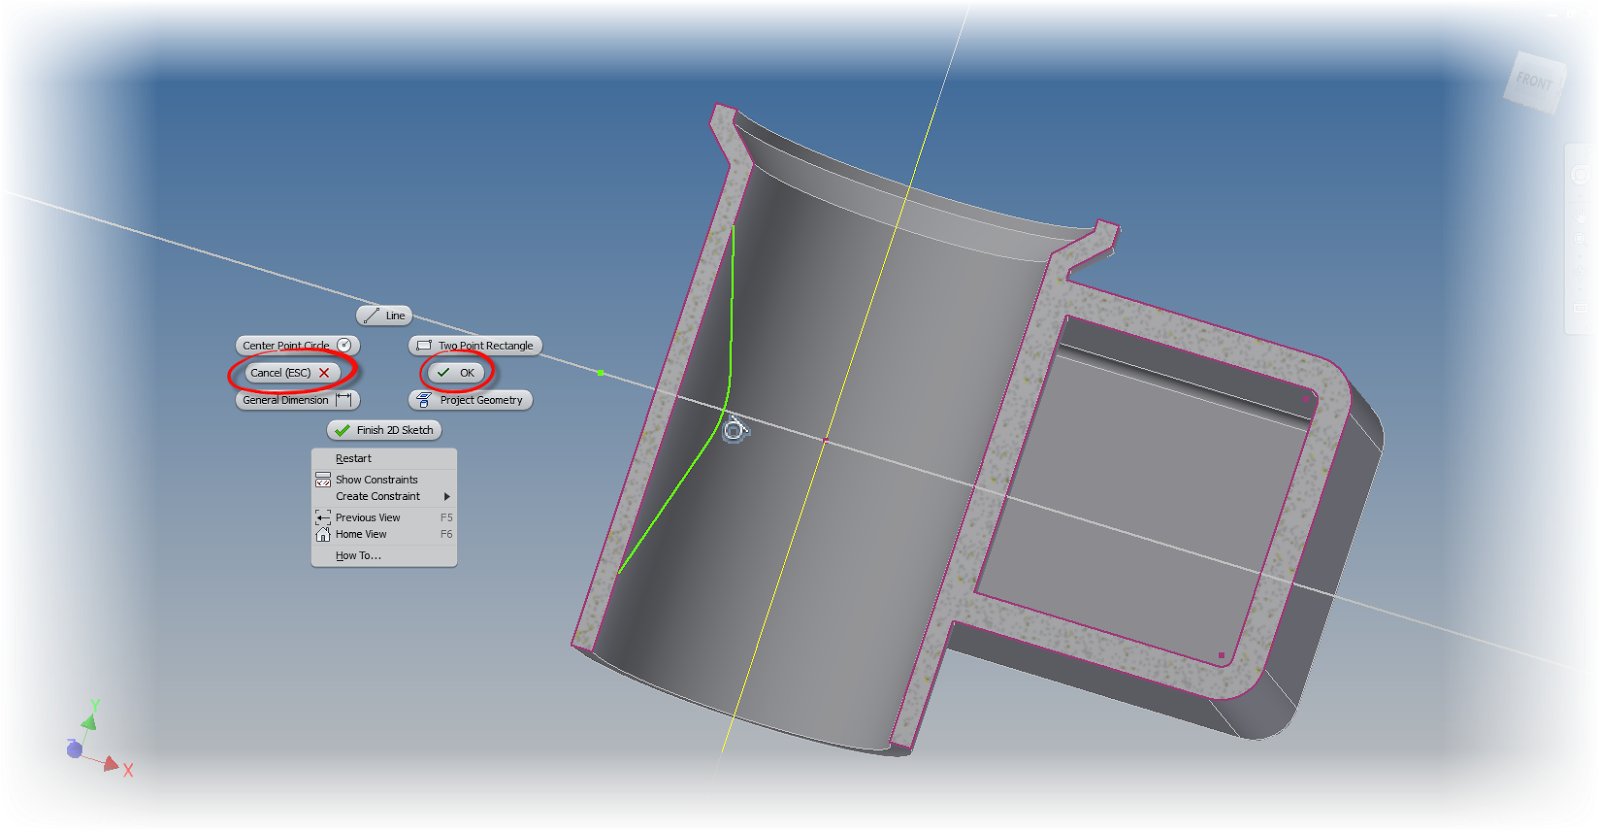
Start by editing the text the same way you always have.  Right click on the text and choose Edit Text

The editing screen

Once inside the text editor, focus on the set of bars just at the top of the text editing portion of the screen. 

From left to right, here's the information each pull down contains, starting from left, and working right. 

  • Component - Which component are you drawing the data from.  In this case, the model is named "Sheet Metal"
  • Source - Are you calling the parameter from the Model Parameters, or User Parameters
  • Parameter - The actual parameter you're placing. 
  • Precision - How many decimal places does the parameter contain. 
  • Add Parameter - This will actually put the parameter into the text. 
  • Special Symbols - Expand this menu to see common drafting symbols to place. 

The toolbar to add your parameters in. 

Clicking the Add Parameters button will add the value to the text, but inside of a gray box.  This tells you that the value is being read from an outside source. The sheet metal part in this case. 

Using the Add Parameter tool to make the magic happen!

Click OK to complete the operation. Now when that value changes in the model, the value will automatically be saved in the text!  


But there's one more thing.  What if you want to adjust the format even more?  To do that, right click on the text again, but this time, choose "Edit Unit Attributes". 

Now you can change the format of the units, including units, precision, and format.  In this case, I removed the leading zero, and added the unit string to make sure the units fit my standard.


All that's left to do, is hit OK, serve, and enjoy!  The units and leading zeros are gone, and the value on the drawing will update should the model change! 


And once that's done, you're all set!  Take a look at this tool, and see how it can help you!

If you prefer to see this information in video form, take a look at the video below!


Sunday, February 15, 2015

Shimming Your Knowledge - Associating Text and Symbols to an Autodesk Inventor Drawing View


Lately, I've been doing a lot of work inside of Inventor drawings. During that time, I was asked how to make sure that all my text and symbols will move with a view.

If you've used Inventor for a while, you may have noticed that if you put in a text or symbols next to a view, they will stay behind if you want to move the view.

Everything looks right here.

After moving the view, the symbols stay behind.

It's usually not a big deal to move the text and/or symbols later, but there's always an opportunity to make a mistake.

And it's just a pain to move the symbols back to where they were!

But there is a way you can make the text and symbols move with the view, and that's to start off by placing the text and symbols using the leader options

Use leader text, and the leader options to place the symbols

If you place the text and symbols with leaders, the move with the view that they're attached to.


Place the symbols using the text as leader, and with symbols


But we didn't want leaders, right?

But that's okay.  If you right click on the leaders, you can delete the leaders, leaving the text and symbols behind. Just choose Delete Leader.

Add caption

The best part?  Even with the leaders removed, the association remains!  If the view is moved, the text and symbols now move with the view.

Now if the view is moved....


The text and symbols move with it! 

And that's how you can make sure your text and symbols update the way you want them!

For a video of the steps I've described above, check out the video below!


Friday, February 06, 2015

Shimming Your Knowledge. Using the Assembly BOM to quickly change Properties


Every Autodesk Inventor part and assembly contain valuable properties, called iProperties by the Inventor folks.  A savvy user can place critical information into iProperties.  These properties are passed from the part, into the assembly, and ultimately into the drawing.".

This information can be critical to making sure your finished product comes together properly.

I would be the first to tell you that, in a perfect world, any Inventor iProperties you need filled out should be filled out before you place the part in the assembly.  You should also set the material as well.


But I also admit that the phrase "Perfect World" comes with an asterisk and small print that reads. "You don't live in a perfect world".

With that being said, do I diligently set my iProperties and materials at the part, long before I place it in an assembly?

That's a big fat NOOOO!

This is usually what I've done.  The assembly has been created,
but the descriptions and materials haven't been set

That's right.  I'm as guilty as anyone out there.  I may even be more guilty.  That's me, sticking it to the man, breaking the rules.

I'll fill out those properties whenever I darn well please Muhahahaha! 

Why don't I take my own advise?  Part of it is bad habit.  I always want to jump into building the models. The fun part.  Documentation?  That's just as important, but it's also boring.

Is it a good excuse?  No.  It's just part of a bad habit I haven't quite shaken yet.

That leaves me with the self inflicted challenge of having to go back and return to my models at a later date, often when they're nearly finished, to add in the properties and set the materials I need.  That task is at best tedious.  At worst, it's time consuming and painful.

But fortunately, I know a nice tool that allows me to change my properties and materials from the assembly, in one convenient dialog box.

The result is like you opened each part and subassembly individually and made these changes, but you don't actually have to do that!

Who needs a perfect world!

The tool of which I speak is the assembly Bill of Materials, which can be found on the Management tab in the assembly.

Accessing the BOM Manager.
The Bill of Materials  icon is grayed out because the BOM
Manger is already open.
Expanding the assembly in the Bill of Materials manager, the fields available to be modified appear next to their components.

But what if you don't see the components you want?

To add columns, select the Choose Columns icon and drag the field you want and place it in the title bar.

Adding a column using the "Choose Columns" tool. 

To remove a column drag it from the title bar to the middle of the screen.  Release the mouse when the "X" appears.

Removing a column from the BOM manager. 

You can add or remove however many columns you need.

Now with the columns you want configured, now you can start filling out your iProperties, as well as selecting what materials you want for your components.

That's more like it! 

This is definitely a tool worth taking a look at, if you spend a lot of time editing properties and changing materials, this should be a big part of your toolkit!

I know there's some of you that prefer video tips!  If you do, I've created another video for the YouTube channel here!

Sunday, February 01, 2015

Shimming Your Knowledge - Quickly Switching Commands in Autodesk Inventor

SHIM (noun) - A thin piece of material, sometimes tapered, used for alignment or support.

In my last post, I decided to create a series of short tips.  Things that I can create quickly, but also that end users out in "the wild" can find useful in their day to day jobs.

And for this post, here's a little tip that, one could say, is "small but mighty."

It's common knowledge to most Inventor users that right clicking and choosing either the Cancel (ESC) or OK keys will exit a command.  Hitting the Escape key on your keyboard will also exit a command.

Ok and Cancel two ways of ending a command.
You can also hit the Escape key.

But did you know that's not necessary?  Did you know that you can invoke a new command from the ribbon, or hitting the hotkey for a new command will not only exit the command, but start a new one?

You can just start a new command, which will end the current command.

Try it!  It works!

And to see a video demonstration, take a look below!