Find us on Google+ Inventor Tales

Sunday, August 06, 2017

Using Extrusion Templates in Fusion 360 Using Insert into Current Design

An F4U Corsair at Planes of Fame in Chino Ca.
Photo is mine.
As part of my Fusion 360 experience, I've been building different parts for a WW2 era Vought F4U Corsair.

Why am I doing it?  It provides me an opportunity to learn how a machine like this was put together, it challenges me to find ways to use Fusion to find creative ways to solve design challenges, and I flat out enjoy it!

And what's the point of doing it if it's not a least a little bit fun!

The planes I've used came via my subscription to Aircorps Library, who has done a marvelous job scanning and sharing plans for WW2 era aircraft.

And before you ask, sorry, I'm not sharing the plans.  I pay for my subscription with them, and I'm happy to support their efforts.  To me, sharing their plans without proper compensation would be tantamount to stealing their hard work.

But with that being said, here's what I've learned about how the engineers of the 1930s and 1940s who designed the Corsair, and here's how I was able to get Fusion to help me with my "recreation" efforts.

Many parts were created from extrusions,  These extrusions were in turn, machined to create various parts for different parts of the aircraft.

The "Make From" reference in the
drawing's title block
Due to this fact, the finished parts had a note to "make from", the "from" part referencing the standard extrusion.

Well the last thing I want to do is redraw the exact same shape for multiple parts!

So here's how I was able to use Fusion to make the extrusion profile available, and reusable, to multiple drawings.

It's actually quite simple.  The first step is to create the cross section of the extrusion in a Fusion 360 part file.  I opted not to extrude the part at this point in time.

A sample of the extrusion template
This part becomes my template for future use.

The next step is to insert the template into a new model file so I can create new parts from the template.

The goal of this is to insert the previously created sketch into a new model, and extrude this sketch to create a new part.


First start a new Fusion 360 file.  Once the file is open, browse to the location of your template, and choose "Insert into Current Design".

Choosing  "Insert into Current Design" to use the
template for the extrusion

This function links the extrusion profile into the new file.  Once the sketch has been inserted, the sketch can be extruded just like it had been created right in the part, instead of being linked in.

The part being extruded using Fusions std. Extrusion tool
Once the extrusion is created, you can work on the part just like any other Fusion 360 part.  You can add and remove material as needed to meet your design requirements.


That's the basics  of creating an extrusion template in Fusion 360.   At least that's how I've approached it.

So what are the advantages I found that drew me to this conclusion?

Well, for starters, I don't have to drawing the same shape over and over again.  That alone is reason to chose that route, at least for me.

Second, any new parts created from the template are linked back to that original template.  So in the event any changes have to be made to the template, the parts generated from the template will also update.

In the event that happens, it can be a lot easier to update several parts than have to transfer the same dimension to several parts, and run the risk of missing that one odd part.

So in conclusion, this is why I approached this file in this way.  You may come at it completely differently, or maybe just vary this process just a little bit.

It's up to you!  If you find a different approach, feel free to share  in the comments.


Disclaimer: The views and opinions expressed in this article are those of the author and do not
necessarily reflect the official policy or position of Planes of Fame Air Museum or AirCorps Library.

Sunday, July 30, 2017

Hydraulic Fluid Fitting Models in Fusion 360

A project I've been working on, "here and there" has been a series of AS5174 hydraulic fittings.

Original created in  Inventor they were imported into Fusion 360 and added the gallery here.

They're samples I've opted to share in the event anyone can use them out there.

If they help you, let me know!

Have fun!

Sunday, July 23, 2017

Using Attach Canvas in Fusion 360 to Find an Unknown Measurement

For the last few weeks, on my spare time, I've been creating models from scanned prints in Fusion 360.

Most of these prints are produced in the 1940s, and they border on artwork.  When an drafter nearly
80 years ago could accomplish with pen and paper was impressive.  They were certainly masters of their
craft!  You can see a sample of a similar drawing here

How can you find the missing dimension? 
But a challenge I encountered was one that even modern users of 2D drawings encounter.  Missing
dimensions.

In some cases, the missing dimension was a result of a drafting error, in most cases, the dimension
was referenced on a different drawing that was unavailable to me.

But it doesn't matter how the dimensions ended up missing, if they can't be found or derived.  Without the missing dimension, creating a model from the drawing becomes much more challenging.

Fortunately Fusion 360 has a nice tool that makes finding this dimensions pretty simple, as long as
you have a single dimension, and the drawing is consistently scaled. 

How do you do it?  Here's how I was able to figure out what that phantom dimension.

Convert your drawing into an image file, a *.png, *.jpg, *.jpeg, and *.tif are all formats you can
use.

Now this image can be imported using the "Attached Canvas". icon.


Fusion 360 will want to know which plane you want to place the image on, and will also want you to browse for the image you want to insert.

Once an image and a plane are selected, you'll have an opportunity to scale the image, using either the handles or in the dialog box.  You can scale it here, but there's a step coming up where it'll be easier to scale the image accurately.  In my case, I used this yet to be seen step.

The Attached Canvas Preview
The drawing will import onto the Fusion 360 canvas, but it's not calibrated.  It's up to us to make sure the scale of the drawing  is 1:1. . 

I recommend re-positioning the attached image easier to measure.  Once that's done, locate the "Canvases" folder in the browser.  Right click on it, and choose "Calibrate".

This step gives you the opportunity to measure a known value on the Attached Canvas.

Choosing the calibrate option will allow you
size the imported image. 
Returning back to the situation I found myself in, The drawing I was reproducing had edges I with dimensions I could use, so I just picked an edge with a dimension, and chose the extents of the dimension for scale.

In the case of my drawing, the dimension I chose was 5 inches.  Naturally, the calibration the dimension on my canvas, but trust me!  It's 5 inches!

Calibrating the image using a known edge.
The image will resize according to that known dimension, and if the drawing with a consistent scale, measurements can be taken from any part of the drawing and a reasonably accurate measurement can be made. 

A measurement taken to obtain the part thickness
By using this method, the dimensions of the part can be obtained from the drawing, and the drawing turned into a 3D model.  

But of course, it's not all a walk in the park. There are some things to be aware of going in.

You've already seen me use the phrase "consistently scaled".  In other words, the drawing has to be created to some sort of accurate scale.  If it's sketched to different scales in the X and Y axis, it will be difficult, possibly impossible, to get good dimensions.

I've also used the phrase "reasonably accurate".  That means you can't quite get to the last decimal point of your measurement.  But you can get close enough to determine many measurements.

For example, if you measure .193 on a part that can be expected to be a standard thickness, then you might be looking at a thickness of .1875 inches.

But even if not perfect, this method can get you exactly what you need when no other methods work.

So give it a try!


Sunday, July 09, 2017

Making a "Port Tool" in Fusion 360

The finished housing
Earlier this week I finished my sequence valve housing in Fusion 360.  And I learned a quite a bit doing it.

Many of my challenges were learning to use Fusion 360, partially because it's a tool I'm still new to, and there are different ways to do things in Fusion.

But the challenge I'm going to focus on is more one of process, than one of creating shapes in Fusion

The ports where fittings attach
One of the challenges I faced was how to easily model the 6 ports that were located in the housing.

They're all based on the AND-10050 standard.  That means that the ports are similar.  And when I say similar, I mean they're all similar geometry, varying only by size.

Take away the dimensions, and they're the exact same shape

I also recalled that there are special tools for drilling these ports.


In other words, where things can be standardized, they are as standardized as possible

So why do the same thing in Fusion?

We'll, here's how I did it, at least in brief.

First, create a new part in Fusion, locate the parameters, and entered the dimensions from the table found in the standard into the User Parameters section.

The user parameters
Why enter them first as User Parameters?  I can enter them in an orderly fashion, as they're seen in the table, and then enter them as I built, instead of trying to do both at the same time.  I think it's easier, personally.

The cross section for the "port tool".
Next, I built the port, using standard Fusion tools, and calling the user parameters I entered above.  In my case, I created the cross section for the port as a revolved feature.

It's interesting, at least I think, to point out that the finished "port tool" is a solid.  But I'll use this to remove material from the base casting that will be receiving the port I need.


The port tool, as a solid.
So what were the benefits I found to doing it this way?

First of all, I had a tool that was easily reusable and repeatable across as many places, and designs as I needed.

Second, since the AND-10050 port comes in multiple sizes, I could copy the port, change those user
parameters that I created earlier, and create a new port in a matter of minutes.

Inserting into the current design
And since there were several different port sizes in the casting I was reproducing, this proved to be a big time saver.

I effectively created a "template" for the port that I would use as a standard design feature.

Those benefits alone were enough to get me to bite on this method.

Now, all that was left to do was to open the design that needed the port, and insert the solid.

With a little magic from the move and combine command, I was able to subtract the port tool from the casting I needed, and end up with the right port.

But I'll save that one for a post a little later.

I hope this port helped, and if you have any tips on how you've tackled a similar challenge, feel free to leave a comment!

Inserting and moving the solid

Good luck!

Acknowledgements.

The print I used to create this valve body was provided via my subscription to AirCorps Library.  Thanks for the awesome work preserving vintage aircraft drawings!

Friday, June 30, 2017

A Friday Fusion 360 Tip - Going Off on a Tangent

My first try at the sequence valve housing.
After a few mistakes, I decided to try again. 
Just today I was working on a model in Fusion 360 of a small valve housing for the hydraulic system in an F4U Corsair.  Call it a self imposed design challenge.

This is actually my second try.  I had a first iteration, but I wasn't happy with it so I just decided to start again with a clean slate.

What can I say?  Life happens!  But I learned, and the new model will be better than its predecessor.

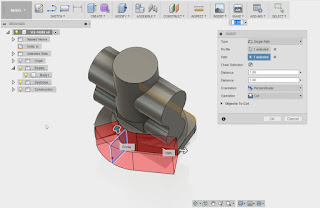
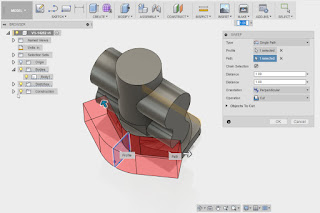
But in the process, I was cleaning some excess material with  the sweep command, and ran into something that left me with a combination of surprise, puzzlement, with a touch of frustration.  

The model path that I chose for my sweep wasn't complete.  The cut I was intending to make came up short.

The sweep coming up short, it should continue around the back
of the part.
I hope this isn't a bug.  I told myself.

I mean, I couldn't have made a mistake, right?  Right....  Of course not.....

Thankfully, I have years of 3D modeling experience behind me.  And when I say "years of 3D modeling experience", I mean "years of recovering from making mistakes building 3D models"!

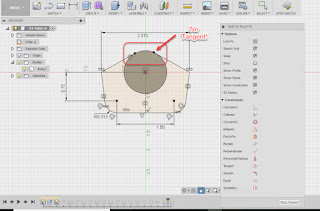
So once my initial feeling of frustration passed, my troubleshooting brain kicked in and my experience told me to check the tangency of the sketch.

The arrow shows where I missed a tangent
Nothing will stop a path dead in it's tracks like a non tangent edge.

So I went ahead and checked the tangency of the path. Sure enough.  I had missed a tangent constraint.

You can see it in the image to the right.  On the left side of the highlighted area, there's a tangent constraint.  On the right, not so much....

So I added that in, and tried it again..  

Guess what!  It worked like a charm!  A small thing, but an important one.

So remember, whether your using Fusion 360, Autodesk Inventor, Solidworks, or another CAD tool, remember that one of the best set of tools you can have is a good set of troubleshooting steps!

Victory! 

And remember.... Watch those tangents!

Sunday, June 25, 2017

Aircraft Maintenance Class - A Milestone Reached... But Why?

The instructional airframes that taught me many lessons.
June 16th 2017 marked a big date for me.  I completed the airframe portion of my aircraft maintenance curriculum.  It's been a long time in coming for sure!

In the 750 hours the FAA required of me, I've covered everything from safety wire, to hydraulic to safety wire, and everything in between.

Now I'm not racing through 18 hour days between work and school, I have time to answer a few questions I seem to be asked.

"Why are you taking aircraft maintenance classes?"

I know I'm supposed to have some sort of awe inspiring, motivational answer.

But the truth of the matter is, I did it because I like airplanes, and when the time came to expand my skill set, I decided to accomplish that by jumping feet first into something I've always liked.

And what resulted was an ongoing journey that has been difficult, exhausting, frustrating, and most of all, rewarding.

I learned many lessons that I've been able to apply to my work as a mechanical designer.

So that's my story.  I'm hoping to find a little time to blog about my ongoing lessons, as well as dive back into Fusion 360 and share a few of those lessons there as well!

Sunday, March 05, 2017

The Amazon Web Service Outage of 2017

Earlier this week, Amazon Web Services suffered a service disruption.  For me personally, that meant disruption in Autodesk Fusion 360 (which I thankfully wasn't using at the time), and Fusion Lifecycle, which I was.  Fortunately, while Fusion Lifecycle was disrupted, it wasn't offline.

So, what happened?!?!

Several sites were affected.  My girlfriend sent me an instant message to let me know their CRM (Contact Resource Management) was down.  According to NPR, Gizmodo and Apple iCloud were affected.

The amazing, and perhaps disconcerting part of this is how easily the service was disrupted.  It seems that a technician was troubleshooting, and took off more servers than intended with a typographical error.

That's right, a typo, fat fingers as us techies call them, were the cause of the disruption.

Added to that, there didn't seem to enough redundancy, or possibly any, to absorb the lost servers while they were brought back online.

Now I'm no expert on Internet architecture. I imagine I know more than some, less than others.  I'm not going to prognosticate on what Amazon could have, and should have done, or should be doing.

There are plenty of people smarter than I who can do that better than I can.

But what I will say, is what I learned, relearned, and what I can do in the future.

What I learned and (relearned)

  • The cloud is a great tool, it's saved my class grades when I didn't print it out by mistake.  But the technology is new, and new technology is often developing systems, and developing systems can be prone to failure.  
  • As a whole, the cloud is pretty robust, but when it fails, it can fail spectacularly.  Many can be affected, and word can get out quick!
What can I do in the future


  • I can't make Autodesk, Amazon, or anyone else change their system, at least not directly.  But I've heard rumors that improved offline capabilities are on their way.  I hope they're true, and that after this outage, the efforts have been increased.  I'll be keeping my eyes out for that development! 
  • To this end, I'll be doing a better job of backing things up locally.  That's right, in a 180 degree turn, I'll be working in the cloud and backing up locally.  Just in case. 
I won't be abandoning the cloud, what I will be doing is approaching it more cautiously, and more diligently.  

In many ways, the cloud is a new frontier filled with pioneers, and pioneers must face the hazards of a new frontier to pave the way for others.  

For my part, I'll choose to stay on that frontier, but I will make sure I'm planning ahead! 

On into the brave new world!

photo credit: NPS Park Cultural Landscapes Program Chilkoot Trail via photopin (license)

Wednesday, February 22, 2017

A Fusion 360 Event with Autodesk and Haas Automation

Today I had a great opportunity to see Fusion 360 at the Autodesk Fusion 360 FastTrack Event in Anaheim, Ca.

The best part?  It was held at the Haas Automation Outlet!  What better way to see the Future of Making Things then to go somewhere the future is being made! 

The Haas Factory Outlet - There's magic inside!

The first thing I saw inside was a little bit of manufacturing heaven!  Cue the theme music from 2001: A Space Odyssey!


That was amazing enough, but next came the opportunity to see a little Fusion 360 in action!  The attendees had an opportunity to see, and try, taking a part in Fusion 360 and build tool paths and G-Code.

Let's do this! 

We also had the opportunity to talk among each other, get ideas, and ask questions.

Even better, we had the chance to talk to CNC machinists, and learn from there experience, which is invaluable.
I'm a far cry from being a machinist, but I have cut a few parts on a mill, and generally can create the shape I'm after if it's not too complicated.  But I learned a lot from listening to them, and will be bending the ear of our own machinists when I'm back in the office.

I remember the days of "Thou shalt not take heavy cuts with your tools!" and "Thou shalt cut radii that are divisible by 1/16th of an inch!"

So shall it be written!  So shall it be done! 


But now, tools like adaptive clearing to remove more material more efficiently.  We were also taught that there's technology exists to keep the tool moving efficiently.  In effect, even though the machine is cutting a curve, the computer can compensate in such a way that the load on the machine is no different than cutting a straight line.

New technology, and a new way of doing things for the future of making things!

I answered a few questions, and came away with a few more.  But most of all, I came away exited with what I'd learned, and excited with what more I could learn going forward!


Here's a few videos I grabbed!  Enjoy!  And get excited about what's out there!


A tool change, and back at the part! 


Finish him!