Find us on Google+ Inventor Tales

Monday, November 13, 2017

Using Your Resources to Design in Fusion 360

I've had a mental idea to build a simple rack to hold bolts of fabric in Fusion 360. 

It would look similar to this mobile pipe rack found on the McMaster Carr Website

But naturally, the store bought version doesn't quite meet my needs.  Murphy's Law wouldn't allow that!  So that leaves me in the position of designing and building one. 

Here's one side of the rack, mostly done,

And seeing how I don't want to work on it evening upon evening, that means I have to take advantage of every step I can to increase the efficiency my design time.

Now I should mention that many of these steps I've shared before, so this will be a link back to these posts.  But I think it's a good example of how these processes can come together and become greater than the sum of their parts. 

Here are the tips!

1) Don't Create a Model if You Don't Have to!

The rack needs to be mobile, so it needs to rest on casters.  Fortunately, Fusion 360 has a link to the McMaster Carr website that lets you insert models from their website into your design.  The part number is included, so you can always order the part from McMaster Car if you like.

Downloading these casters was more accurate and less time
consuming than trying to build my own versions

Here's the link to a previous post if you want to read more!

2) If you have to build it, reuse it! 


Every wooden piece pictured here was built and resized from
one source model.

The frame is going to be made primarily of 2x4s.  And while this isn't a complicated part, why keep drawing rectangles over and over again if you can just Copy and Paste New?  This tool allows you to copy a part, paste a new, independent version, then resize and reposition it where needed.

You can find a link to more details there. 

3) Don't rebuild what you don't have to! Redux!

I couldn't find the joist hangar on the McMaster Carr website.  It might be their, but I couldn't find it.  So instead I tried GrabCAD and found it here.

The joist hanger inserted into the model.


The download wasn't quite as slick as the one on the McMaster Carr website, but it was still a lot quicker than building the model myself. 

In Conclusion!

The design still has a long way to go.  It's not even complete, and I can already see a few changes I'll probably want to make.  But being able to reuse and download parts got me a lot further down the road in a couple of hours than I otherwise would have been.

So I hope these ideas inspire you to try a few things, and get a little further down the road yourself!

Friday, November 10, 2017

A Life Lesson - My Inspiration from a Little Black Cat

Foreword

This post is far off my usual topics.  It's a reflection on a little inspiration coming from the strangest places.

But who doesn't need that once in a while!

*******

This week has been one of those weeks.  You've probably had them, where nothing seems to go right.

In work and play, I've had projects go sideways, problems big and small plague me.  Like zombies from the grave, rookie mistakes I made months, or even years ago came back to bite me.

It was one of those weeks that leaves you asking yourself "Why am I doing this?"  (Looks at bank statement).  "Oh yeah, that's why.'

But even in this week of frustration, a ray of inspiration came to me.  And strangely enough, that inspiration came in a form I would have never expected.

A couple of nights ago I saw two of my cats, who are brothers and littermates, get into a little playful "rough and tumble". It's not uncommon, they like to roughhouse with each other.

The contenders were...

"Runtley" earned his name because he's the runt of the litter, he was born a little guy, and now, fully grown, he's small and slight of build.

This is "Runtley the Runtling"
His brother, "Scar", earned his name because he was missing a chunk of fur under his eye when we adopted him, a product of an unknown kitten misadventure. The wound has since healed, but the name remains. Scar is bigger, bolder, and stronger that his smaller brother.

This is Scar.  He's the bigger and bolder one.
The two cats wrestled on our hardwood floors, rolling about and pawing at each other as they played.

Naturally, I expected the bigger, tougher Scar to come out on top.  He had every reason to.  He has a size advantage, he had a weight advantage, he's even the more confident of the two cats.

Scar as a kitten. Bearing the mark that named him
But to my surprise, the Runt twisted and rolled, wrapped his front legs around his bigger brother, and with a heave from his back legs, rolled Scar and threw him to the floor.

The Runt's "baby picture". You can see how tiny he was.

My mind's voice shouted in it's best UFC tone: THERE'S THE TAKEDOWN

Scar got up and ran off, the fight knocked out of him for now, the round going to the undercat.

The victorious Runtling gave chase, as if to say "How 'bout another round!"

I instantly thought of the Mark Twain quote, "It's not the size of the dog in the fight, it's the size of the fight in the dog."

Perhaps in this case, it was a cat instead of a dog.

But in a few minutes, a runt of a black cat taught me that we all have disadvantages.  We've made mistakes, and we've all suffered setbacks.  Some of us were given a disadvantage from the very start. 

It's easy to give up and make excuses, but if you stick with it, you might just beat the odds.

Sometimes you have to be the scrappy little runt in the room, who isn't the biggest, strongest, or most confident.

Sometimes you just have to be too stubborn to quit.

Scar (left) and the Runtling.  In spite of their wrestling matches, they get along!

Tuesday, November 07, 2017

Lessons from Life's Workbench - Selecting a Solid Rivet

In my last Wednesday, I talked briefly about how rivets are sized.  But what about how to choose a rivet for a given application?

There are requirements for how to select a solid rivet, and while they may vary slightly from application from application, the FAA publication AC43-13-1B is a good guideline for selecting a solid rivet.

The pages referenced are 4-20 and 4-21, and can be downloaded at this link.

So what do those instructions tell us?

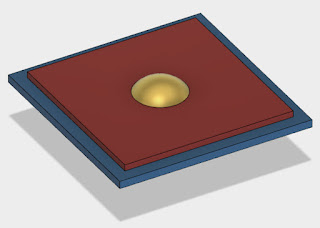
For my example, I'm going say I'm riveting one sheet of .032 thick material to .040 thick material, using a MS20470 "universal", or button head rivet.   
The Sheet Metal Thicknesses shown
in red and cyan.  The rivet is in gold
The first step to choosing a rivet is to select a rivet diameter.  By referencing the document, you can see that it states that we should use a rivet with a diameter 3 times the thickness of the thickest sheet.  

So if the material is .040 thick, then 3 times that thickness is .120, which is close enough to a 1/8th (.125) inch rivet.  

So there we go!  The diameter is selected!  But now, how long of a rivet do we need?

The dimensions of the rivet needed for this application.
AC43.13-1B states that we should use a rivet that extends 1.5 times its diameter beyond the underside of the material.  

Adding .032 and .040 we end up with a total material thickness of 0.072.  Extending 1.5 rivet diameters beyond that we get a total length of .2595 inches,
which is close enough to 1/4 (.250) inches.

So this application calls for using a MS20470-4-4 for this particular application.

Now the rivet can be driven with a rivet gun and bucking bar, and the parts can be fastened! 

A typical rivet gun and bucking bar set.


I hope you find this tip helpful!  

A sample of the approximate dimensions of the set head.
One final note, the documentation I've used is an "Advisory Circular".  If you have engineering documentation, such as a manufacturer drawing or a maintenance manual, do what it says!  The manufacturer's data always wins in this case!

Wednesday, November 01, 2017

Lessons from Life's Workbench - Finding Rivet Diameter and Length from the Part Number

A few counter sunk rivets corralled
on my laptop
One thing I've learned about aircraft fasteners is that their part numbering system is like speaking another language.  But if you can understand the language, it all begins to make sense.   

Although I admit, it might take a little while!  But if you work with it, the patterns begin to emerge.  

For my sample, I'm going to use solid aircraft rivets.  It's the first fastener I learned the part numbering system for, and it gave me a basis to become familiar with other fasteners as I encountered them.  

So let's say we're given the part number MS20426-AD4-5.  You're first reaction might be: That means absolutely nothing!!

But in reality, it does mean something, once you learn to speak the language.  

Here's how to begin to break down the seemingly cryptic system.

I'll start by separating the part into it's key components. Each group of the number means something, although some mean more than others.

MS20 * 426 * AD * 4 * 5

MS20 - This part of the number tells us it's part of the Military (MS) standard

426 - This designates the head style for the rivet.  In this case, 426 tell us this is a countersunk rivet. The other common rivet style is designated by the number 470, for a universal (domed) head

AD - This designates the material of the rivet.  AD is 2117 aluminum.  Other examples of material and designations are: 
          A - 1100 or 3003 Aluminum
          DD - 2024 aluminum

4 -    This designates the diameter of the rivet in 32nds of an inch.  In other words, this example has a diameter of 4/32nds of an inch.  In other words, 1/8th (.125) inches.

5 -     This final number represents the length of the rivet in 16ths.  For our example this rivet is 5/16ths (.3125) inches long

A sample of  universal (MS20470) rivets
on the left, and countersunk (MS20426)
rivets on the right. 

So that's a quick example of a rivet part number.  Granted, not all of the numbers are intuitive.  Why 426 and 470 to designate head styles?  I have no idea.


And while there will be differences from fastener to fastener, the diameter and length can be derived from the part number.

So bear it in mind!  I hope that helps you out when you're thumbing through another catalog! 

Acknowledgments and Additional Resources

Aircraft Spruce - I've gotten a few tools and supplies here.  I've linked to their page on rivets not because you can buy them here, but because their page breaks down the part numbers clearly. 

Aviation Maintenance Technician Handbook - Right off the FAA website.  Check Chapter 4, Page 4-31 for more information on the rivets I touched on here. 

World Fasteners - Another site I like because they have a visual guide of different fasteners and their root part number.  You can see their visual catalog here: