As I've been working with Showcase, I've started to try different things to see what effects they would have on the scene I was working on.
One of these was lighting, and particularly the color of lighting can have on a scene. I don't profess myself to be some sort of lighting expert, but here's some of the things I've learned from other users, and by poking around after saying 'I dunno, let's try it!"
By default, the colors of your lighting is white. For many scenes, that will be sufficient. But just like you can create an effect and impression, changing the light colors can add some nice touches.
One thing I've done is look a photos for inspiration. Here's an example of a picture I took at the Planes of Fame Museum in Chino, near my home in Southern California.
This F-86 Sabre is parked indoors, so it's lit mostly via skylights that let in natural light, but tint it slightly yellow.
But the tail is catching the natural light coming in through the open hangar doors, which is more of a natural white.
You can use the lighting in Autodesk Showcase to simulate similar effects.
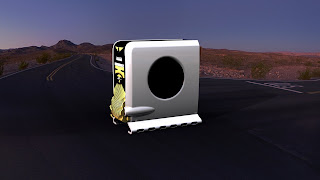
Here's a scene where I've used a personal computer in the 'Desert Dawn' environment (hey, don't we all keep our computers on desert roads?).
But this scene has a lot of red and blue hues in it, so it shows how the lighting can affect the look of a scene.
In this first picture, I've used all white lights. You can see how the computer looks 'bright' compared to the rest of the scene. Almost like it's been lit by an artificial light source. This is fine, it does make the the lit object standout (which may be the desired effect).
(Click to Enlarge)
There are currently two lights, one in front of the computer, and one in the back of the computer. For what I'm doing here, I won't change the lighting position at all, just the color.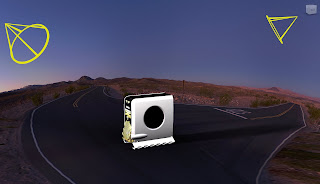
(Click to Enlarge)
But what happens if we start changing the colors of the lighting?
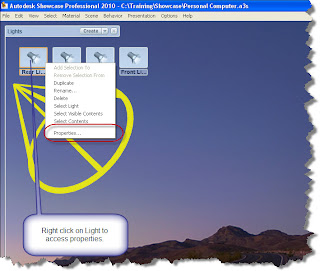
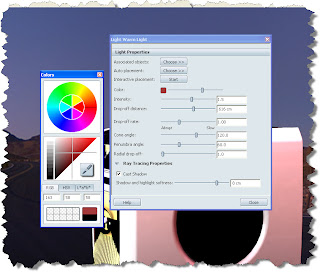
If I choose one of my lights, right click, and choose 'Properties', I can start to change the properties of my lighting. There's a lot of settings, but for now, I'll just focus on color.
(Click to Enlarge)
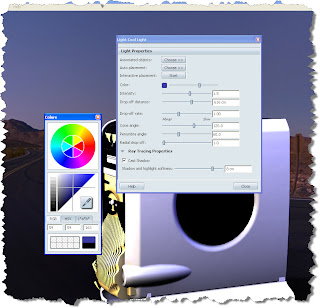
Once you choose properties, you'll see the light properties come up, you can click on the button that affects the color, bringing up the color screen.With the color screen up, you can click on either the wheel, or the scale. Both will let you change the color of the light in their own ways.

(Click to Enlarge)
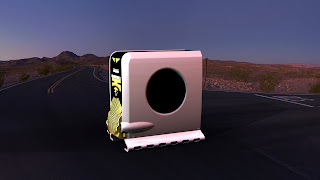
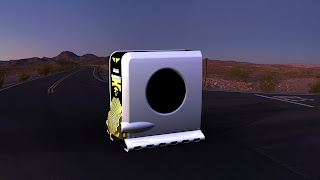
Now, I'm going to change the lighting properties of the light, and give it a red tone. Notice how the image looks different, it's a 'warmer' (at least that's my term for it) light.
(Click to Enlarge)
(Click to Enlarge)
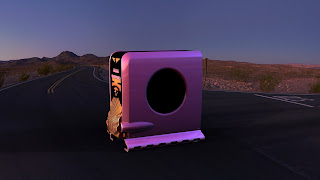
Now giving the back light a blue hue.
(Click to Enlarge)
(Click to Enlarge)
(Click to Enlarge)
The effect is pretty dramatic. Personally, I'd keep one of the white lights in there because the original color of the case (white) has been lost. But in many cases, it's about what your audience finds compelling.
That's it for now. Don't be afraid to experiment a little bit. You can always change the colors back!
On a parting note, here's a couple of more pictures I took of a Grumman Duck. Here you can see how the natural light coming in from the front hits the nose of the plane, highlighting the front of the airplane.
The natural light filtered by the skylights hit the rear of the plane (similar to the F-86 Sabre). You can also see in the different pictures where the lights come from (The windows in one picture, the skylights in the other).
I've found if I keep things like this in mind, it helps give me ideas on what to do with lighting to create better renderings in the future.
Besides, it gives me an excuse to run off to Planes of Fame and take pictures of cool old airplanes!
Natural light from front, you can even see some fill from the flash on the float (Click to Enlarge).

Filtered light from the skylights fills in the background. Notice how it interacts with the natural light hitting the front of the plane. I look at images like this to get ideas on how to place lights in Showcase.

Happy Monday all!


No comments:
Post a Comment