
“Logic is the beginning of wisdom, not the end”
Commander Spock (Leonard Nimoy)
After a brief hiatus, I'm back in the saddle with iLogic again. It's now starting to make sense
First of all, what is iLogic. I'm definitely guilty of sometimes jumping into the nuts and bolts of what I'm doing, without telling everyone what I'm doing.
iLogic is a utility that allows you to create rules via a simplified code. It's based on VB.Net, but doesn't require you to be some sort of code guru to make it work.
The good news. iLogic is a free add-on for subscription members from the Autodesk Subscription website here. You'll need to login. If you're not on subscription. Well, I'm afraid that you'll be on the outside looking in.
I've been looking for something meaningful to me to start creating rules for, and something began to make sense to me.
Since I love simplicity (I think that a simple solution can be a marvelous solution), I started with the 235-U Destaco toggle clamp I downloaded from the Autodesk Content Warehouse.

(Click to Enlarge)
After a little conversion, I figured out that the clamping force is 750 lbs, and the clamp height is 1.69in. I can remember, this, but I decided to use iLogic to create rule that's going to remind me what they are automatically.
First, I get my part downloaded from the site, and opened up in Inventor.
 (Click to Enlarge)
First, a disclaimer. I did change the colors of the components (initially they did come in all gray).
But aside from that, it's stock. So now to get the code started.
Step 1: Click on the Manage tab, and choose the 'Add Rule' button to start the iLogic wizard.
 (Click to Enlarge)
Step 2: iLogic will ask you to name the rule.

(Click to Enlarge)
Step 3: After the rule is named, the rule wizard will open. You can start typing your code now, but if you don't know code, click on the 'Rule Syntax' tab. It'll have sample lines of code that will help guide you. (See step 3)

(Click to Enlarge)
Step 3: Here I've used the Rules Syntax Wizard to put in text that is essentially my 'template' for my code.
 (Click to Enlarge)
Step 4: Now for 'Message', I substitute the following
"Clamping Force = 750 lbs" & Chr(13) & "Height Under Bar = 1.69 in"
The data in the quotes is the text I want to show in my dialog box. The text '& Chr(13) &' is the code for carriage return. This will force the text to appear on two separate lines.
For 'Title' I substitute 'Clamp Stats'. This is just the title of the dialog box.
So my overall line of code looks like this:
MessageBox.Show("Clamping Force = 750 lbs" & Chr(13) & "Height Under Bar = 1.69 in", "Clamp Stats")
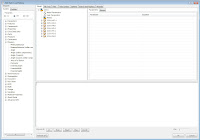
Inside the wizard, the code will look like this:
When I click this button, I get a new dialog screen.
Yet another dialog box shows up, and you can check the box have the Clamp Load Rule trigger every time you open this document.
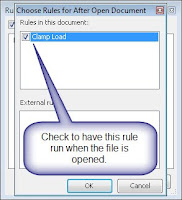
Now your ready. Hit 'OK' to close the dialogs and save the document. Everytime you open this file, the rule will fire, and you'll see the load for this rule.
That's it for iLogic!
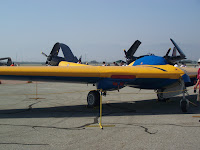
As for me and my adventures? I was down at the Planes of Fame Museum again this weekend (I'm volunteering to be a guide, so I'm still in the training process). But I swung by and saw some of the guys working on the N9MB Flying Wing.
She suffered an engine fire in 2006 on takeoff, and thankfully made a safe landing, but she's been grounded since then while undergoing repairs. The engines have been reverse engineered (since they're no more spares), so it's been a time consuming process.
But, the parts are starting to arrive now, so hopefully within a year, she'll be up in the air again.
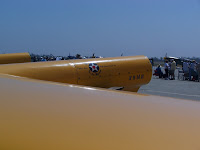
Unfortunatley, I didn't have my camera, and it didn't occur to me to use my cell phone camera, but here's a picture I took at the last airshow in May. In the second shot you can see where the engines are removed.
Let's hope we see her taking off again like she is below! This picture courtesy of the Goleta Air & Space Museum's website

 (Click to Enlarge)
Step 4: Now for 'Message', I substitute the following
"Clamping Force = 750 lbs" & Chr(13) & "Height Under Bar = 1.69 in"
The data in the quotes is the text I want to show in my dialog box. The text '& Chr(13) &' is the code for carriage return. This will force the text to appear on two separate lines.
For 'Title' I substitute 'Clamp Stats'. This is just the title of the dialog box.
So my overall line of code looks like this:
MessageBox.Show("Clamping Force = 750 lbs" & Chr(13) & "Height Under Bar = 1.69 in", "Clamp Stats")
Inside the wizard, the code will look like this:

(Click to Enlarge)
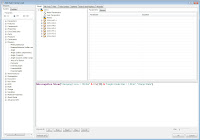
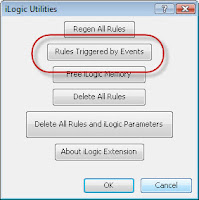
When I do this, I get the list pictured below. Notice I've circled 'Rules Triggered by Events'I can now close this window, and the rule is created. If you haven't made any mistakes, it'll display right away.
 (Click to Enlarge)
So far, this is pretty cool. But I have one more thing I want to do. I want to set this so that every time this file opens, the dialog pops up and advises me of the clamp load. This way, I can quickly see if this clamp meets my desired requirements.
To do this, I click on iLogic utilities, on the Manage tab.
'
 (Click to Enlarge)
 (Click to Enlarge)
So far, this is pretty cool. But I have one more thing I want to do. I want to set this so that every time this file opens, the dialog pops up and advises me of the clamp load. This way, I can quickly see if this clamp meets my desired requirements.
To do this, I click on iLogic utilities, on the Manage tab.
'
 (Click to Enlarge)
(Click to Enlarge)
When I click this button, I get a new dialog screen.

(Click to Enlarge)
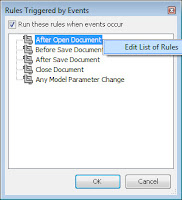
You'll notice that there's one for 'After Open Document'. By right clicking on that, I get 'Edit List of Rules'. Choose 'Edit List of Rule'.Yet another dialog box shows up, and you can check the box have the Clamp Load Rule trigger every time you open this document.

Now your ready. Hit 'OK' to close the dialogs and save the document. Everytime you open this file, the rule will fire, and you'll see the load for this rule.
That's it for iLogic!
As for me and my adventures? I was down at the Planes of Fame Museum again this weekend (I'm volunteering to be a guide, so I'm still in the training process). But I swung by and saw some of the guys working on the N9MB Flying Wing.
She suffered an engine fire in 2006 on takeoff, and thankfully made a safe landing, but she's been grounded since then while undergoing repairs. The engines have been reverse engineered (since they're no more spares), so it's been a time consuming process.
But, the parts are starting to arrive now, so hopefully within a year, she'll be up in the air again.
Unfortunatley, I didn't have my camera, and it didn't occur to me to use my cell phone camera, but here's a picture I took at the last airshow in May. In the second shot you can see where the engines are removed.


Let's hope we see her taking off again like she is below! This picture courtesy of the Goleta Air & Space Museum's website

No comments:
Post a Comment