
“Nothing helps scenery like ham and eggs.”
Mark Twain
As promised. Here's part 2 of creating an environment inside of Autodesk Showcase. What's the biggest lesson I've learned so far? There's a TON still left to learn!
But that doesn't mean I can't share what I've learned so far.
So in the last Showcase blog post, I talked about where to get environments. Now, what to do once we have them.
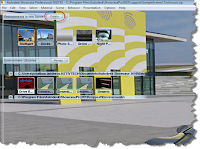
So first, I've downloaded a *.hdr image from the Alias Design website. In this case, I've grabbed the 'Daylit Gypsumcrater' *file. You'll find them in 'Environments' under the 'Downloads section.

First, the Image
(click to enlarge)
(click to enlarge)
Once downloaded, now we switch gears and jump into Showcase. First, we get our scene open.
 Our Car in its Natural Environment
(click to enlarge)
But, today it's about creating a new environment, so now, we have to go to the 'Scene' pulldown, and activate our Environments menu.
 Accessing our Environments
(Click to Enlarge)
Now. click the 'Create' button to load up our environment
 What Type of Environment do we want?
(Click to Enlarge)
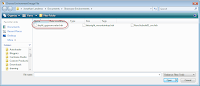
Now, we bring in our *.hdr file. Shown in the screen capture below.
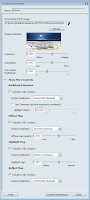
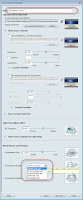
Now we can finally adjust our Environment. There's a lot going on here, and yes, I'm definitely still learning a lot here myself. I can say that I've adjusted exposure most often, since this adjust how bright an environment will appear.
If your not sure, just take the defaults go from there. You can always go back and adjust!
The Help button is definitely your friend for reference. I'll definitely post more tricks as I learn.
Once you've made your adjustments, hit create, and Showcase will crank for a bit as it creates the environment.
So these are the steps to create the environment. You'll even notice the new button (named 'Generic' by default) attached to the environments tree.
Of course, there's a good chance you may want to go back and make adjustments. In this case, right click on the newly created environment and choose properties.
 Now, we can 'tweak' our enviroment
(Click to Enlarge)
There's a lot going in here as well, so for this part, I've shown two common areas that I change. First, is the name. The second, is the shape of the dome. The dome shape can affect the look of the environment. I definitely suggest trying different dome shapes to get the best one. This will vary based on how the *.hdr file is used.
 (Click to Enlarge)
One last note. Right click on the new environment, and you can save it to your library. This makes it available for future scenes, and saves you the trouble of having to repeat these steps unnecessarily!
 Time to Save This For Later!
(Click to Enlarge)
Whew! There's a lot going on, and I didn't go into all the details. But it's definitely a start. And as I start learning more, I'll start posting the tricks!
As for what's next? I'll be at the Pacific Design and Manufacturing Show in Anaheim next week helping out at the Autodesk booth. So if you're at the show, come by booth 3609 and say hi!
 Our Car in its Natural Environment
(click to enlarge)
But, today it's about creating a new environment, so now, we have to go to the 'Scene' pulldown, and activate our Environments menu.
 Accessing our Environments
(Click to Enlarge)
Now. click the 'Create' button to load up our environment

Finally, the Fun Part!
(Click to Enlarge)
(Click to Enlarge)
Showcase will ask you if this is a Backplate Environment(a flat environment) or a Geometric Environment (a 3D Environment). In this case, I'm using a Geometric Environment.
 What Type of Environment do we want?
(Click to Enlarge)
Now, we bring in our *.hdr file. Shown in the screen capture below.

(Click to Enlarge)
Now we can finally adjust our Environment. There's a lot going on here, and yes, I'm definitely still learning a lot here myself. I can say that I've adjusted exposure most often, since this adjust how bright an environment will appear.
If your not sure, just take the defaults go from there. You can always go back and adjust!
The Help button is definitely your friend for reference. I'll definitely post more tricks as I learn.

The Create Environment Adjustment screen
(Click to Enlarge)
(Click to Enlarge)
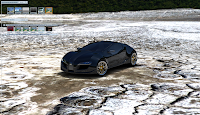
Once you've made your adjustments, hit create, and Showcase will crank for a bit as it creates the environment.

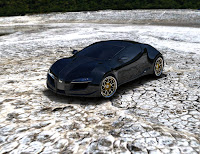
The Car in a Whole New World
(click to enlarge)
(click to enlarge)
So these are the steps to create the environment. You'll even notice the new button (named 'Generic' by default) attached to the environments tree.
Of course, there's a good chance you may want to go back and make adjustments. In this case, right click on the newly created environment and choose properties.
 Now, we can 'tweak' our enviroment
(Click to Enlarge)
There's a lot going in here as well, so for this part, I've shown two common areas that I change. First, is the name. The second, is the shape of the dome. The dome shape can affect the look of the environment. I definitely suggest trying different dome shapes to get the best one. This will vary based on how the *.hdr file is used.

Even MORE Adjustments You Can Make!
(Click to Enlarge)
(Click to Enlarge)
Finally, the result!
 (Click to Enlarge)
One last note. Right click on the new environment, and you can save it to your library. This makes it available for future scenes, and saves you the trouble of having to repeat these steps unnecessarily!
 Time to Save This For Later!
(Click to Enlarge)
Whew! There's a lot going on, and I didn't go into all the details. But it's definitely a start. And as I start learning more, I'll start posting the tricks!
As for what's next? I'll be at the Pacific Design and Manufacturing Show in Anaheim next week helping out at the Autodesk booth. So if you're at the show, come by booth 3609 and say hi!
No comments:
Post a Comment