Find us on Google+ Inventor Tales: New Inventor Technology
Showing posts with label New Inventor Technology. Show all posts

Monday, May 06, 2013

That Time of the Year - Migrating Templates to Autodesk Inventor 2014 Using Task Scheduler

“Are you suggesting that coconuts migrate?"
Monty Python

In a previous post, I talked about migrating Styles from a previous release of Autodesk Inventor into Autodesk Inventor 2014.

The simplest way, of course, is just to open each file in Inventor and save it.  This will migrate the files.

And it does have it's advantages.  Opening the file would allow for an "inspection".  Old styles could be inspected and purged, new styles can be added, and general clean up could be performed.

But another way to quickly migrate files would be to use Inventor's Task Scheduler.  This tool allows for the templates (and any other file for that matter), to be migrated in batch, hands off.

Note!  Before migrating any templates, make sure you've backed everything up!  I've never had a problems with migration, but you only have to be wrong once! 

 To access Task Scheduler, go to Windows Start>All Programs>Autodesk Inventor 2014>Tools.  Task Scheduler will be in there.

Finding Task Scheduler
Selecting the icon will open Task Scheduler for use.  Choosing Create Task>Migrate Files will bring up the dialog box to set up migration tasks. 


With the Migrate Files dialog open, now the settings for migration can be configured.

There are several settings that can be changed for this dialog.  Some of the major ones, and my preferences for this task

Project: The project under which the files will be migrated
Vault: Migrates the files out of Vault - Since my templates are not in Vault, I won't be using this setting
Folder icons: Are the files going to be added individually, are folders going to be added, or is an entire project going to be migrated?  I'm going to use folders

Under Task properties, it's also possible to give the task a name (I just use default), and schedule the task for a given time.  Since my templates aren't particularly large, I'm going to run them immediately.

The Migrate Files dialog.

In the dialog below, I've added the folder to migrate, and completed my settings.  I also like to click on options, and have the Task Scheduler Skip Files with Unresolved References, Purge Old Versions, and Compact Model History.  

If these were parts with features, I'd also compact the model history, but these are mostly empty templates.

Setting up options

Once the settings are ready, I can close the Migration Options, click OK, and start the migration.

Committing the migration

The migration will begin running.  For templates, this typically takes a few minutes, but it does depend on how many files are being migrated, so that has to be taken into consideration before starting.

Once the notification is completed, right clicking on the task will allow for a report to be generated that will show which files were successful, and which files failed and why. 

Finished!
But those are the steps to migrate files.  Here I've used them in templates, but they're not limited to just template files.  This is valid for any Inventor files, so remember that it's available for use!

If you prefer the video form, just take a look below!


Tuesday, April 23, 2013

Migrating Styles to Autodesk Inventor 2014 from a Previous Release

“The flow of migration is not this inexorable, constant increase.”
Roberto Suro

It's that time of year again.  Autodesk Inventor 2014 is hitting the streets, and I'm kicking the tires on the new release. 

One of the first steps I like to do, is migrate my custom styles (dimension styles, Sheet Metal Rules, Thread Data, etc) and templates to the current release

In this post, I'm only going to focus on migrating my styles.

Getting started with the styles.

The Wikihelp for Autodesk 2014 contains the steps for migration, but states that I can:

"Continue to use the migrated library. It will function exactly as it did in the previous release. However, you will not be able to take advantage of the corrections and additional styles that Autodesk has added in the latest release."

Translation?  If I just migrate all my 2013 styles libraries to 2014, I may be missing some good stuff. In light of that, I decided to merge my custom libraries with the standard 2014 styles, which is a departure from the method I used in my post a couple of years ago.

So here's how I went about it this year.

First I made a decision where I'm going to keep my 2014 design data.  Since I'm on a laptop, I keep them in a "Utility Folder", based on version.  

True, the default locations could be used, but I like having my styles in a location I choose.

The Utility Folders I like, based on Inventor Version

Now, I direct my installation of Inventor 2014 to look at that folder.  This can be done in one of two places, in Application Options with the File Tab.


Or in the Folder Options section of the project.  Note, that if the paths specified in Folder Options is different than that in Applications Options, the Folder Options path will be used.


The location as used in the project
I'm going to copy my default styles libraries from Inventor 2014s default location (which is the one depicted in Application Options), to the "Utility Folder" I created.

Copying the standard styles from the default location to my custom location.


With that out of the way, I  copy the Styles from my previous release, Inventor 2013, into a new "Transition" directory.  The reason for this is twofold.

1) I'm not playing with my live 2013 styles
2) I can still use that old data to work with the previous version of Inventor, which I often need to do.

Copy and Paste my previous versions styles to the transition folder

With my "setup" completed, I'm going to go ahead and open the Styles Library Manager, Located in Windows Start>Programs>Autodesk>Inventor 2014>Tools

Locating the Styles Library Manager
 Once the Styles Library Manager is open, I'll browse to my "Transition Folder" from the left pane, and my new location in the right pane.  The custom styles, which are currently missing from the 2014 library, are shown in blue.  These are my custom libraries

A sample of my Dimension Styles.  Two of my custom styles are in blue

Clicking on the "Migrate" button, the libraries will be migrated for use with 2014.

Migrations done!

After migration, the arrows to copy the style to the new location for Inventor 2014 light up, and by clicking the button, the styles are transferred over.


Click to transfer over
It's just a matter for repeating this for any other styles that need to be done, and soon, you'll be off and running!

An example of the transferred libraries
And for more information, naturally, I've included a video below!

Thursday, March 28, 2013

Keeping up with the Power Curve - 2014 System Requirements for Autodesk Design Suites

I have the power!
He-Man

It looks like Autodesk's 2014 based products are on the horizon.

And while I haven't seen any dates indicating when that's going to be, I've noticed that the system requirements are up on Autodesk's website.

I've noticed that it looks like Windows 8 is getting support, which is good news for many, I'm sure! 

The Product Design Suite Page


So if you're thinking of going to the 2014 based products, and you're interested in seeing if your hardware is up to snuff, check out the link HERE and see if how your hardware stacks up!

Tuesday, March 26, 2013

Looking Forward - The Autodesk 2014 Suites Announcement

“I don't think there's any bigger goal than that one right there, up to this point. It was another highlight reel by our best player. And it just kind of shows the kind of character he has to just take charge like that.”
Steve Rucchin

Earlier today, Autodesk announced the 2014 Suites to the world.  Just in this fairly brief preview, there looks to be a lot of cool things coming down the ways.  It's something I'm looking forward to diving further into as the details come out!

New tools like Recap for laser scanning have my curiosity captured, along with the improved Inventor to Revit interoperability. 

But there is something for all the designers out there.  If you're using Building Design Suites, Factory Design Suites, or Entertainment Design Suites, there's a little something for everyone. 


Before I get to the video, I do have to do a little bit of shameless plugging.  Look for the Sunkist and California Analytical (CAI) in the opening "credits".  They're KETIV customers!  And so are Plastics Research Corporation, and Enviroguard

It's an honor to be a a member of the team involved with helping these companies.  Best of luck to them going forward!

Now to the video! 


Thursday, February 21, 2013

From 2D Picture to 3D Model. Ready, Set, 123D Catch!

“It's funny what a picture can do.”
Ira Hayes 

Technology marches on at an alarming rate sometimes, as a matter of fact, probably faster and faster every day.

I remember when looking up directions meant using a paper map.  I recall when "dropping a dime" actually meant dropping a dime into a coin slot on a pay phone, and when sending mail required the use of pen and paper. 

Now, just today, I simultaneously setup software on computers in Dallas and Pennsylvania without leaving my chair in Southern California.  After completing that, I used my phone to get directions (with live traffic updates), and drove home while simultaneously chatting with a friend in Arizona.

Times have changed.... And I do find myself wondering what technology the kids of today will see unfold in their lifetime.

Tonight I stumbled onto a video of what a student is doing with the Autodesk Technology 123D Catch.   

All I can said is: "Wow". 

If you don't know what 123D Catch is, it's a technology that lets someone take multiple pictures of an object, and stitch it into a 3D model that can be used for creating concepts, presentations, and event 3D printed models. 

But I'll leave it to the video to describe.   The student creating the models, Ehsan Noursalehi, shows how much an imagination person can do with new technology. I especially like how he uses Mudbox and 3dsMax to make the most of the scanned object!

It surely inspires me!  I hope it inspires all of us! 

Wednesday, December 26, 2012

A Holiday with Autodesk Force Effect Motion

"Never mistake motion for action.”
Ernest Hemingway

As the holidays approached, I found myself finally taking a look at something I had told myself to look at, and "never got around to it". 

It was Autodesk's Force Effect Motion.

If you're not familiar with Force Effect Motion, it's a mobile app that works on Apple and Android devices, and allows for the laying out of mechanical mechanisms on a mobile device, instead of using paper and pencil, or even firing up a CAD package like Autodesk Inventor or AutoCAD.

A Force Effect Motion diagram - Courtesy of the Autodesk Force Effect Facebook Page.
 
So to satisfy my geeky curiosity, I imported two images to try out as backgrounds.  The first was a picture of the landing gear for a Douglas DC-3, the second, the extended and retracted positions for a Boeing B-17 Flying Fortress

I had a lot of fun playing with these two mechanisms.  It allowed me to sit on my couch, and analyze the landing gear mechanisms and better understand how they worked!

I can see how using this application can help get a mechanism conceptualized before firing up a CAD application and creating models that may have to be thrown away because part way through the process, it's realized that I've gone down the wrong design road. 

It's like creating a napkin sketch, but with the added benefits of being able to modify the diagram, and avoid getting food on your engineering designs! 

In conclusion, I have to say I wish I had tried this app out sooner, but now that I have, I'm glad I did.  The next time I'm at Planes of Fame, I'll definitely be getting  a few more pictures of landing gear mechanisms to try out! 


So here are a few videos.  First, a video from the AutodeskMFG YouTube channel, showing how to use Force Effect Motion.
\

And next, the videos I created, showing the DC-3 and B-17 landing gear mechanisms.  \


Monday, September 10, 2012

A KETIV AMA Preview Video - Automating Repetitive Design Tasks

“All the people were nice. They all acted like family and friends.”
James Bush

During this weekend, there was no time to create a video for the blog I was hoping to create. 

It was lost for one of the best reasons a weekend could be lost.  I had friends come from out of town for a visit! 

So this weekend was a blog free weekend (and even a mostly computer free weekend) that was consumed by catching up with life long friends, so part three of my iFeatures blog post will be delayed a bit.

But all is not lost.  Here's a preview of the video series that will accompany the Automate Repetitive Design Tasks session at  Autodesk Manufacturing Academy  on October 10th in Lake Oswego in Oregon, and October 25th in Cerritos, California.  

I hope to see you there!  


And here's the preview for the whole event!  Check it out!


Friday, August 24, 2012

Autodesk University 2012 - It's Coming and the Class Schedule is Out!

“I'm not the smartest fellow in the world, but I can sure pick smart colleagues.”
Franklin D. Roosevelt

Autodesk University 2012.  It's coming around again starting November 25th (click here for full Schedule) in Las Vegas, Nevada!

AU Image Courtesy of the Autodesk University Website.

For those who aren't aware of Autodesk University (commonly known as AU), it's a series of classes, seminars, and network sessions on all manner of Autodesk Technology.  I've gone in the past, and I think it's well worth attending.

But as they say, "don't take it from me".  Take a look at the class schedule HERE!  Take a look at the classes that are available this year.

And on a final note, become an AU Member and become eligible for early registration!

Friday, August 17, 2012

Update Time! Autodesk Inventor 2013 Update 2 Arrives

I tried to draw people more realistically, but the figure I neglected to update was myself.
Joe Sacco

While searching Google for information on a troublesome Material Library, I ran across something I hadn't noticed before.

Autodesk Inventor 2013 Update 2 is out, and can be downloaded HERE.

The readme describes what's been addressed by the hotfix, so if you're seeing any of these issues, Update 2 is likely a good one to install.

It's also important to note that Update 2 contains the updates from Update 1, so if you haven't installed Update 1, you don't have to go hunting in it down.

When the zip file containing the update is uploaded, there are two files named
  • DL20082900_32-bit.msp   ==> Update for 32 bit systems
  • DL20082900_64-bit.msp   ==> Update for 64 bit systems
In the zip containing Update 2 also contains a hotfix for Autodesk Vault; DL19384851, which fixes an issue with crashing when checking in files. 

Today might  be a good day for a little "Update Maintenance"!  It prevents the more violent "Percussive Maintenance!"

We've all wanted to do it!

Have a great weekend everyone!

Sunday, June 03, 2012

Simplfy... Simplify Me - Inventor Simplfication from Autodesk Labs


In my post last week, I talked about how you could remove features and voids using some of the new tools in Autodesk Inventor 2013


Now, while cruising about the internet, I find Inventor Simplification. Brought to us by the team at Autodesk Labs


Admittedly, this tool did come out back in April, but I only got to install and start driving it late last week.  


So what about it is so wonderful that it warrants a blog post? 

I was impressed by the workflow.  There are only four tools, all located on a "Simplfy" tab that's added to Inventor's ribbon.


y
Just for buttons!  That's it.


  Another plus, is the flow is pretty natural, at least in my humble opinion.  The basic steps are:

  • Select the components to be added to the simplification by picking, or using a filter for external parts

    • Inventor Simplify creates a View representation containing the parts selected

  • Export the parts to an Inventor part file that now contains the simplified geometry.  If desired, the exported geometry can be edited further by patching holes.  This removes additional detail, or even voids.

Optionally,  components can be reduced into "envelopes".  In other words, show the volume the components occupy, without showing the actual component.  Handy for removing that intellectual property you don't want to show!


Additionally, if components need to be removed from the simplification, the View Representation can be edited. This makes it a lot easier to make adjustments.


An example of a simplified component

As always, I've got a video where you can take a look at the process.  If, after seeing the video, you can't wait to get your hands on it, you can download it at the link here


Have thoughts or cool uses for Inventor Simplfication?  Throw out a comment.


On a more personal note.  I've tried removing the "bookend" slides from the video.  I'm looking for a little feed back on if the users out there would like them better "out" or "in".  Let me know! 

Monday, May 28, 2012

Removing Features and Voids Using Autodesk Inventor 2013's Derived Component Tool

About that time, stronger features became fashionable on the screen.
Marie Windsor

Many of us have been there before.  We need to send our 3D CAD assembly to a 3rd party, like a vendor, for example.  But we don't want to directly export the full 3D model.

Why?  The 3D model contains all the information required to build the components within the assembly.  The "feature rich" assembly may be overkill because the extra information, such as internal cavities, may create a model that is "overly heavy and complicated" for the end user.

Even worse, giving them that feature rich model may give away proprietary information that may allow an unscrupulus end user to take advantage of our hard work.

Would you always want to send out a model with all this detail to a 3rd party>?


In older versions of Autodesk Inventor, you could derive the assembly into a part model, and use standard Inventor part modeling tools to remove the excess features.  You could even use Autodesk Inventor Fusion if you wanted.

But this process took time, and while it might be worth it to protect intellectual property, who doesn't want a faster way.

As of Autodesk Inventor 2013, there is a way.

To take advantage of this new tool, the model is still derived into a part file using the Derived Component too, just like before.

We still go into Derived Component


We can still go into the Options tab, and change how the assembly is derived and remove parts and features that we don't need.

But now check out the "Options" tab for the new options.

But a new option in this window is to remove internal voids that allow the part to be quickly simplified.  With the addition of this tool, manually filling holes, voids, and generally "dumbing down" an assembly can be reduced, or even eliminated.

Remove voids!  The new tool! 

So on that note, here's a video that shows both the steps, and the result of a quick simplification of a component.


Have a suggestion on how you approach this challenge?  Drop a comment below! 

Thursday, May 24, 2012

Where's my "Show All Constraints" Tool?!? - Autodesk Inventor 2013

“If we are facing in the right direction, all we have to do is keep on walking.”
Buddhist Proverb

Show All Constraints.  It's been in Autodesk Inventor since I started way back in the days of Release 4.  It was available from the right click menu, or by hitting the F8 key. 

The right click menu from Inventor 2012.  The "Show All Constraints" option is there like it's always been!

Just today I fired up Inventor 2013, and started up Inventor 2013, created a sketch, and right clicked to show all my constraints.


Guess what?  It wasn't there!  The hotkey (F8) still works, but it wasn't on the right click menu any more.


I puzzled for a second, then I face-palmed.

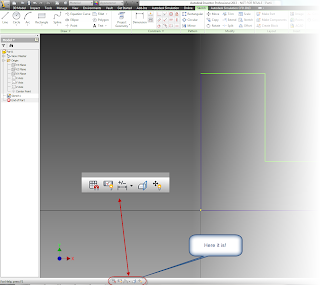
I remembered reading in the What's New for Autodesk Inventor 2013 that it was moved to the new Status Bar at the bottom of the screen!

I found it!

Along with the Show Constraints tool: some other familiar tools have been moved there (listed in order, from left to right):

  • Snap to Grid
  • Show/Hide All Constraints
  • Dimension Display
  • Slice Graphics
  • Show/Hide All Degrees of Freedom
And if you want more info on these tools, check out the Wikihelp here for the full rundown

But I like the old way better!

Now, I know that there are those out there who are asking; "Why can't we make it like it was in 2012 and earlier?"

If you are on that team, you're in luck!

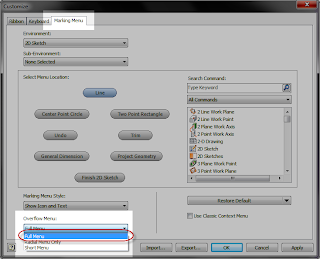
Go to the "Tools' ribbon, and choose the "Customize" icon.

Choose Customize
On the dialog that appears, choose the "Marking Menu" tab.  Then in the lower left hand side, pull the fly-out open and set the Overflow Menu to "Full Menu".

Tada!
Click "OK" and the settings will be back to the older style settings!

Back to "old school"
So there it is, a few of the Inventor 2013 changes, and some ways to go back to your last release settings.

I hope the tip helped!

Thursday, March 29, 2012

Autodesk Vault 2013 - Upgrading Made More Flexible

"Whereof what's past is prologue; what to come, In yours and my discharge."   
Shakespeare, William

I've always been excited to upgrade my Autodesk software.  I still like to geek out about all the new tools I get to learn.  It's like Christmas in spring!

Usually, it means taking an afternoon or evening (sometimes both!) installing Product Design Suite, and updating Autodesk Vault.

Then the fun with new tools began!

But there is always one thing that must be addressed when upgrading to your shiny new release.

It takes time and planning to upgrade.  Vault has to be upgraded on both clients and server, along with the new versions of the CAD products it's going to integrate with


Extend that to a facility where there are several users connecting to Vault.   You had to install new clients, upgrade Vault, and get everyone working together in one long marathon session

To make it more interesting, there might also be a grumpy CAD Manager looking over your shoulder, snorting like an agitated thoroughbred.

But now with the release of Autodesk Vault 2013, a new capability has been added that should greatly increase the flexibility of migrating to your shiny new version of Vault.

Forward compatibility.

Great! What does "forward compatibility" actually mean?  

What it means is you can upgrade the Vault Server to 2013 in the background, without ever touching the clients.

They can access a server running Vault 2013 using the same Vault Explorer and CAD plugins they used for Vault 2012!

Mixing and matching like you've never done before

 So what?  Why is this a big deal?

Just think about the ability to upgrade the server without having to immediately upgrade all your clients.  You can stagger your rollout, and upgrade machines clients in stages instead of hitting your CAD department like a whirling dervish!

So as you plan on deploying your new Vault versions, take a look at your new choices for deployment.  You have more options to make for a smoother transition.

And avoid a haircut such as mine (see profile picture)!

 Curious about what else is new in Autodesk Vault 2013?  Check out the What's New!

Tuesday, March 27, 2012

Autodesk Inventor 2013 Arrives, and I'm Excited!

“Based on the feedback we're receiving, people are very excited to try something so exotic and new.”
Eitan Segal

Autodesk announced their 2013 based products today!  It's certainly like Christmas in March!

For me, I installed Autodesk Inventor 2013 immediately and read through the "What's New"!  Why?  To find out what's new of course!

Have I done an in depth study of everything yet.  Pfffft!  Of course not!   But I'm not going to let that stop me! 

What I am going to do, is list the top ten features that caught my eye.  Things I can't wait to explore some more.

I will, however, put in a disclaimer.  This top ten is based my first impressions, so I may change it as work with the features more.  Also, the order of the features isn't necessarily in order.  In other words, it's just a list!

But with that! Here goes!

Number 1: New file screen


Autodesk changed the appearance of the "New File" screen and I like it!  I think it's more sensibly organized, and will help me find the right template a lot more quickly than I used to!

It's really much clearer now!
Number 2: New Sketch Options

Previous versions let set which sketch to start on, but Inventor 2013 allows you to start a sketch, and choose the plane to work off of at this time.  It's a flexibility I think I'll really get to like!


Oh.. I like this.

Number 3: Set Sketch Scale by First Dimension

When the first dimension is placed on a sketch, the entire sketch scales in proportion to the first dimension.  This should help prevent me from having those "which way did it go?" moments when I make a large change in a sketch dimension.

Very smooth!


Number 4:  Center Point Rectangle

Sure I could do this with a little construction geometry.  I didn't even take long, but this is a nice little feature that just makes things run a little smoother.


Huzzah!
  

Number 5: Equation Curves

Need to make a parabolic curve to create a reflector!  Now the equation to define a curve can be entered. I can think of a few places where this one will help out!

The Algebra is Strong in this One!
Number 6: Remove Internal Voids in a Derived Component

Need to hide internal components so you don't "give away the farm" when sending components out!  I think I'll be checking this one out!

Hmm.  This will make securing intellectual property a little easier!

Number 7: Export Colors to STL

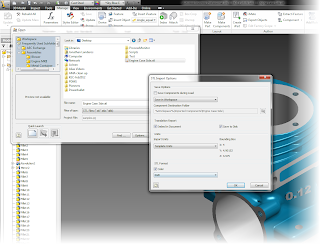
Now you can export your part colors to an STL file!  Need to send out components to a rapid prototyping house and print the component colors!  Here it is!


I see your true colors shining through!
Number 8: Import STL files

Someone sends you an STL file?  Fear not!  Inventor will import them now!

Got em coming and going!
Number 9: Purge via Task Scheduler

It's important for any CAD Manager to purge out dated and unused Styles and Materials from your files.  Now you can "Nuke the Site from Orbit" with Task Scheduler.  Instead of getting those pesky styles one at a time, you can grab a fist full of files and purge en mass!

Purging in one fell swoop!


Number 10: Default Application Options

If you've ever taken an Inventor class with me, you know that there are "settings Jon changes on any new Inventor installation".  Apparently Autodesk agrees with me on this one (at least that's what I'm going to tell myself).  But many students did agree with this, so Autodesk really has listened to all of us.

Now "Grid Lines" are automatically turned off, and "Edit Dimension When Placed" is on!  It's nice that I won't have to go and turn these off on my own now!

Nice Change in Defaults!

So these are the things that "caught my eye" out of the gate.  Does that mean this is the best?  No, just what I found on first blush.  I'll surely find more as I get behind the wheel and start driving.

Look for those posts to start coming up soon.  And yes, they'll be videos! 

Do you have your own favorites for what's new?  Post in the comments.  Here's the full list for What's New in Autodesk Inventor 2013!

Wednesday, February 29, 2012

A Guest Video - Sketchbook Designer, to Alias Design, to Project Falcon

“In a market that has been void of quality offerings with quality names attached this will be welcome.”
 David Menlow

Today's post is a guest video created by KETIV Technologies own Mike Prom

Mike is quite a guru in Autodesk Sketchbook Designer, Autodesk Alias Design, and the Autodesk Project Falcon add-in for Alias.

Here he shows how t concept for a truck cab can start in Sketchbook Designer, expand in Alias, and finally, be analyzed in CFD (Computational Fluid Dynamics) to explore it's aerodynamic capabilities.

It's a great way to see how an idea can be conceived, and analyzed! 


Since Mr. Prom is the one bringing the knowledge, I'll step aside and like Mike take the virtual podium!

Thanks, Mike!


Wednesday, February 15, 2012

Pacific Design & Manufacturing Show 2012 & Something New!

Mobile blog #2:  Let's see how it goes!  :-)

Today was my day at the Pacific Design & Manufacturing Show in Anaheim.

It was a busy show, with lots going on with CAD software (like at the Autodesk booth) as well as with the 3D Prototyping booths around us.

My laptop ready to go.  Yep, I managed to sneak a warbird picture in there!


There was no shortage of 3D rapid prototyping available!   I love this stuff!

There was a lot of activity today.  I spent a lot if time talking about Autodesk Showcase, Autodesk 3ds Max, and of course Autodesk Inventor.  The whole time the Autodesk team was running presentations.

There was a lot of interest.  Most of all, it seemed like the black cloud of the Great Recession that had been hanging over us the last few years was but a memory.

Good news indeed! 

The team getting ready


And Mr. Mike Aubry goes on stage!
And in the middle of it all.... My Droid X chirps as an e-mail arrives in my inbox.

I open it up, quietly hoping its not disposed foreign royalty offering me untold millions to help them get their fortune out of "SouthNorthern Whatsitsplace". It's not. It's an announcement...

"Autodesk Design Review for the Android is now available". 

There's some other words in there. But it's those few that grab my attention.

With cat like reflexes I go to the Android market and begin downloading. After a few minutes of waiting, there's a glow & the sound of angels singing as the app installs.

There it is! In all its dwf-y glory!  Now you can view 2D and 3D files, as well as markup dwfs on the comfort of your Android based mobile device!

Oh.. .this is cool! 

Yep, pretty cool!

So if you've got an Android and you've been waiting for your own version of Design Review, wait no longer! 

Head over to the Android Market and get your copy!  It's free! 

A good show and a new app!  It's been a great day! 

Turn out the lights
The party's over!