Find us on Google+ Inventor Tales

Friday, August 31, 2018

A Fusion 360 Doodle - A Hydraulic Reservoir

With my time consumed by more than one project, I don't get the time to blog as often as I like.

But I wanted to share a 3D "doodle" I mad  in Fusion 360.

It's a rudimentary hydraulic reservoir, based on the type that has been used for many aircraft for quite some time.  I modeled it because I find a certain inspiration in a simple solution to  a problem. 

The challenge for this hydraulic system?  How is a supply of hydraulic fluid kept for the emergency system, should the primary system fail, and bleed out completely? 

The solution? There are two intakes in the reservoir.  The inlet for the primary system uses a standpipe, which sits higher in the reservoir than the inlet for the emergency system. 

Showing the different inlets in the hydraulic reservoir
The result is should the primary hydraulic system completely fail, it can only empty the reservoir to the level of the standpipe. 

That leaves enough fluid for the emergency system, allowing the pilot to do things like lower the landing gear and flaps for example. 

The primary system has failed.  But the Emergency system
can still get you home. 

 It's a clever way to solve a problem! 

Naturally, there is much more to an aircraft hydraulic system than just this reservoir.  There are pressurized reservoirs, hydraulic fuses which close if hydraulic fluid starts flowing above a certain rate, and redundant hydraulic systems found in airliners. 

If you're inclined, you can read up on aircraft hydraulic systems with the FAA handbooks found at this link.  The PDFs are free, so there's no reason not to take a look!


Monday, July 30, 2018

Fusion 360 - Keyboard Shortcuts are here at Last!

Last week, Autodesk released a new update for Fusion 360, and while there's a few updates, the one that's getting the most attention is the addition of keyboard shortcuts.

Creating a shortcut

Now, if you'd like to setup your own custom shortcuts, you have the freedom to do it.  Just start a command from the pulldown menu, and click the "3 dots" on the far right of the toolbar.

Click the dots1

Now the Change Keyboard Shortcut dialog appears, and you can type in the shortcut to almost anything.  In this case, I chose to use "Shift+R" for a 3 point rectangle. Then hit OK, and you're ready to go

Changing the shortcut
You may have seen that I typed "almost anything" in the above paragraph.  There are some reserved shortcuts that can't be changed.  Among them are the standard Windows shortcuts, such as CTRL-S for save.  There are also shortcuts reserved by Fusion 360.

Man!  I'd love to make "S" a shortcut for "Create Sketch"!
And if you don't like any of the shortcuts you've created.  You can always restore to default! 

And finally, this wasn't the only enhancement to be introduced in this release, for the rest of them, follow this link here!


Wednesday, July 11, 2018

Dropping by the Pasadena 3D Printing Meetup

Some very cool 3D Printed Dice
It's said that we should learn from others mistakes, because we won't live long enough to make them all ourselves. 

It was in this spirit that I attended the Pasadena 3D Printing Meetup in Southern California.  Having picked up running a 3D printing machine recently, I've been trying to do what I can to learn as much as I possibly can.

And the group delivered.  There were several knowledgeable people who were happy, even excited to share their knowledge.  I got some great ideas on different materials to try. 

I was even able to share a little of my knowledge with new users.

This was followed by a presentation by Tracy and Tom Hazzard, who talked about the trials and tribulations of running a 3D printing business.  And they have experience, they run 3D Start Point.

Tom talked about building his own support structures, instead of letting the machine build them.  His goal was to reduce cleanup as much as possible.

There's some food for thought!

Probably the single best take away?  Tom and Tracy run a 3D printing podcast!  I've already looked at the first few episodes, and I'll be adding this to my regular podcast rotation!

It was well worth spending an evening with the group.  It's one I'd encourage you to attend, if you're in Southern California. 

And if you're not in Southern California, see if you can find a group in your area.  Meetup.com can be a great resource for that.

Here's a few more pictures from the group.  Enjoy!

And let's get out there and make some stuff!

A sample of PETG or PLA.  I can't remember which now.  I like the.
surface finish, and a lot of people recommend PETC

Another PLA/PETG sample.  I told myself I'd remember which was which.
I was wrong. 

A 3D printed tie.  It's printed in one piece and is wearable.
Tom Hazzard wore one for his presentation. 

A 3D printed bracelet printed by the Hazzards for their daughters wedding.
It was a wedding favor o the female guests.

A 3D printed bow tie.  This was printed as the wedding favors to the male guests.

The bow tie with support still attached.  This is the bow tie where
Tom Hazzard elected to keep the supports attached

Rope knots printed by Shorey Designs as part of a test.  The "fuzzy" rope on the
left has absorbed moisture form the atmosphere, the one on th eright was dried before printing.
That filament dryer I've heard about might be worth it. 


Thursday, July 05, 2018

Sharing a Short Lesson on Flared Tubes in Fusion 360

It's been a while since I've posted.  New projects and a different path of life have kept me away from working on "bloggable projects".

So I now share only the occasional post, and I hope that you find these posts helpful.

The other night, I was "doodling" in Fusion 360, and decided to model a "semi-rigid tube", similar to what one might find in an aircraft or some automotive applications.   It was good to get a little practice.


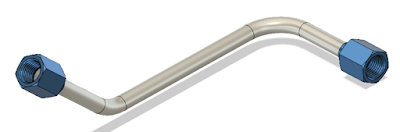
A typical 37 semi-rigid tube

And I found a couple of things that were worth documenting, at least for me.

Background on the Part.

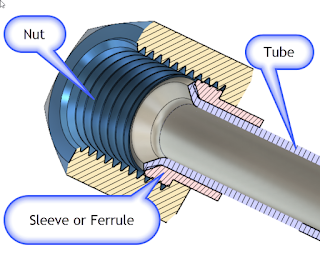
In real life, a semi-rigid tube of this type is composed of a seamless tube, typically made from aluminum, or stainless steel, although other materials are sometimes used.

The flare is backed by a sleeve or "ferrule".  This reinforces the flare.  This design also greatly reduces the possibility of "wiping" damage to the flare, since the nut doesn't turn against the flare itself.

So that's why the design is made the way it is!

The Part in Fusion 360   

The part isn't complex, it's just a path created using a couple of 2D sweeps.

The flares at the ends of the parts are revolutions.  Just like the paths creating the sweep, there's nothing earth shattering if you're familiar with the tools

One thing worth noting, I downloaded the flares and sleeves from McMaster Carr, using the tools built right into Fusion 360.  That's a nice feature that simplifies downloading and inserting standard parts.

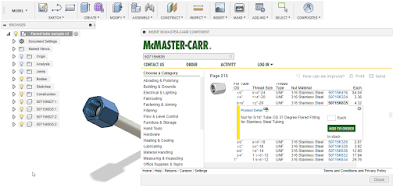
Inserting from McMaster Carr


I wrote about that tip here in a post a little ways back.  You can check out that post here.

And by the way, here's a link to the part.  Feel free to download it and take a look at it!


A Few Other Notes


  • McMaster-Carr actually didn't have the fitting I needed.  I wanted the fitting in aluminum, which does exist.  So I used a steel part and changed the material.  Yes.  In this case, I'd probably have to go elsewhere to purchase the part. In my case, Aircraft Spruce.  Sorry McMaster, I love you, but you didn't have what I needed in this case.


  • The parts from McMaster weren't modeled quite right.  There's some interference with the threads and the ferrule, and the flare on the ferrule is actually 30 degrees, not 37 degrees.  But how much does it matter?  If the purchased parts are correct (which they should be), then the fact that the models are slightly incorrect won't make much difference.  But it is noticeable in the cross section.


  • Aircraft tubing is sized using a unique numbering system.  The tubing (and hardware) are assigned a number, such as 3, 4, 5, etc.  If you take this number and divide it by "16", you'll get the outside diameter of the tubing in inches.  So #3 tube is 3/16, #4 tubing is 4/16, or a 1/4 inch, and so on.  The hardware is often number the same way. 


  • Aircraft tubing is also flared to 37 degrees, not 45 degrees as may be found in other applications. Just in case anyone is wondering why I'm using that flare!
  • If you're interested in learning more about flaring, here's a nice video that shows the process of flaring the tubes.  It's worth a few minutes of your day! 


In Conclusion

I started this project out as a bit of practice, as I said, it was an elaborate doodle.  But I had the chance to try a few tricks, and I thought I'd share them with you.

So go ahead and download the part, and have a little fun with it!

Sources and Acknowledgements

Flare Dimensions are from HylockUSA.  They also have the dimensions for metric flares!

Part Models are downloaded from McMaster Carr.

Wednesday, April 18, 2018

A New, Improved Hole Tool for Fusion 360

While I don't get to use Fusion 360 as much as I'd like to, I still keep track of it's goings on.

And improvements to the hole tool has been one I'm waiting for!  They've integrated threads into the hole tool

Holes and threads in the same dialog box now.
It's 

I grant you, I don't think much new was added.  But now, instead of having to create a hole, then go to a separate thread tool to add screw threads, it can all be done from one dialog box.

The new thread dialog box and thread section

I'm sure there's a corporate buzzword for this, like "synergy", or "paradigm shift", or maybe even  "synergistic paradigm shift in the way we shift or synergistic paradigms".

Who knows?

But I just think it's going to make adding threaded holes a lot smoother.  I'm looking forward to giving it a try when I have an opportunity.

While true enough, I don't get to use Fusion as much as I would like, this tool is making me want to make more time for it!

And there's more new tools to check out with Fusion 360!  You can see the full list of whats new in this update at the link here!

But on this night, it's time for bed, much like my kitty cat "Runtley the Runtling" is telling me!


(data:image/png;base64,iVBORw0KGgoAAAANSUhEUgAAACwAAAAsCAMAAAApWqozAAAABGdBTUEAALGPC/xhBQAAAAFzUkdCAK7OHOkAAAAMUExURczMzPf399fX1+bm5mzY9AMAAADiSURBVDjLvZXbEsMgCES5/P8/t9FuRVCRmU73JWlzosgSIIZURCjo/ad+EQJJB4Hv8BFt+IDpQoCx1wjOSBFhh2XssxEIYn3ulI/6MNReE07UIWJEv8UEOWDS88LY97kqyTliJKKtuYBbruAyVh5wOHiXmpi5we58Ek028czwyuQdLKPG1Bkb4NnM+VeAnfHqn1k4+GPT6uGQcvu2h2OVuIf/gWUFyy8OWEpdyZSa3aVCqpVoVvzZZ2VTnn2wU8qzVjDDetO90GSy9mVLqtgYSy231MxrY6I2gGqjrTY0L8fxCxfCBbhWrsYYAAAAAElFTkSuQmCC); display:block; height:44px; margin:0 auto -44px; position:relative; top:-22px; width:44px;">
,sans-serif; font-size:14px; line-height:17px; margin-bottom:0; margin-top:8px; overflow:hidden; padding:8px 0 7px; text-align:center; text-overflow:ellipsis; white-space:nowrap;">href="https://www.instagram.com/p/BhvYWZxAYmE/" style=" color:#c9c8cd; font-family:Arial,sans-serif; font-size:14px; font-style:normal; font-weight:normal; line-height:17px; text-decoration:none;" target="_blank">A post shared by Jonathan Landeros (@jlanderos1973) on ,sans-serif; font-size:14px; line-height:17px;" datetime="2018-04-19T05:30:04+00:00">Apr 18, 2018 at 10:30pm PDT</blockquote>

Friday, February 23, 2018

Getting Inspired - The SpaceX Launch on February 22nd, 2018

Yesterday, I was fortunate enough to be within sight of  the SpaceX launch from Vandenberg Air Force Base in California.  I was about 150 miles (240 km) to the south, which is easily in sight of a rocket shooting into space,

I was also lucky enough that the launch was scheduled for early morning, before the sun had fully risen.  So we were able to look up into the sky and see it.

Here's the video I captured as we stood on the balcony at work and watched it go.

The video quality isn't fantastic, but I thought it was worth sharing.

It was an inspiring sight to see!  Enjoy, and get inspired too!


Wednesday, February 21, 2018

A Welding Class is Over - And Now its Time to Think of New Directions

Wow, it has been a while since I've blogged.  

In that time, I've been busy in school, where I took a class in Oxy-Acetelyne welding, as well as Tungsten Inert Gas (TIG) Welding, in both steel and aluminum. 


It was a lot of fun, and a big lesson in how much skill goes into making a truly high quality weld. 

I blew quite a few holes in aluminum trying to get there! 

My best TIG/GTAW weld. 
You should see how I started!
(No you shouldn't!)


If you spend much of your time building parts in the computer, I'd encourage you to step into the shop and learns what it takes to make computer models reality.  

As designers, we should all spend some time in a place like this! 


You won't regret it!
I've been reflecting, and not the same reflecting
you see in my welding lens.

But in that time, I've come to realize that I've been neglecting InventorTales.  

My energy has been devoted to work, and school, which means my time with Fusion 360, Inventor, and Vault has suffered. 

My postings with Inventor have ground to a halt, mostly because most of the work I do with Inventor must remain behind the "Walls of Proprietary Design", and I'm not able to share my lessons as easily.  

That has caused me to rethink the direction of InventorTales....

And I've concluded it's time to step back from it a bit.  

This isn't the "Farewell" post.  I'm not shutting the blog down, I'll continue to maintain it for the foreseeable future.  I've been fortunate enough to provide information that's been helpful to the community.  I hope it continues to help in the future.  

It's been a great run for the last few years, and while I'm not going away, I'm going to admit it's time to take a "mental sabbatical"  

I intend to continue to post occasionally, and share some of the new lessons I've learned.  

Thanks for a great few years, and I'll be seeing you out in the 'Verse as I discover what new form the blog should take! 

Monday, January 01, 2018

Using the Fusion 360 Data Panel to Search for Components

Sometimes a part number etches itself in my memory so well, it seems like I'll never forget it.  I know that an MS20470AD4-4 rivet is a universal rivet with a .125 inch diameter head, and is .250 inches long. 

Other times, I couldn't remember a part number to save my life.  It really depends on how often I work with a given component. 

This is the first Fusion 360 component I've created in a long time! 
The parts I create in Fusion 360 tend to fall into the latter category.  I find I'm creating parts when I have time between work and my school studies. 

That means I need to find an effective way to find parts when it comes time to look for them again. 

The thing I found that helps is to include a short description with the part number in the component name. 

Typing the part number, and description in the name.
It helps when searching for files when the part number escapes me, which it often does.  Fortunately, Fusion 360 provides a means to search a project using it's name.  It's accessed by clicking on the magnifying glass shown in the image below .

Choose the magnifying glass to begin a search.

Next, the scope of the search can be controlled by clicking on the pulldown menu.  All your Fusion 360 can be searched, or just a given project, just choose it!

Choosing the scope of data to search.
Once the scope of the search is selected, type in the data to be searched for, it can be any part of the description.  It doesn't have to be complete.  Just a portion of the data will do!

A list of data meeting the search criteria will be shown. This includes the component I created at the beginning of this blog.

A successful search.
Now double  clicking will open the component.  Or if you prefer, right clicking will show multiple functions for the component.  The same options if you had navigated to the file manually!

The right click options are highlighted in yellow.
So give this a try when you need to find a component quickly.  I know it's helped me find components after I've been away from Fusion 360 for a while!
 
And last of all, I'd suggest adding the part number, assuming you have one, the other thing I suggest is keeping the file description as simple and effective as possible.  I like to use a description similar to what I would put in a drawing title block.

Good luck in your design and data managing challenges!