Find us on Google+ Inventor Tales

Friday, May 31, 2019

Eighteen Months of 3D Printing - Where Have I Learned to Use It?

Eighteen months ago, I took on the task of running the 3D printer at work.  It's a Fusion3 F400-S, similar to the upgraded 410 shown on Fusion3's website.

It's a FDM (Fused Deposition Modeling) printer, in other words, it melts plastic and lays it down one layer at a time until it produces the desired result.  '


At least that's what's supposed to happen!

All I can say is that it's been fun, frustrating, rewarding, and discouraging at various stages of the journey.  I've tasted the sweet joys of victory, and I've muttered the bitter "F-Bomb" of defeat.

Most of all, I've realized that while I've learned a lot, I'm far from an expert. Because of that, I'm not going to tell you how to make a successful print.  There are plenty of people who are doing that, and frankly, they are much more knowledgeable than I.

But what I can share are my experiences watching our 3D printer making an impact in our design process.  So here I go, showing a few places where having a 3D Printer has shown itself to be a helpful part of our design processes.

One disclaimer before I get started.  I can't share the real parts online.  Words like "proprietary" and "security" start getting thrown around.  So I have to use "surrogate" parts that represent the concept.

Thanks in advance for bearing with me!

1) The "Show and Tell" 
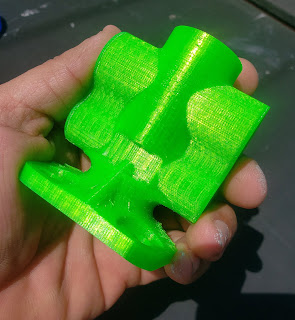
There's nothing like holding a represenation
of the part in your hand.
When I think of 3D printing, this is the first application that comes to my mind.  It's simply a cosmetic print meant to give an idea of the "form and function" of the part.  In our case, it didn't do anything but give everyone a sense of size and shape. 

This might seem simple at first.  With 3D CAD Modeling tools, we can model our designs precisely.  So why "waste time" printing a part that's just "for looking".

Well, I know I've fallen victim to being able to zoom into a small screw until it looks like a table leg.  And with that, comes a distortion of scale that can affect those of us that live in the real world.

And I know I'm not the only one.  I've heard more than one person say, "I really didn't think about big/small that part is!"

A particular example comes to mind.  I was in a meeting where the projected image of the CAD model rotating on the wall was completely ignored because engineers and customers were drawn to the 3D printed model that represented a much more tactile experience that couldn't be experienced with the 3D model.

2) The "Assembly Test" 

This print is in reality a series of parts that make up an assembly.  It may even be a combination of real and printed parts.
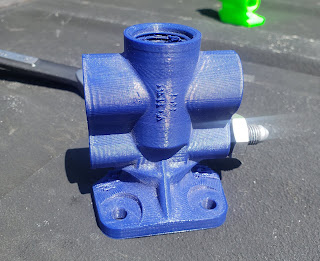
A sample part with a real hydraulic fitting threaded into one hole

The purpose of this part is to ensure that the parts you've carefully designed can not only be put together, but put together easily.
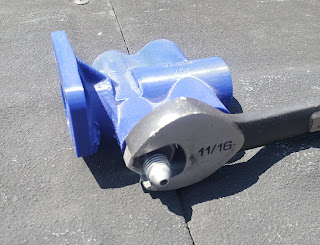
I can see which fitting will have to get torqued in first! 
For example, can a bolt be inserted into the bolt hole, and once in there, can the wrench follow up and turn the bolt once it's in the hole.

3) Tooling and Covers

I've lumped these tooling and protective covers into the same category, partially because the two sometimes blend into each other, at least where I work.
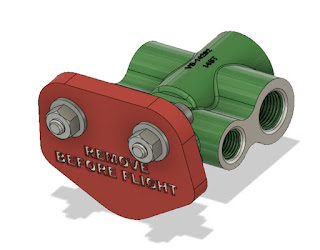
An example of a protective cover that has a unique shape

Because the 3D CAD model exists, it can be relatively quick to create a negative of the part, then print that negative as quickly as a few hours.
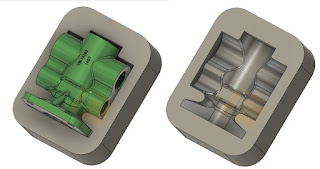
An example of a cradle created by creating
a negative of the part. 
Sometimes these shapes are odd or unique, and can't be easily duplicated by the machine shop, or frankly, the machine shop just doesn't have the time to make them.

In any case, 3D printing provided us with the ability to create odd geometry quickly, without disrupting other operations.

In Conclusion

My intention here was just to share a few cases where I've found 3D printing helpful.  By no means is it comprehensive.  If anything, I hope it provides a few ideas, and dare I say, inspiration.

I think it's also important that we bear in mind that 3D printing is a new tool that can supplement existing tools.  Don't by a 3D printer thinking that you'll be able to shut down your machine shop, woodshop, or welding shop. .

So take these ideas and make them you're own.  And feel free to share in a comment if you have a good use for 3D printing in your home or office.

Acknowledgements


Wednesday, March 20, 2019

Thank Goodness for Fusion 360's Document Recovery!

I start work pretty early this morning, 6AM to be precise.  
Coffee..  The "Go-Juice to start
any day.

That means I usually get up around 4:30, get dressed, and make a little coffee to prime the pumps, so to speak. 

If I have time, I read a little news on the computer before jumping in the car and braving the Los Angeles traffic. 

This morning, I my laptop announced that Windows needed to install an update and restart.  Just as I was leaving for work, I told Windows to go ahead run through the update process. 

I knew I had saved all my documents... Including that Fusion 360 part I had been working on the night before.  Of course I saved....  right????  RIGHT???
Sure enough.  At lunch, I open up Fusion 360  to take a look at my part.  I'm going to bathe in the the power of the cloud and all the power of accessibility it grants me! 

And I see a blank screen when I open my document.  That part I was so sure I had saved???? I hadn't.  

I mentally shrug and accept that I'll have to redraw the part.  It wasn't complicated and it will only take a few minutes to recreate.  But still, the CAD version of "Groundhog Day" is never fun. 

Once I get home, I opened up Fusion 360, considering recreating my geometry, and with the voice of angels, the document recovery screen appears. 

And it includes the part I had forgotten to save! 

The File Recovery screen. Note this image doesn't contain
the filename for my recovered file. In my excitement, I had already recovered it.
I didn't have the courage to try to re-break it to see if it would recover again.
All I had to do was right click, choose open, and bask in the joyful joy-ness of File Recovery.  

File Recovery pops up when there are files auto-saved on your computer.  It's a handy reminder there is potential data that can be salvaged. 

It can also be manually by choosing the "Recover Documents" option from the File pulldown. 

Locating the "Recover Documents" screen manually

Regardless whether or not it's access at startup, or manually from the pulldown, it can be a great way to recover lost work in case of computer/software crash, or if, as in my case, a forgotten file save!

Boy am I glad I didn't have to rebuild this geometry!
(note the part name states its "Recovered"


Additional Photo Credits

photo credit: wuestenigel What's the worst thing that could happen? via photopin (license)

Wednesday, March 13, 2019

Painting PLA 3D Printed Plastic.

The valve body part I use for everything from machine
calibration to well, paint tests! 
One of my newer endeavors is running the 3D printer at work.  And with any new journey, it's got is rewarding victories, and frustrating setbacks. 

My most recent "let me figure that out" moment came when printing a "presentation" part, meant to give an idea of shape and volume.

I printed the company logo into the part, because that's just good marketing right there.  But then came the suggestion....

"Can we paint the logo to make it pop?  Do we have an white out anywhere?" 

After a build lasting 22 hours, I wasn't willing to roll the dice with white out.  But while home sick, recovering from the flu, I had an idea (fever dream?) to go to the local crafts store and see what they had for paint. 

So once recovered, I wandered off to the crafts store and found a paint pen.  Not willing to try my first attempt on the part at work, I tried it on another PLA part I had. 

The results for a first attempt weren't too bad.  We're they perfect?  No. but it'll do for what we're currently after, and if I do say so myself, not bad for a first attempt.

The "paint pen" and its willing test piece

Have you got any suggestions for painting PLA?  I've heard acrylic and spray paint work well, but haven't tried it myself.  For that matter, has anyone tried the good old fashioned whiteout?  Maybe I'm being a little elitist and it really is a good choice!


Wednesday, March 06, 2019

Revisiting My Old Friend Fusion 360. And Searching for Documents in the Data Panel

My beacon many a night
A few months ago, I took a brief hiatus on blogging to concentrate on studying for my FAA (Federal Aviation Administration) Airframe and Powerplant tests.  As many of us encounter, there are only so many hours in the day, and the body will only tolerate so much caffeine.

I'm proud to say that those tests have been passed now, and it is quite a thrill, and yes, a relief too.

But that means that my evenings are free to pursue other endeavors, and some of those evenings will involve building a few models in Fusion 360.

I don't expect I'll get too crazy with parts, my time is still somewhat limited.  But I'll share my adventures here as I learn new things.

So what's the first thing I (re)learned?

How to search for a file I saved to the wrong location!

That's right!  I'm diligent about saving my files!  What I don't always do, is remember to make sure I save to the correct location! 

However, Fusion 360 does have a way to fix that!

First, locate the search "magnifying glass" on the Fusion 360 data panel.


Once the magnifying glass is selected, the data panel shows  a search window.  All there is to do is type the name of the document you're searching for, and click the search icon.

It helps me when I misplace my files. Perhaps it can help you too!

Good luck!  I hope this helps!

Additional Credits

photo credit: bryan... 星巴克, 慶州, 徐羅伐, 韓國, 南韓, 大韓民國, Starbucks, Gyeongju, South Korea, Republic of Korea, ROK, Daehan Minguk, 경주시, 대한민국 via photopin (license)

Wednesday, September 12, 2018

Improvising Dry Storage for 3D Printing Filament with Help From my Cat

A little less than a year ago, I found myself learning how to use the 3D printer at work.  It's a Fusion3 F400, and it's been a pretty good machine so far.  I've learned a lot from it!

Samples of a valve body I use for calibration.  From left to right, PLA, PETG, and Nylon

One of the things I've learned is that many 3D printing filaments are "hydroscopic". That is, they absorb water from the atmosphere.  After absorbing water, the part finish will deteriorate as the en-trained water boils as it leaves the print head.

That means finding a way to keep filament dry.

Some methods include:

  • Keep filament stored in it's shipping bags until just before use.  That reduces the time that filament is exposed to the atmosphere.
  • Store filament in containers with a desiccant. 
  • Use a filament dryer, if you have one, such as this one from PrintDry.
Over time, I found I had several spools of partially used filament with no place to put them, and I didn't have access to a filament dryer.  

That left me with the option of trying to find a good way to store several spools of filament in a container with desiccant.  

The answer came as I was sitting on the couch, scratching the ears of my cat, "Runtley the Runtling".  
The Runtley seems interested in his potential contribution
to the 3D printing industry.
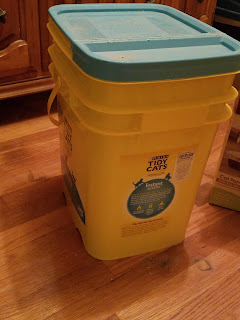
I had an empty 35 lb cat litter container!  It's free with the purchase of 35 lbs of cat litter, it's big enough to hold 4 or five spools of filament, and airtight enough to keep cat litter dry, and that's designed to absorb liquid!

This can be a dry storage container!

So after being emptied and thoroughly rinsed to make sure there was no lingering dust, the container made its way to work.  

It now resides at my desk with a few bags of desiccant and a few spools of printer filament inside.

The container at work

Add a few desiccant packets

Mix in a few spools of filamnet

Tag it so it doesn't get thrown out by the cleaning crew! 

 Hopefully this soles my filament storage issues!

Do you have a clever way of dry storing your filament?  Leave a comment! 

And thank you Runtley the Runtling for your donation! 

In true cat form, Runtley is unimpressed.  


Wednesday, September 05, 2018

Fusion 360 Has A Title Block Editor!

A little while ago, Fusion 360 found itself with a bright, shiny, new Title Block Editor.  It's not as exciting as some of the other tools (I'm looking at you Generative Design), but it's a tool that's very necessary for many users.

When tools like Generative Design have all the flash,
how is the Title Block Editor supposed to stand out? 

So with a little spare time on my hands, I decided to spend a few moments giving the Title Block Editor a try.

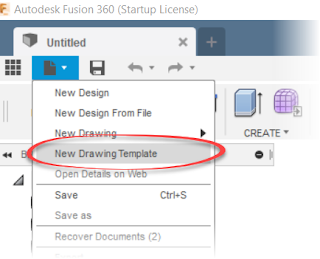
My first step was to create a new template from the file menu.

Starting the Title Block Editor

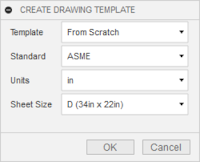
Choose the options for the title block, such as source, standard, and sheet size, and click OK.

An example of the title block options
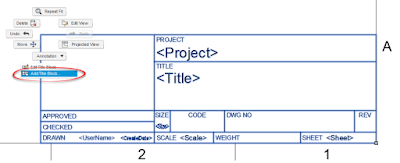
Once the template generates itself, zoom in on the title block, select it, right click and choose "Add Title Block" to create a new title block.

Adding the new title block
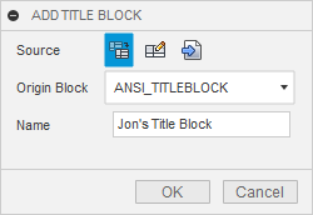
This creates an editable copy of the title block.  It's time to give the title block a name, and you're ready to edit.

Givein the Title Block a Name
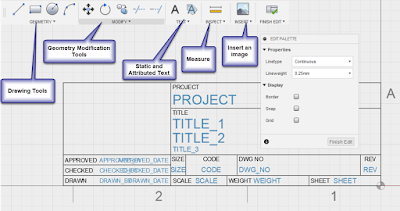
Editing is pretty intuitive in my opinion at least.  Sketch, insert images, and place properties as needed to Create the required title block.

The tools at the users disposal. 

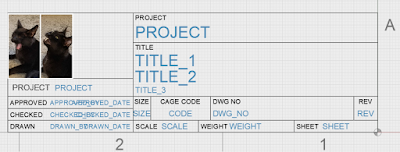
For my first tests, I threw an image and a few lines.  I also changed the "CODE" section of the title block to "CAGE CODE", and added the "PROJECT NAME" attribute.

Modifying the title block
I do find myself wishing for the ability to dimension the geometry, although when all is said and done, it's a title block, so close enough is probably good enough in this case.

There's also the ability to use geometry and grid snaps, which helps create more accurate geometry.  I suppose it's the old Inventor user in me feeling the black hole like gravitational urge to fully constrain everything.

The more I practice with it, the more comfortable I found I got.  Go figure!

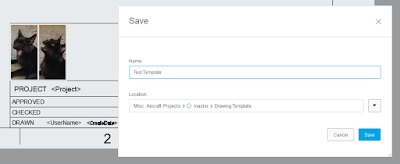
Now save the template like any other document, and the template will be ready to use, with the new title block.

Saving the Title Block
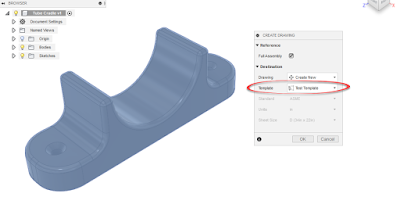
Now when starting a new drawing, choose "From Template", and you'll be able to start using those fancy title blocks I'm sure you'll all be creating!  Note that you may have to browse to the location where the template was saved.

Adding the Template
The drawing can be created and the new title block can be put to use.  The auto-populating properties are already populating.

The custom title block in use.
Personally, I've only scratched the surface.  I have more to test and try, and certainly more to learn.

Next, I think I'll tackle those customer properties.  Stay tuned!

Acknowledgements:

photo credit: torbakhopper liberace is still having fun times in the lower haight, scott richard via photopin (license)

Friday, August 31, 2018

A Fusion 360 Doodle - A Hydraulic Reservoir

With my time consumed by more than one project, I don't get the time to blog as often as I like.

But I wanted to share a 3D "doodle" I mad  in Fusion 360.

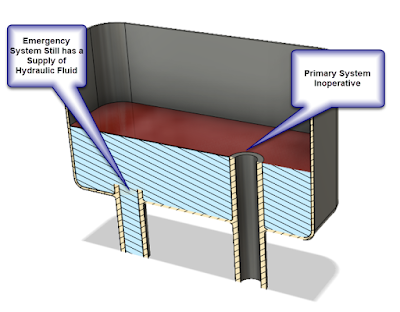
It's a rudimentary hydraulic reservoir, based on the type that has been used for many aircraft for quite some time.  I modeled it because I find a certain inspiration in a simple solution to  a problem. 

The challenge for this hydraulic system?  How is a supply of hydraulic fluid kept for the emergency system, should the primary system fail, and bleed out completely? 

The solution? There are two intakes in the reservoir.  The inlet for the primary system uses a standpipe, which sits higher in the reservoir than the inlet for the emergency system. 

Showing the different inlets in the hydraulic reservoir
The result is should the primary hydraulic system completely fail, it can only empty the reservoir to the level of the standpipe. 

That leaves enough fluid for the emergency system, allowing the pilot to do things like lower the landing gear and flaps for example. 

The primary system has failed.  But the Emergency system
can still get you home. 

 It's a clever way to solve a problem! 

Naturally, there is much more to an aircraft hydraulic system than just this reservoir.  There are pressurized reservoirs, hydraulic fuses which close if hydraulic fluid starts flowing above a certain rate, and redundant hydraulic systems found in airliners. 

If you're inclined, you can read up on aircraft hydraulic systems with the FAA handbooks found at this link.  The PDFs are free, so there's no reason not to take a look!


Monday, July 30, 2018

Fusion 360 - Keyboard Shortcuts are here at Last!

Last week, Autodesk released a new update for Fusion 360, and while there's a few updates, the one that's getting the most attention is the addition of keyboard shortcuts.

Creating a shortcut

Now, if you'd like to setup your own custom shortcuts, you have the freedom to do it.  Just start a command from the pulldown menu, and click the "3 dots" on the far right of the toolbar.

Click the dots1

Now the Change Keyboard Shortcut dialog appears, and you can type in the shortcut to almost anything.  In this case, I chose to use "Shift+R" for a 3 point rectangle. Then hit OK, and you're ready to go

Changing the shortcut
You may have seen that I typed "almost anything" in the above paragraph.  There are some reserved shortcuts that can't be changed.  Among them are the standard Windows shortcuts, such as CTRL-S for save.  There are also shortcuts reserved by Fusion 360.

Man!  I'd love to make "S" a shortcut for "Create Sketch"!
And if you don't like any of the shortcuts you've created.  You can always restore to default! 

And finally, this wasn't the only enhancement to be introduced in this release, for the rest of them, follow this link here!


Wednesday, July 11, 2018

Dropping by the Pasadena 3D Printing Meetup

Some very cool 3D Printed Dice
It's said that we should learn from others mistakes, because we won't live long enough to make them all ourselves. 

It was in this spirit that I attended the Pasadena 3D Printing Meetup in Southern California.  Having picked up running a 3D printing machine recently, I've been trying to do what I can to learn as much as I possibly can.

And the group delivered.  There were several knowledgeable people who were happy, even excited to share their knowledge.  I got some great ideas on different materials to try. 

I was even able to share a little of my knowledge with new users.

This was followed by a presentation by Tracy and Tom Hazzard, who talked about the trials and tribulations of running a 3D printing business.  And they have experience, they run 3D Start Point.

Tom talked about building his own support structures, instead of letting the machine build them.  His goal was to reduce cleanup as much as possible.

There's some food for thought!

Probably the single best take away?  Tom and Tracy run a 3D printing podcast!  I've already looked at the first few episodes, and I'll be adding this to my regular podcast rotation!

It was well worth spending an evening with the group.  It's one I'd encourage you to attend, if you're in Southern California. 

And if you're not in Southern California, see if you can find a group in your area.  Meetup.com can be a great resource for that.

Here's a few more pictures from the group.  Enjoy!

And let's get out there and make some stuff!

A sample of PETG or PLA.  I can't remember which now.  I like the.
surface finish, and a lot of people recommend PETC

Another PLA/PETG sample.  I told myself I'd remember which was which.
I was wrong. 

A 3D printed tie.  It's printed in one piece and is wearable.
Tom Hazzard wore one for his presentation. 

A 3D printed bracelet printed by the Hazzards for their daughters wedding.
It was a wedding favor o the female guests.

A 3D printed bow tie.  This was printed as the wedding favors to the male guests.

The bow tie with support still attached.  This is the bow tie where
Tom Hazzard elected to keep the supports attached

Rope knots printed by Shorey Designs as part of a test.  The "fuzzy" rope on the
left has absorbed moisture form the atmosphere, the one on th eright was dried before printing.
That filament dryer I've heard about might be worth it. 


Thursday, July 05, 2018

Sharing a Short Lesson on Flared Tubes in Fusion 360

It's been a while since I've posted.  New projects and a different path of life have kept me away from working on "bloggable projects".

So I now share only the occasional post, and I hope that you find these posts helpful.

The other night, I was "doodling" in Fusion 360, and decided to model a "semi-rigid tube", similar to what one might find in an aircraft or some automotive applications.   It was good to get a little practice.


A typical 37 semi-rigid tube

And I found a couple of things that were worth documenting, at least for me.

Background on the Part.

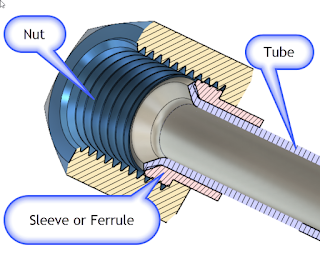
In real life, a semi-rigid tube of this type is composed of a seamless tube, typically made from aluminum, or stainless steel, although other materials are sometimes used.

The flare is backed by a sleeve or "ferrule".  This reinforces the flare.  This design also greatly reduces the possibility of "wiping" damage to the flare, since the nut doesn't turn against the flare itself.

So that's why the design is made the way it is!

The Part in Fusion 360   

The part isn't complex, it's just a path created using a couple of 2D sweeps.

The flares at the ends of the parts are revolutions.  Just like the paths creating the sweep, there's nothing earth shattering if you're familiar with the tools

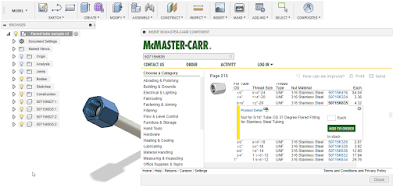
One thing worth noting, I downloaded the flares and sleeves from McMaster Carr, using the tools built right into Fusion 360.  That's a nice feature that simplifies downloading and inserting standard parts.

Inserting from McMaster Carr

I wrote about that tip here in a post a little ways back.  You can check out that post here.

And by the way, here's a link to the part.  Feel free to download it and take a look at it!


A Few Other Notes


  • McMaster-Carr actually didn't have the fitting I needed.  I wanted the fitting in aluminum, which does exist.  So I used a steel part and changed the material.  Yes.  In this case, I'd probably have to go elsewhere to purchase the part. In my case, Aircraft Spruce.  Sorry McMaster, I love you, but you didn't have what I needed in this case.


  • The parts from McMaster weren't modeled quite right.  There's some interference with the threads and the ferrule, and the flare on the ferrule is actually 30 degrees, not 37 degrees.  But how much does it matter?  If the purchased parts are correct (which they should be), then the fact that the models are slightly incorrect won't make much difference.  But it is noticeable in the cross section.


  • Aircraft tubing is sized using a unique numbering system.  The tubing (and hardware) are assigned a number, such as 3, 4, 5, etc.  If you take this number and divide it by "16", you'll get the outside diameter of the tubing in inches.  So #3 tube is 3/16, #4 tubing is 4/16, or a 1/4 inch, and so on.  The hardware is often number the same way. 


  • Aircraft tubing is also flared to 37 degrees, not 45 degrees as may be found in other applications. Just in case anyone is wondering why I'm using that flare!
  • If you're interested in learning more about flaring, here's a nice video that shows the process of flaring the tubes.  It's worth a few minutes of your day! 


In Conclusion

I started this project out as a bit of practice, as I said, it was an elaborate doodle.  But I had the chance to try a few tricks, and I thought I'd share them with you.

So go ahead and download the part, and have a little fun with it!

Sources and Acknowledgements

Flare Dimensions are from HylockUSA.  They also have the dimensions for metric flares!

Part Models are downloaded from McMaster Carr.