Find us on Google+ Inventor Tales

Saturday, September 26, 2015

The (Bald) Eagle has Landed

I think I'm quite ready for another adventure."
Bilbo Baggins - Return of the King


Time to find out what's over that hill. 
This week is a short post to announce that I'm joining Can Lines Engineering as a Mechanical Engineer.

I'm looking forward to getting back into a design and manufacturing again.

I'm sure it's going to be a new adventure full of new challenges and learning experiences.

I'm hoping to "relaunch" InventorTales as a part of this, and share new tips and new experiences.

Stay tuned!


Photo Credit

photo credit: Nick via photopin (license)

Friday, September 18, 2015

A Visit to Westec 2015!

I've had some time on my hands while I've been on the job market, so I decided to take a drive to the Los Angeles Convention Center and spend a short time at Westec 2015.  

A little tech in action
There was some pretty cool technology there!   

The first machine I saw was a waterjet machine made by Flow Waterjet.  It's been a little while since I've had any interation with one, but the most interesting thing I learned was that the taper (caused by the waterjet spreading out as it cuts through the material) has been eliminated by automatically tapering the head.

I also made a trip to see if there were any 3D printing companies there.  I did find the 3D Systems booth.  Most of the things I have seen before.  But it's always an amazing technology to see.  There's a certain Zen I find watching the machine build,   And the things have gotten much more amazing since I last saw it in the early 2000s. 


And seeing how it's a show for machine tools, I had to see a few more "traditional" CNC machines.  I only call it traditional because they're probably the oldest technology there, but event that technology evolves constantly.  

I was able to get a pretty good video at the Datron booth of a machine running toolpaths.  I wish I had gotten there when it was cutting the part instead of repeating the path over a finished part, but I'm sure aluminum billet gets expensive after a while.  Not to mention cleanup!  


Finally, I did swing by the Autodesk booth where they were showing Autodesk Inventor HSM and HSM Works.   As a long time CAD jockey, I can say that it's strange to see Solidworks running in an Autodesk booth!   But this is life in the modern era.  Autodesk is a Solidworks supplier after all. 

The Autodesk booth was like this all day! 
They were making parts on a Haas CNC machine, and they were getting a lot of attention.  I could barely get room to get the video! 


I was really amazed at how crowded the show was.  It was a zoo!  Which is great for the vendors.  I'm glad they're busy.  It took me nearly 45 minutes and repeated flybys of the SolidCAM booth before I was able to talk to a friend for 10 minutes.

But all in all, it was a good show.  I just wish I'd been able to grab a few more pictures and videos! 

And by the way, if you ever have a chance to swing by a trade show in your industry, I encourage you to do it!  You don't have to spend all day, you don't have to become the "turtle person" who is weighed down by twelve bags full of t-shirts, pens, and squeezy stress balls.

But see what's out there, and see what you thought was state of the art, may have past into history while you were hunched over your desk in the cubicle farm.

Technology will march on!  And it won't wait for you to make sure you packed a lunch. 

Monday, September 07, 2015

When is it the Right Time to Buy the Right Tool?

Recently I had the experience of changing my own front brake pads again on my runabout, the 2007 PT Cruiser.

A typical caliper for disc brakes. 


In the last couple of years, my schedule has been busy enough where it's been easier to take it to the shop, and pay someone else to do it.  But I decided to do it myself this particular day, because I missed that certain Zen I get when I work with my hands.  

The steps to change brake pads isn't a hard one.  It's a matter of jacking up the car, taking a tire off, removing the caliper, swapping the brake pads, and reversing the steps.

You can find the basic steps here. 

But there's always one step that makes it a little tricky.  

The calipers, which press the pads against the rotor to slow the car, are extended because the old pads are worn down.

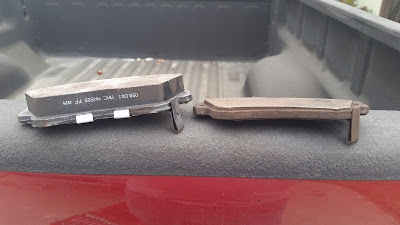
One of my old pads vs the new.  You can say I got my money's worth! 


That means that getting the new pads to fit around the rotors, which means compressing the caliper piston, which means using a tool, improvised or otherwise. 

Many years ago, when I was a broke college student and would spend hours working on my own car, I would wrangle a the calipers open using a combination wrench or a screwdriver as a pry bar.  This usually included a lot of grumbling as I balanced the caliper in my hand an tried to get leverage with whatever improvised tool I was using.

One day, I was having one of those "garage conversations" with an old mechanic laughing about opening calipers.  He reached into his toolbox and said "buy one of these".  And showed me a caliper opener.

I bought one that same day.

Although there different styles for this tool, the one I purchased nearly twenty years ago uses a screw and scissor mechanism.  Not unlike the scissor jacks included with most modern cars.

The piston compressing tool ready for action
By twisting the screw, the scissors open, and the caliper piston compresses.

It has reduced both the time, and aggravation of getting the calipers open.

You may have guessed that the moral of my story is "have the right tool for the job".  As a matter of fact, I've written a post on a very similar vein before.

But that's not always part of it.  Many times, there always a "better tool".  But in order to enjoy the savings of the tool, you have to spend the money on the tool.

I'm sure there are a few of you who are thinking, "that tool is a waste of money, an improvised pry bar will work just fine!"

Are they wrong?  I don't think they are.  It's a choice they've made based on their own unique experience.

The other question?  Is there enough benefit to having that tool to justify the investment?  

That's the big question that has to be answered.  Depending on your tool, ROI calculators may be available, but do they tell the entire story.

Some other things that might be worth considering.

  • How often will you use the tool?  Are you going to use the tool every day?  Every few months?  Or "Who knows when the next time will be?"  The more use you get out of the tool, the better off you'll be. 
  • How much time does it save? If it's saving you 5 minutes every 2 years, and costs thousands of dollars, it's not as wise of an investment as something that costs a few hundred dollars and saves thirty minutes every few weeks. 
  • How much frustration does it save you? Are you, or one of your coworkers cursing a blue streak while trying to "make it work"?  Someone who's frustrated can make other costly mistakes.  That frustration can even seep into other projects. 
  • There's never time to do it right, but there's always time to do it twice! In other words, how much does it cost *not* to have the right tool? Are you scrapping parts because it takes more than one try to do what the right tool could do once?  Scrap costs money too. 
The right tool can turn a frustrating job into a "cakewalk",  But at the same time, buying a tool "to have it" can get expensive quickly. 

Whether it's a caliper opener costing 15 US Dollars, a CNC machine costing 100,000 US Dollars, or a CAD Program costing 10,000 US Dollars, it's not always a simple decision.  

From the wrench to the CNC machine in the background, every tool has to
make more than it cost to make its purchase worth while.
Image courtesy KRF Machine
That's where consideration, analysis, and a large dose of experience have to combined to decide when the time is right to make that investment. 

Photo Credits:

photo credit: Primed Caliper via photopin (license)


Tuesday, September 01, 2015

My Test Drive of a 3Dconnexion CadMouse

The last few weeks I've had an opportunity to test drive the new CadMouse from 3Dconnexion.

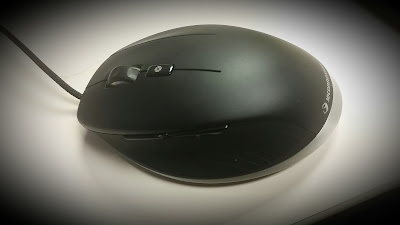
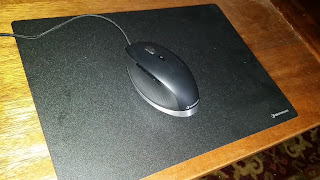
The guest of honor for this post. 
Color me impressed.   Very impressed. Here's why.

Initial Impressions

Naturally, I had to inspect the mouse when I first freed it from it's packaging.  The feel is nice and solid, and it fits comfortably in my hand.

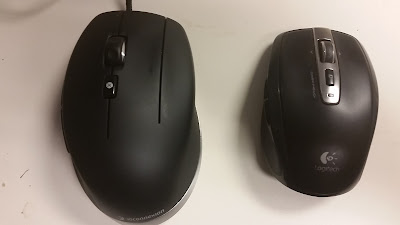
It was much bigger than my current go to mouse, a Logitech Anywhere Mouse MX.  Which I am a big fan of, incidentally.

My CadMouse on the left, my Anywhere MX mouse on the right. 

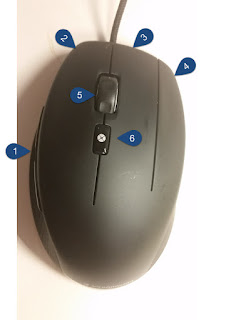
As I inspected the buttons, I quickly noticed there are three mouse buttons, plus a wheel, plus a gesture button.  On top of that, there are two additional buttons on the side.


  1. Side buttons
  2. Left button
  3. Middle button
  4. Right button
  5. Scroll wheel
  6. Gesture Button


Each button has its purpose. And you can control that purpose
The Test Drive

Installing  the driver, was pretty easy.  Having my laptop recently go back for repairs, I had to reinstall my drivers. But after a quick download, a few clicks and a little waiting over a cup of coffee, and it's ready to go.

Next it's time for the rubber to meet the road.  Drive it!

I purposefully ran without my usual SpacePilot Pro.  I didn't want to use it as a crutch and skew my opinion of the CadMouse.

So in I dove into Autodesk Inventor with the CadMouse alone.

The first thing I fell in love with was the wheel.  As much as I love my Anywhere mouse, I hate the scroll wheel for panning.  It's great for non-CAD applications.  But for double clicking to "Zoom Extents" in Inventor with the Anywhere mouse?  Forget it.  I programmed the menu button to duplicate the middle mouse so I could zoom and pan with that.

The CadMouse on the other hand, works beautifully for scrolling and panning. That alone is a big winner for me. It's designed for CAD users, nuff said.

The rest of the buttons are smooth, and work nicely.  I customized the extra middle mouse button as the "F4" key, so I can use that as a shortcut to access my orbit tools.

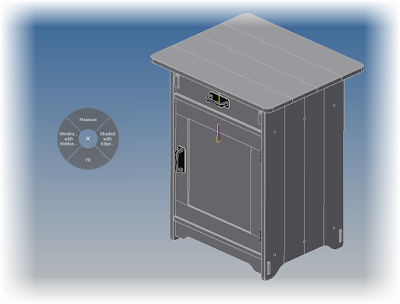
The Gesture button is a nice tool.  It places commands on a "Heads Up Menu" that you can customize.  I haven't had a chance to really customize it, but I see it as a great way supplement the commands on Inventor's marking menus.

The gesture menu in Autodesk Inventor.  And it can be customized.


The "Side Buttons" are set to Zoom in and Out by default.  I've changed them to Undo and Redo.  Since those are tools I use often.  I'm content to scroll with the mouse wheel.

And as for that optional mouse pad.  It's not a necessity to use it with the mouse.  The CadMouse works great on the surfaces I've used.  This includes tables made out of plastic laminate and my mahogany coffee table.

3Dconnexion also included the optional mouse pad.  The first thing I noticed about this is it's about the size of a small helipad at 350mm x 250mm (13.75 inches x  9.875 inches).

The mouse pad has plenty of room! 
While not required to use the CadMouse, the mouse pad makes the CadMouse just glide.  It's like having a great car on the urban freeway, versus having the right car on a wide open country road.

I do recommend the mouse pad for the desk at home, although it might be a little tough to travel with.

The "Drawbacks"

I really can't find much to say is "bad" about it.  I always feel I have to find "something" to have a proper review, but I'm really splitting hairs.  I had to try to find something.

The cord sometimes gets in my way. Due to the fact I'm very mobile and always have it connected to a laptop, I tend to have a lot of extra slack. Wireless might be nice, but in a few seconds, I can arrange the cord so it's not in my way.

And because it's corded.  No batteries to change!

.But that's a minor complaint, really.  If the cord is the best I can come up with, then I have a collection of nits I'd love for you to pick through.

At 100 US Dollars, it costs more than a many mice.  So sticker shock might be an issue.  But if much of your job is driving a CAD machine, this is an investment that will pay off quickly, especially with the ability to customize the buttons.

The Summary

The CadMouse is great.  That's all there is to it.  3Dconnexion put some thought into it, and it shows.  I've thoroughly enjoyed the time I've had with it so far, and I'm looking forward to getting some more time with it.

If you're in the market for a new mouse, I think you should seriously consider the CadMouse as an option.  You're doing yourself a disservice by not taking a look.

Next, I'll be customizing the buttons even further.  Not to mention connecting my SpacePilot again!

Friday, August 21, 2015

Defragging Autodesk Vault Using a Script

It's been a little while since I've been able to dig into Autodesk Vault, but just this week, I had to locate a script to defragment the Vault database. 

The reason for a defragment is to make sure Vault performance doesn't degrade when making database queries.  For those of us not intimate with SQL, those are Vault Searches.

A manual defrag can be kicked off from the ADMS Console on your server at any time.  All you have to do is right click on the database you want to defrag, and choose "Defragment Database".
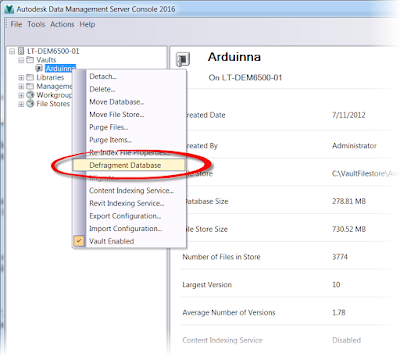
A manual defrag from the ADMS Console


But the next warning will give you an indication that this isn't a small feat.
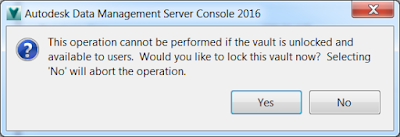

You should read and heed this message! 
The database will lock during a defragment, and the users won't be able to use it.  As a rule, this is undesirable during working hours.

What would be better, is if we could run it during off hours when nobody is accessing the server.

A script can be used to make sure you, as a CAD Manager, don't have to log in during the dead of night to execute the command yourself.  The script is just a text string that runs the same function as the command shown above.

An example of the script in Notepad.  Click to enlarge this image.

This can be set to run as a Window Scheduled Task.  You can let the server run this at a time of your choosing.

First of all, the text for the script is listed below.  You can type this in Notepad.  Also, it's all one line of text.  Don't let the wrapping below fool you.

"C:\Program Files\Autodesk\ADMS Professional 2016\ADMS Console\Connectivity.ADMSConsole.exe" -Odefragmentvault -NVault -VUAdministrator -VP -S

There's a lot of geeky sort of words and phrases in this script.  So let's break it down a little bit.

C:\Program Files\Autodesk\ADMS Professional 2016\ADMS Console


This line just opens up the directory where the executable file to run thee script is located.  Note that it's version specific if you use the default location.

To make sure I've got it right, I copy and paste the location into Windows Explorer.  If it opens up the folder location with the file, Connectivity.ADMSConsole.exe in it, congratulations, it's right.

Go get yourself a cookie!

Speaking of Connectivity.ADMSConsole.exe. 

This one is pretty simple, it's the executable file that starts Vault commands.  In effect, it's starting the ADMS Console without the interface.

-Odefragmentvault

This is the switch that tells Vault that a defragment is being done.  Different switches can get Vault to do different functions, such as backup.

-N

This is important! The -N is a switch tells Vault which Vault database is going to be defragmented.  For example -NOlympus would defragment the Vault database named "Olympus".

-VU

Often the user "Administrator", the -VU switch tells Vault which user the Vault is using to run the defragmentation.  The user running the script isn't important, but they must be a Vault user with administrative permissions.

-VP

This is the password for the user identified by the -VU switch.  In my sample, it's blank because my administrator doesn't have a password.

Yes I know, this is a terrible practice.  Do as I recommend, not as I do!  (cheeky grin).

-S

This runs the script silently.  That means that it won't show you any dialog boxes and wait for you to hit "OK".  It's just going to chug along.

Now that all that is been explained, you can save this script with a *.bat extension.

Now, set it up as a Windows Scheduled Task, and you should be off and running!

It's hard to give a solid schedule to run a defrag on, but I usually run my tasks about every six months or so, but that's just what works for me.  You'll have to keep an eye on your Vault and see how it performs.  You may be able to go longer or shorter depending on your personal experience.

If you want, you can always check the ADMS Console, if it says "Defragmention Recommended", it's probably a good idea to run that defrag!
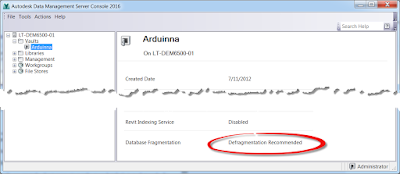
Time to do a little maintenance! 
One more tip, but this is a big one.  Always! Always! Always! Make sure you close the ADMS Console interface when you log off your machine!  

Vault will only allow one instance of the ADMS Console to run at a time!  If you forget this step, the script won't be able start.  That means that no backups, defrags, or anything else that runs off Connectivity.ADMSConsole.exe will work!
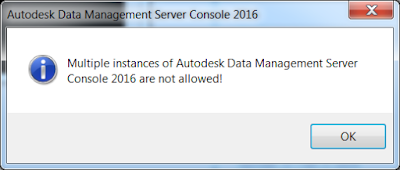
You don't want to see this message
The last thing you want to see is this message when you need a backup, and one hasn't been running for six months because you forgot to close the ADMS Console!

In conclusion, good use of batch scripts can be a boon to making sure your Vault runs efficiently.  It can eliminate the need to constantly log into run maintenance processes.  Instead, you can let them run on a schedule, and just monitor to make sure the finely tuned system is still finely tuned.

The defragmenting script is one, the backup script is another.  But there is a lot more that can be done.

For a full reference, check out this link from Autodesk here!


Sunday, August 16, 2015

After a GPU Failure, Fusion 360 Keeps Me Designing!

This Friday, my laptop had to go to back to the manufacture because the graphics card was spiking at a 100 degrees C.  Needless to say, my GPU was better suited to making coffee than processing graphics.

At least that GPU is good for something! 
With my laptop, I also lost my installs of Autodesk Inventor, Autodesk Vault, and AutoCAD Electrical.

Fortunately, I have a personal laptop that I can use, but it doesn't quite have the horsepower to run 3D modeling software.

So what do I run in the meantime?  I decided to take it as an opportunity to use Fusion 360 in the meantime.

I've not used Fusion 360 much but I have created some files, and that did allow me to enjoy a couple of benefits.

1. I had very little configuration to get up and running on my "backup" system.

Most of the configuration is stored in the cloud.  I only had to install the Fusion 360 application.  At about 1.5 GB, it not a big install.

The client itself is pretty small. 


2. All my files were readily accessible.

The files are all stored online, so there was no backup to restore.  I just need an internet connection, and I just log into the system.

My training files. No restore needed.  They were there when I logged in to my account.
3. The hardware requirement isn't nearly as heavy.

My "backup" laptop only had a 4 GB of RAM, a 2 GB ATI video card, and a respectable AMD processor.  Not a bad machine, but not a CAD station for sure.

But it does run Fusion nicely!

Most of the drawbacks are matters of my own personal preference, but I suppose in many cases, drawbacks always are.  And ultimately, it's all a result of my acceptance of the "status quo".

1) It's not Inventor!

I've been using Inventor since 2000.  That's right!  Since the turn of the century!  I'm used to it, I'm comfortable with it.  Fusion is new, and different.

I guess I'll just have to expand my comfort zone!

2) All that data is online.

It's a little weird at first, isn't it?  I'm used to having my data local.  I'm comfortable with it, I know it.  But I'm already backing up my Vault data to Dropbox, so it's not that big of a departure, in many ways.

So I'll have a bit of learning to do!  I'm planning spend a little time this week!

Friday, August 14, 2015

It's Been a Great Run - Farewell to KETIV

After 7 incredible years, I've decided its time to move on from KETIV Technologies.  I will remain with them until August 31, 2015, in order to make sure our transition is as smooth as possible.

They've been good to me, they deserve my best efforts.

A perfectly natural question to ask is "Why?" or "What's the story?".  Some may even ponder, "What's the real story?"

And that question has really been posed to me!

Some seem to think that this is a good analogy for leaving a job.
This is far from reality for KETIV and I.
I can say there are no great wrongs, real or perceived, no dirty laundry to air.  It is simply time for me to move in a new direction.

I'm going to miss my colleagues at KETIV, even as I look forward to my new course.  They're an outstanding group of people, and I look forward to seeing them at a future event!

As a user, I wouldn't hesitate to have KETIV support any engineering department I land in!

So what does that mean for InventorTales?  I plan on keeping it going and adapt it to my new path.

And as for that path?  What does that look like?

It's a trail I'm still blazing.  I'm hoping continue taking aircraft maintenance classes, combining my theoretical engineering mind with the practical lessons of grimy hands and bloody knuckles.

It may yet be a while, but I'm hoping to gain my aircraft maintenance certification from the FAA some day.

I also plan on continuing to expand and improve my work in CAD, I'm not quite sure what form that's going to take, but stay tuned! There will be more news for sure!

I'll add updates as I have them, and I will certainly have some!

Thanks to all those who've supported me over the years!


You'll never find out what's over the next hill, if you don't get up and take the journey.

Acknowledgements

U.S. Thunderbird F-16 Ejection: By U.S. Air Force photo by Staff Sgt. Bennie J. Davis III [Public domain], via Wikimedia Commons


Sunday, August 02, 2015

Does the Future of Making Things Spell the End of the How it Was Done?

There's a lot of buzz about the "Future of Making Things" lately.  Personally, I'm a big fan of the possibilities this new wave has to offer.  Things like connected devices, cloud technology, and 3D printing, just to name a few.

But while I excitedly absorbed this new age, I was reminded of an experience I had.

Not to long ago, perhaps a year at the most, a colleague needed to find a component in an industry catalog, like many of us designers needed to do.
Most of us have thumbed through catalogs like this one from Aircraft Spruce
But we were standing in a large hangar, the closest computer wasn't readily accessible.

I began browsing in my smart phone, to which he proclaimed to me defiantly, "I bet I can find this in the catalog faster than you can find it on that contraption.

"You might."  I responded, sensing his need to prove a point.  I willed my smart phone to pull those bits and bytes faster.

And in fact.... He did beat me! He found his part before I had found it in my smart phone.

"See!  Those smart phones aren't the answer to everything! I'll take that over that fancy thing any day!"  He stated proudly.  I'm sure he felt he had proved that his older technology had beaten my new tech.

You might think I would have felt the frustration of having "lost".  My colleague certainly felt like he'd "won".  But in truth I had earned valuable experience.

Sometimes, I find myself looking at new technology as a "replacement" to old technology.

Throw away your catalogs and reference books!  Dispose of your paper prints.  

The Internet, connected devices, and data shared via the cloud will replace that!

3D printing is the future!  Why machine, mold, or cast parts when you can print them at will!

We've all likely heard a similar mantra before.


Will the Future of Making things make prints like this a thing of the past? 
But reflecting on that inner monologue, I asked myself a different set of questions.

Will it the future of making things spell the end of the "Past of Making Things"?  

Should it?

And finally.

Does it have to?

I have battery operated screw drivers now, but that doesn't mean I threw away my hand screwdrivers.  I've reached for my thirty year old screwdriver for a quick job, or when the battery in my power screwdriver is dead (usually because I forgot to charge it).

I have a belt sander and two orbital sanders, but I've still folded sandpaper over a block of wood to make a sanding block.

Why?  It was the right tool for the right job.

The power tool vs the hand tool.  Is one better than the other?
Or does it depend on what you need it for? 
Doesn't each one of those cases represent a situation where an old technology wasn't replaced by a new one, but instead augmented by it?

I've lost count of how may times I've seen oil, water (including coffee), or grease smeared on paper prints.  Would you rather see that on paper, or an expensive tablet?

In this environment, paper gets torn, but tablets get shattered.
Would you rather print a new document, or replace a tablet?
Picture taken at Mt. SAC Aircraft Maintenance Dept 
But why not use that tablet to quickly find the information, then print to a piece of paper?  All without a trip to the engineering department!

Does that make one better than the other?  Or does it make one better suited for one type of job over another?

The lesson I learned was valuable indeed.  My colleague's catalog beat my smart phone.  No doubt about it.  On the other hand, what if his catalog is out of date?  Even if it was slower, it's likely my smart phone would have been more accurate, since an online catalog can be easily updated with new information.

So what?  What's the lesson, the "call to action"?

Stay open minded, and don't throw the "baby out with the bath water".  Don't integrate new tech at the cost of your old tech, but use the "new fangled", add it to the "tried and true', and make it greater than the sum of it's parts.

Jonathan Landeros

Acknowledgements

photo credit: should you really be letting those just hang around? via photopin (license)

Monday, July 27, 2015

The Future of Making Things Event in Los Angeles - That's a Wrap!

Last week I attended the Future of Making Things Event in Los Angeles, hosted by KETIV and Autodesk.

Why?  I was supposed to be there!  But more importantly, I was excited to be there.  I was more excited than I've been in a while.  The concept of the Future of Making Things is something I not only find appealing, but invigorating.
First of all, the event was held at the California Science Center.  Just the location was enough to make me want to start building something!

In the parking lot was a Lockheed A-12.  What a way to be greeted!

The Lockheed A-12.  It looks fast just sitting there. 
But I was here for the Future of Making Things event, so in I went though the museum lobby past the T-38 Talon and F-20 Tigershark and into the event.

I can actually tell you which is a T-38 and which is a F-20 from here. 
After meeting and greeting everyone, and naturally getting coffee, it was time for the presentations to start!

Andrew Anagnost kicked things off with his presentation.  The information was flowing.  But one simple statement made me take a moment of pause.

Five years ago, nobody owned an iPad. 

Wow.  I had to think about that.  iPads are commonplace now, I've used it to store recipes, there are videos of  pets playing games on them!

Many of us have seen an iPad replacing a cash register, or seen it used to take notes in lieu of pen and paper.  Regulatory agencies like the FAA are placing their regulatory books, many of which are hundreds of pages long, online in a downloadable formats!

This Advisory Circular from the FAA can now be contained on an iPad, along with a myriad of other books.
Image from Marv Golden Pilot Supplies


And much of that change has come within the last decade!

But there's even more.

Andrew spoke about a 20 story building in China that was assembled on site in fifteen days.   How?  It wasn't built onsite.  The building was modular, with major components assembled offsite, then assembled onsite.

An entire 30 story building, in fifteen days!


Naturally 3D printing was a topic for discussion as well.  It's pretty well known that 3D printers are becoming more and more common.  Autodesk has their own version called Spark.

But did you also know that the 3D printing of metals is another frontier being developed?  A 3D printed heat sink was shown, purely designed and optimized by computer and printed in metal on a 3D printer.  By using these methods, they were able to create geometries never before imagined!

A heat sink designed by computer, and 3D printed in metal. 

The presentation moved on to connected devices.  Imagine a world where cars can talk to the infrastructure they're driving on.  Imagine traffic signals adjusted to traffic realtime.  How?  The cars themselves report it.

Andrew used the Skully motorcycle helmet as an another example.  Imagine a bluetooth enabled, fully connected motorcycle helmet with a review camera and a heads up display.  Ten years ago, this was the realm of the fighter pilot, now it's a device used to make motorcycle riders more connected and safer than before.


It was said "We are living in a connected world".  No doubt of that now!

Next, came the CAD demonstrations, Jorge Fernandez and Jeff Brown showed how data from different CAD vendors, obtained through this connected world can be tracked in Autodesk Vault, brought into Inventor, and edited and modified.

They demonstrated how legacy data, the knowledge built of experience,and captured in AutoCAD 2D could be brought into Inventor and reused via DWG Underlay.


Then they tested the data in Nastran In-CAD to validate the design.

Specifically they tested the part in fatigue.  After all, it's one thing to be strong enough once, it's another thing to be strong for hundreds of thousands, or even millions of cycles!


All of these tools that used to be exclusive to the specialist are now becoming easier to use and more available.  Now they're not limited to the select few of trained individuals, but available to more and more designers, so they can interact with the specialist more effectively.

The data is then returned to Autodesk Vault for safekeeping, and can also be distributed via A360 through connected devices to far flung places in the world for their consumption.

It's a web that's ever expanding, and becoming more powerful than the sum of its individual pieces.

Then after seeing all that awesome technology, the event wrapped up.  After saying my goodbyes to some great people, I was lucky enough to visit the Space Shuttle Endeavour, and gain some inspiration from the giants of design who have gone before me.

The future of making things is certainly here, and I think we're all fortunate to be able to be a part of it.

Endeavour on display.


This engine was once part of the Future of Making Things.
The Torch has been passed on now. 


Wednesday, July 15, 2015

Living the Future of Making, and Learning Things

About two years ago, I decided to return to school in the evenings and began taking Aircraft Maintenance Classes at Mount San Antonio College.

The practical, hands on nature is at times stressful and frustration, but most of all, inspiring and rewarding.

I realized that I miss having "dirty hands".  It's also teaching me to be a better designer.  After installing mounting bolts purely by feel, I look at Inventor 3D models in a renewed light of practicality.

The best way to learn how a jet engine's fan is assembled?
Take a wrench and take one apart!
  
It's been nearly 20 years since I've taken classes that contain a heavy theory component, in addition to labs.  I'm amazed that in many ways, college hasn't changed.  But moreover, I'm impressed at how much has truly changed. 

The Internet.  AKA the "cloud" has found away to change how I'm learning with a device nearly all of us carry around now. 

A connected smart device.

The new window to learning.

My homework is no longer written out in long hours spent at a desk.  I keep them safe and sound with Google Docs.  I can even have them archived for years to come!


My homework, online in the cloud instead of on paper. 


I've sat on a patio enjoying lunch, and thought, why don't I answer a couple of homework questions?  

No looking for a book, no wishing I had brought a pen.  I just pull out my smart phone, and start working. 

When I wanted to get more practice building and understanding electric circuits, I was able to find a cloud based simulator that allowed me to build circuits at test them even when I don't have access to the lab with it's physical simulators.

The physical electric circuit simulator with a digital multimeter on top.


I showed it to a few of my fellow students, and I was met with various forms of the phrase "Where did you find that?!?"

Relay Activated Transistor switch - EveryCircuit
Cloud based applications, and connected devices are giving me a competitive advantage in improving myself.  Most of all, it's doing it right now, in my every day life. 

It left me realizing one thing.  The Future of Making Things may not be revolutionary.  It's happening every day, all around us.

It's not necessarily about making things.  It's about how we interact with the information we use to make things.

It's not a revolution.   It's an evolution.  

And it's not the future.  It's here, now, in an evolving information age.. 

I bet your using it, and don't even know it! 


Monday, July 13, 2015

Remove Unwanted AutoCAD Links when importing into Autodesk Vault

One of the biggest challenges when trying to get data loaded into Autodesk Vault are dealing with missing links.

They can't be loaded into Vault while broken, and resolving them can be difficult when the associated files may have been long lost to antiquity. 

One thing I see a lot of, is the notorious "lost logo image".  These are images linked into a drawing, many times these are nothing more than image files representing the logo for a company. 

I've seen many, many times! 

They were linked into these drawings at some point, but during some part of their lives, the original image files were lost.  The links were never repaired, because it wasn't a big issue before Vault came along.

In my example, I've created several AutoCAD files representing that exact condition.  Company logos that have been lost.  

If you try to push them through Autoloader stands in the path and like Gandalf the Gray shouts "You shall not pass!".  

Broken links  We never want to see these in Autoloader, but often do. 
You can't push them in through Autoloader, so now you're now stuck.  Fixing the files manually can be a daunting task.  So what options are there? 

I have one trick I can offer, and while far from an all encompassing solution, it can ease the pain a bit if you have a lot of AutoCAD files that have the "linked logo" problem. 

First, it's very important that the files meet the following criteria. 

The only link that exists in the file, is the link you want removed.  

That's it, the biggest consideration. But it's a doozy.  The method I'm about to show you will break every single link your file has.  That includes external references in AutoCAD as well as Inventor parts, assemblies, drawings, and presentations.

So make sure the links in the files are links you want broken! 

I'm going to show you how to do something Vault tries very hard to talk you out of.  But if you're crazy enough to try it, it's crazy enough to work. 

So here it goes. 

Log in as the Vault Administrator. Go to the Tools>Administration>Vault Settings, and on the Files tab, uncheck "Disable Check In of Design Files".  

Time t work without a net! 

You've just turned off the safety switch!  This allows you to drag and drop files into Vault.  

But now, take the files with the unwanted links, and drag them into a Vault folder. 

Dragging the files into Vault
The standard Vault Check In dialog box appears.  Enter a comment, and adjust any settings you want, and hit OK. 

The standard check in dialog box.


A warning appears advising you that any depending relationships, meaning file links, will be lost.  But the only links here, are one's we need to get rid of.   

Now the warning that links will be lost.  This time, this is what we're after. 

So shave your head, put on your best accent, and say, "Engage". 

The files will checked in.  In the meantime, Vault will be stripping away the links to the unwanted images. 

The files are getting checked in. 
Once the files are checked in, the "Used" functionality can be used to show that the links are all gone. 

Now, before you do anything else, turn the Disable Check In of Design Files back on! You don't want just anyone trying this, that is unless you want herd of files with broken links roaming free in your Vault! 


In this case, this functionality becomes a filter that cleans out the unwanted links, and while it may not be something that can be used when links you want to keep do exist, it can still help get important files into Vault.  

So keep this in mind when you need to add some files into Vault.  The next time there are a bunch of files with "lost logos", you can be the CAD guy who says "I know a trick..." 


Sunday, July 05, 2015

Learning Electricity with EveryCircuit - The Future of Making Things

A few days ago I posted about how I'm taking a class in electricity at Mount San Antonio College as part of my slow journey through the aircraft maintenance program.

After two weeks, it's been a challenge, but it's also been very rewarding as I've studied and applied my knowledge both in the classroom, and in the lab.

The physical simulator in the lab.  It's a great learning tool, but it's not very mobile.

Part my goal in getting as much as I can out of the class was looking for tool to help me study and learn circuits.  I really only wanted to meet three goals. 

I wanted it to:

  1. Be mobile.
  2. Be able to run simulations.
  3. Be inexpensive.

The first place I started looking was at mobile apps.  I didn't think I would get all three of my bullets.  That was my best hope of meeting as many of my requirements as possible. 

It took me only a few minutes to find an app called EveryCircuit, and it hit all three bullets. 

It runs on Android and Apple devices, as well as in the Chrome browser, so I could have it anywhere I had one of my mobile devices.

Practice Relay Circuit - EveryCircuit


A relay circuit I created in EveryCircuit.
Much more mobile the physical simulator! 

It has functions I could use to "quiz" myself., I can place voltmeters, ammeters, and ohmmeters into my circuits, mimicking functions I'm required to perform in class.

It also has a community where I can get additional circuits that I can use as tools to make myself better.

And all at the price of 1 U.S. Dollar per month.  A year can be purchased for 10 U.S. Dollars.  I've spent more on lattes in a week!

I haven't finished the trial period yet, but I'll be making a purchase.  It's already helped me immensely, and I can see where it will keep helping me.

If you design electric circuits, I'd suggest taking a look at this program too.

So here it is.  The Future of Making Things taking a hand in my life.

And why?  Just look at the connectivity coupled with mobility.

The app is accessible on my mobile devices.  I can also save circuits to the cloud, and access my circuits on any one of my devices.  With the Chrome extension, I can even get to my circuits on any computer that has Chrome.

Think of it as Gmail for circuits!

It's data shared via the cloud.   It's shared between devices, and it can be shared in a community at large.  It's increasing the accessibility to information.

An example of some of the circuits shared by the community.
There are examples from all over the world!
And this is just one portion of the Future of Making Things.

And speaking of that, I'll be attending the  Future of Making Things Roadshow at the Los Angeles Science Center with a new perspective, and excitement, based on my experience with EveryCircuit's capabilities.

I'd encourage all of you out there to seek out events in your area, and attend them if your able.  If you can't, keep an eye out on how mobility, and accessibility is changing how we make things now.

To quote William Shakespeare, "What's past is prologue, what to come, in yours and my discharge".

Wednesday, July 01, 2015

Expanding My Comfort Zone by Facing My Old Foe - Electric Circuits

This post is a little different from my usual posts. It's not about software, it's about a lesson I learned that to my surprise, applies to my software world.

It's about how I had to revisit an old nemesis of mine.  The Professor Moriarty to my Sherlock Holmes....  The Joker to my Batman....

The name of that nemesis is "Electric Circuits".

Circuits.... My old adversary... We meet again.

When I was earning my engineering degree way back during the last century (the 1990s to be specific), I was required to take a class in electric circuits.

I passed it adequately. If my memory is good, I think I got a B.  But I hated that class.  I remember complaining and grumbling through the whole class.

I'm embarrassed to admit that I often said "I don't do electricity", or "I don't want to be an electrical engineer".

I think I still owe an apology and a strong drink to my lab partners in that class for putting up with me!

To my lab partners.  I owe you a few of these! 

In the last few years, I've felt the compulsion to return to the technical, "hands on" side of my profession.  To put my mouse down and pursue a passion to get my hands dirty again.

This desire has manifested in the form of taking aircraft maintenance classes at the local community college.  And the experience has been rewarding.  It's made me a better designer, and has re-stoked my passion for my trade.

But this summer, I've faced against my old nemesis again.

I'm currently taking a course in electric circuits.

The relay...  I remember you...

I started out nervous and intimidated.  I thought about taking the summer off and taking the class later.

But eventually, I found myself sitting in class with my notebook and calculator at the ready, repeating "I think I can" over and over again.

I told myself not to let electric circuits intimidate me.

I will not be cowed by this electrified panel of "nope"!
As class started, I came to realize that it isn't so bad.  Naturally, there are challenges as I relearn amperage is constant and voltage varies in a series circuit, while conversely, voltage is constant and amperage varies in a parallel circuit.

And then there are series-parallel circuits that are combinations of both circuits that must be simplified into their basic components before you can completely solve them.

It hasn't been a walk in the metaphorical park though.  I've cursed myself for making basic mistakes in arithmetic.  But instead  of grumbling about how I'm not "an electrical guy", I've stuck it out and told myself "take your time and step through the circuit".  I've built relay circuits doesn't of times in the lab, using that repetition to understand what the circuit is doing.

And what did I find happened?  I started to understanding it!  I started looking at a circuit, and building it up on the simulator, and it made sense!

After that particular class session, I came home at 11PM, and sat down for a moment to wind down.  I felt energized. I was learning circuits! I was understanding circuits!  I could even explain a basic circuit to someone else.

I was befriending my nemesis!

There's a circuit breaker, and relay integrated in this circuit.
And they all worked to turn on the blue light! 

And now I'm actually looking forward to going back to class!

I had to asked myself, "Why was this so hard back when I was in college?  What changed?"

The only answer I could come up with was "I changed".

But what changed?  I'm two decades older.  I've gained a few pounds.  I've lost more than a few hairs.  Naturally, I'm also wiser and more mature.

That begs another question, "So what?"  What does this lesson that I've learned matter to the world at large?

Time and time again, I've seen this reflected in the extended technological world.  That user who stubbornly sticks to old software like a drowning man clinging to his suitcase full of his worldly possessions.  The engineering manager who proudly proclaims, "I'm not going to change what has worked since I was a designer!"  Or that CAD Manager who says "I looked at that technology five years ago.  I didn't like it then, I don't need to look at it now!"

Upgrade?  But I upgraded in 1986?!?!?
Are these users wrong?  Perhaps. Perhaps not.

It's not about making changes.  Change isn't always a good thing.  But staying safe and sound with the known can be just as costly reaching to far and coming up short.

It's about being willing to make the right changes.

Technology is changing fast.  The best of us have to aspire to be open to it, look at it positively and objectively.  We shouldn't embrace it blindly, but we also shouldn't shun it because "that's not important right now".

The Future of Making Things is like a wave.  Learn to ride it, and it will carry you far.

Step one?  Just be open to what the future has to offer.

Photo Credits:

photo credit: Opening Day 2007 - Astros via photopin (license)

photo credit: Geography Department, 1986 via photopin (license)