Find us on Google+ Inventor Tales: Autodesk Data Management Topics
Showing posts with label Autodesk Data Management Topics. Show all posts

Monday, June 30, 2014

Using Desktop Content in Autodesk Inventor as "Sandbox" for Custom Content

“Always have a backup plan.”
 Mila Kunis

Custom Content Center in Autodesk Inventor can be extremely useful.  It can help organize custom parts, providing a central place to maintain and manage them.

But it when in use it a production environment, it can be a challenge to work with, simply because users are accessing it at the same time new configurations may need to be added or changes to content may need to be tested.

Fortunately, with a little planning, there's a nice way to take a copy of Custom Content out of production and work on it off line. 

But, before I wade too deeply into this particular post, there's one thing I would like to clear up.  It's something that I don't always think is clearly explained.  It's just sort of assumed. 

What exactly is a Content Center Library?

What a Content Center Library is not, is a list of folders upon folders that can be browsed for Inventor parts. Content Center Library is a database with the necessary numbers and mathematics to build Inventor parts.

This Libraries can be configured to be accessed from one of two places.  The first, is Desktop Content, where the Content Center Libraries are stored outside of Vault. 
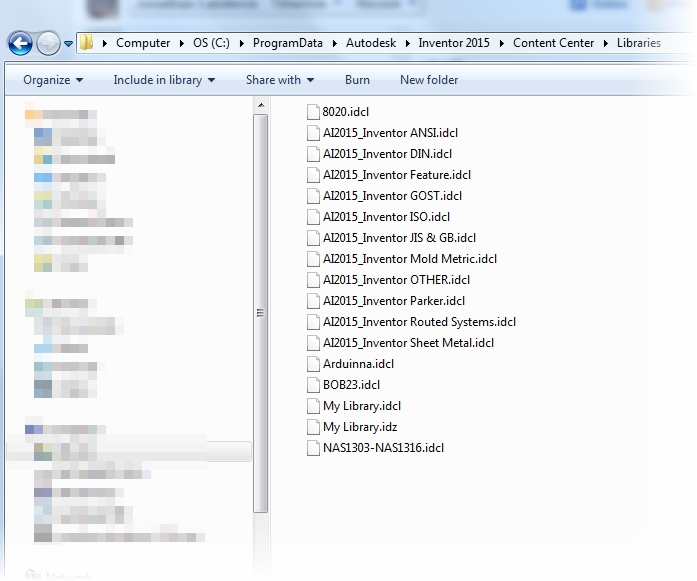
Example of the Desktop Content Libraries


The other, as Vault Content, where the libraries are stored with the Autodesk Vault databases. 
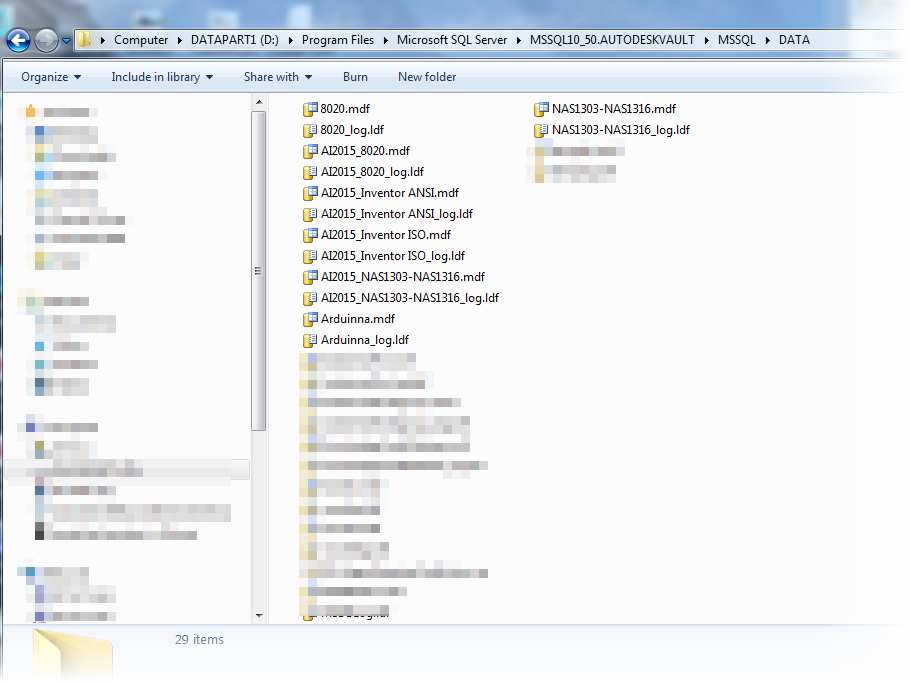
Example of the Autodesk Vault Content Libraries.
Note that not all libraries are installed here.


Regardless of how the Content Center is configured, it essentially functions in the following manner. 


  • User requests a component from the Content Center, by using Place from Content Center, for example.
  • Content Center will then check the folder where it publishes the data to see if the part has been previously created.  This location is set by either the Application Options, or by the Project, incidentally.
  • If it has, Content Center will place that component in the assembly
  • If it has not, Content Center will build that part, and place it in the assembly. 
So why would one be chosen over the other?

Vault Content is typically used when Vault is being used to manage data.  With the Content Center Libraries stored with Vault, they can be centrally managed with other Vault databases.  Also, and very importantly, the Custom Libraries can be backed up with the Vault backups, making sure all that critical is kept safe and sound.

The case for Desktop Content comes primarily when Vault isn't being used.  Vault Content requires the installation of the Autodesk Data Management Server (ADMS).  Using Desktop Content prevents having to do install ADMS just to run Content Center.

Another possibility is... Why choose one?  There are some users who will run Desktop Content event when running Autodesk Vault.  Why do this?  On its face, it may seem a bit backward. 

These users may be mobile users, who check out files from Vault, and leave the office.  They check out files, work on them, but don't check them in until they return to the office.  Having a copy of desktop content ensures that they can access content, even off site. 

Another reason is for users Content Center Administrators.  They may need to test content locally before publishing it to Vault Content.  Using Desktop Content provides a twofold benefit.

First, they can use Desktop Content as a "sandbox", testing configurations before they push them out to production.

Second, it can provide an additional backup. Should something happen to the Vault Content Library, the Desktop Content can be pushed to Vault without having to restore the entire Vault!   That can come in handy, and prevent having to restore an entire Vault to save content.

Imagine the downtime that could save. Just think about that a moment....  This is where I was really going with this post when I started it, way back about six inches up the page.

But with that said, how is it done?  

First, where Inventor is accessing it's Content Center Libraries can be selected in Tools>Application Options on the Content Center tab.

This can be done whenever needed, but in this case, I'm going to switch it now.  Why?  I intend to use the Desktop Content next, because I want to test a new configuration.
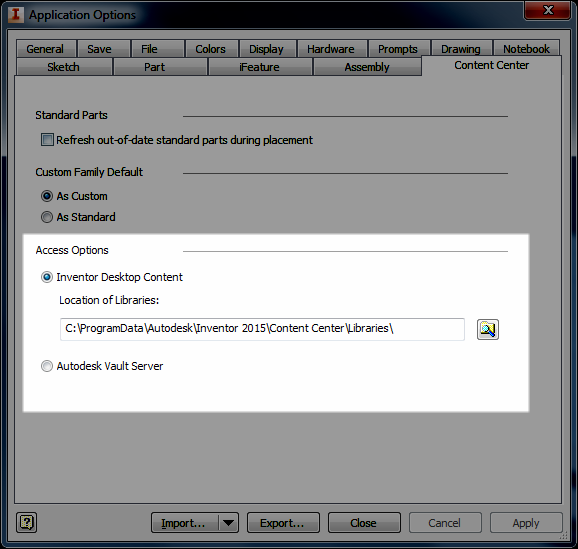
Selecting the location Inventor is pulling Content Center From
But this only tells Inventor where I'm accessing my libraries from.  It doesn't sync the libraries.  For that, there's a different step. 

Let's say, for the sake of my example, that I want to take a copy of Vault Content and transfer it to Desktop Content so I can test some changes before pushing them to Vault Content.  I also have several libraries in my Content Center so in this case, I'm going to work the the library containing NAS standard bolts, it's called NAS1303-NAS1316.  

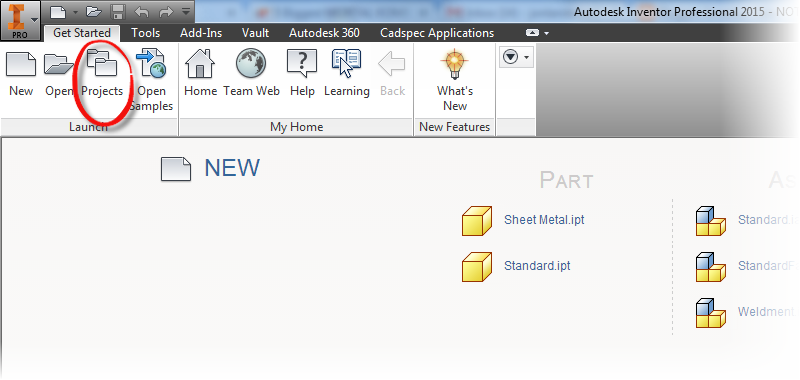
To make the transfer, I go to the Get Started tab, and choose Projects

Locating the Project Icon

Now, once the project screen opens up, I need to choose "Configure Content Center Libraries" for the Content Center I'm working with. 
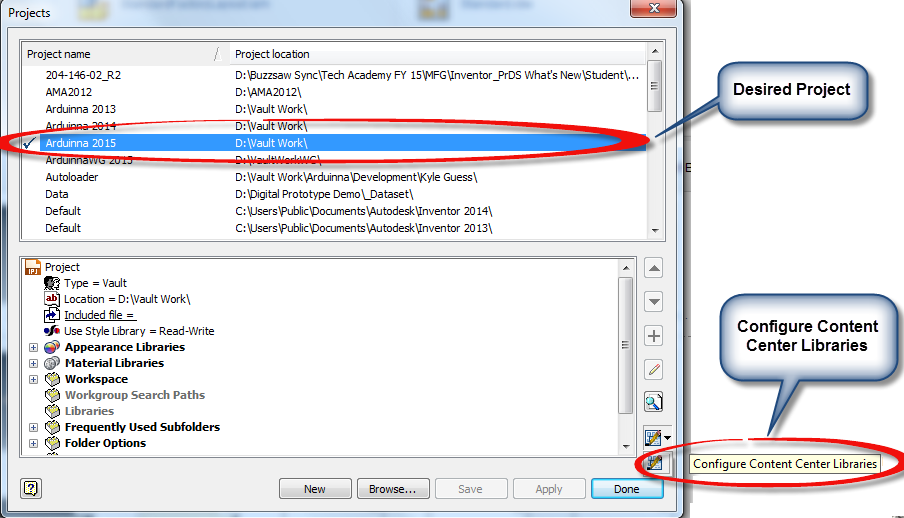
Selecting the Configure Content Center Library option


I can see where my content is currently being accessed from, and which are being used by this project. And from the bottom, I can choose the Library Transfer Guide, where I can transfer a library from the Vault Content to Desktop Content, or vice versa.
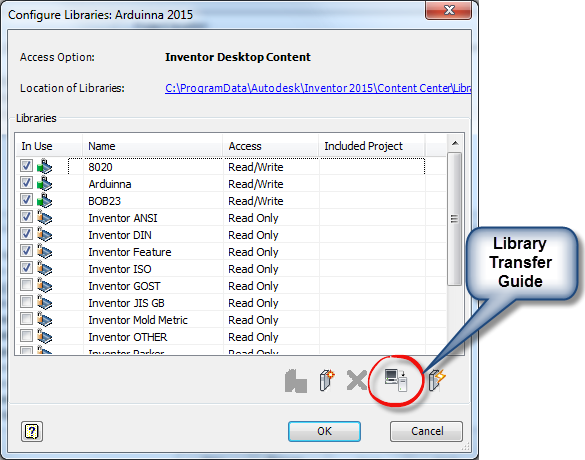
Selecting the LIbrary Transfer Guide


Selecting the Transfer Guide, I now get to choose which direction I want to transfer the libraries.  In this case I want to transfer from Vault Server to Desktop Content.  

Why?  It's my intention to transfer Vault Content to Desktop Content so I can work on it offline.  In the meantime, Vault Content can remain available to my users.
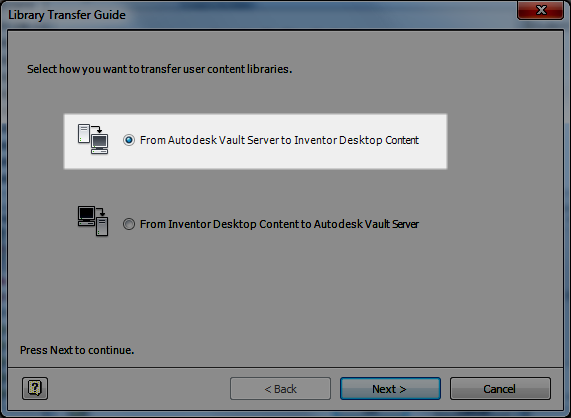
Choosing which direction to transfer the content


Choosing next, I can step to the next screen, I 'm asked to log into my Vault, which I do.
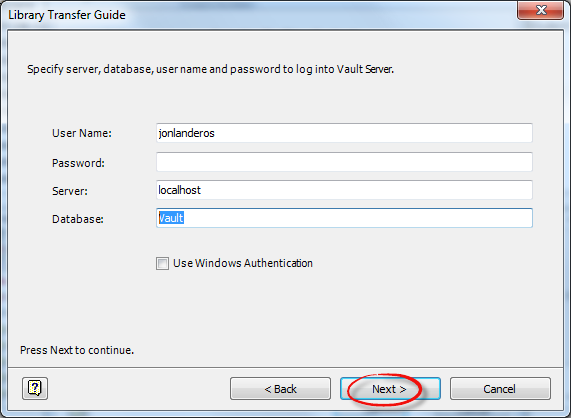
Logging into Vault

Now getting past this step, I go ahead and choose the library I'm transferring. Also note that the Custom Libraries at the destination are listed too. I chose my NAS1303-NAS1316 library, and click next.
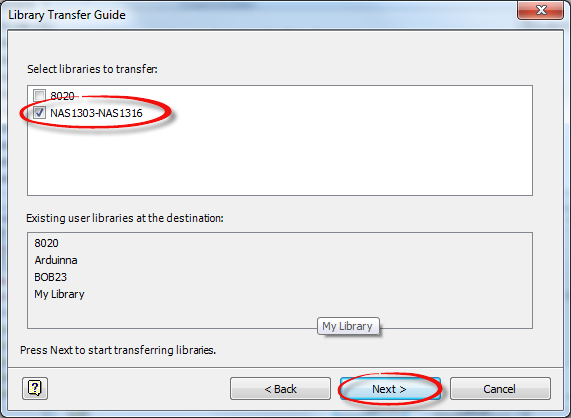
Choosing which library to transfer


The library will transfer, and after a few moments, depending on the size of the library, the process will complete.
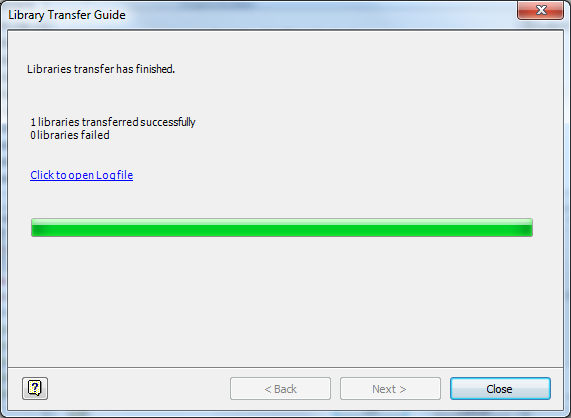
And we're done!

Now, I hit close.  On the next screen, I make sure to check the library I intend to work with.  Why?  I need to make sure it's available to this project, or else I can't edit it!
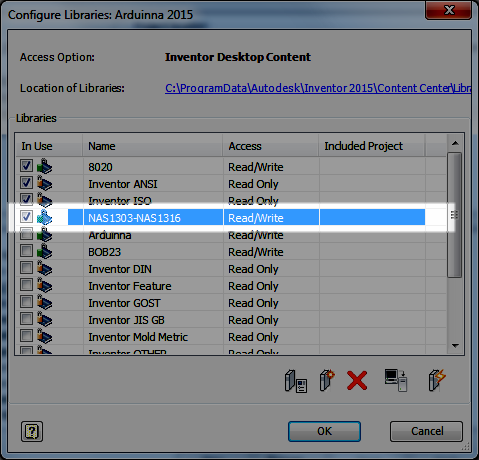

Making sure the library is available to the project

Now I can close all my screens, and if asked, save the project.  Now, I've accomplished two things.


  1. I've set Inventor to use Desktop Content
  2. I've transferred Vault Content to Desktop Content.


Now I can make changes to the library in Desktop Content, and test them while the content in my Vault Content is safe.

Once I'm happy with my results, I can transfer my Desktop Content to Vault Content by reversing the steps I've performed above.

 But there is one last thing to be aware of!  In order to make the transfer, the previous library occupying the space will need to be deleted! Why, the Library Transfer Guide can't overwrite content.  It's not difficult, but something that does need to be planned for.

Just make sure that the Vault is properly backed up, and that Custom Content was backed up with it.  If it's Desktop Content that needs to be backed up, just copy it to a new location, where it will be safe! And you're all ready to go!

Wow,  this was a long post!  But one I think was worth the time.  Take a look at it, and make good use of it!

And this isn't the only way this could be done.  Depending on configuration, and preference, there might be a few ways to approach this! Feel free to share if you have a different way of doing it!

And on a final note, for more information on editing content, check out my posts on that subject here!  There's a few, so follow the links!

And if you'd like the NAS libraries I used as an example, I've posted them to GrabCAD here!

***********************************************************************
Edit 13-July-2014 - Added Video to Accompany Text Post
***********************************************************************


Monday, May 05, 2014

Getting Ready for Autodesk Inventor 2015 - Migrating Custom Templates

“Burglars know there's more than one way to skin a vault.”
James Chiles

In previous posts, I showed how to install your Autodesk Design Suite, as well as migrate a Vault from 2014 to 2015.

However, there are still things that need to be done.  For example, what about custom templates that have been carefully crafted in previous releases?  They aren't usable in Inventor 2015 until they've been migrated.

It goes without saying that this step is important.  So what are the steps to migrate template files?

The simplest, is to just open each template file in Inventor 2015 and save it.  It will work just fine, and it's a completely valid way of doing things.

However, I'm going to describe something that's more automatic then just opening and saving.

Here is my scenario.
  • My custom template files are checked into Vault
  • I want to check them out, migrate them, and check them in all in one fluid process


And while it's possible to perform these tasks manually, I'm going to use a tool called Task Scheduler.

Why?  I like letting the computer do the work where possible, and this is my chance!

The steps required for Task Scheduler are in reality, straightforward.  It's more a matter of knowing where to find the right tools.

Having said all that, what will Task Scheduler do for me?

It's going to check the files out of Vault, migrate them, and check them back in again.  Making sure they're all ready to use in 2015.

First, what are my preparation steps?  Really, there's only one.  But it's a big one!

Make sure everything is configured the way you want it.  For example, I'm still using 2014, so I've kept my 2014 templates safe and sound in a separate directory, so I can still use Inventor 2014.

Remember, once migrated, there's no going back!  So plan accordingly!

The first thing to do, is locate Task Scheduler, which can be found in:
Windows>Start>Autodesk>Inventor 2015>Tools>Task Scheduler


Once the Task Scheduler starts, choose Create Task>Migrate Files


Now, I see a screen to setup my migration.  There are several settings I can choose from.  For your migration, you can change any of the settings here.  For my migration for my vaulted, files, I'm going to make sure to check the following:

  • I'm going to choose my 2015 Inventor project
  • I'm going to check migrate from Vault
  • I'm going to start the migration instantly, instead of scheduling it for later (I'm impatient)


Now, I add the files from Vault.  The icons allow me to add Files, Folders, and an entire project.  I can even create combinations of these if it suits me!

But in my case, I'm just going to choose a single folder in Vault. This is the one with my custom templates.


After choosing the folder,  I'm going to choose my options icon, where I can change settings on what functions to use when checking in.

The first tab, the Local Options, such as rebuilding files, deferring updates, and so on.  The help system describes the steps well. In my case, I'm just going with the default settings.


On the Vault tab, I can add a Vizualization file, and delete the local copy from my workspace.

In my case, I'm not creating a visualization file, only because this is a template, and it's just a blank file.

I'm also not going to delete the local copy.  I need them locally to use them, so they have to stay!


Finally, I'm all ready to go, and I can hit the "OK" button, once to close the options, and once to "pull the trigger".

The migration begins, and all I have to do is give it a little time.


After a short time, it's done!  I have my new templates.


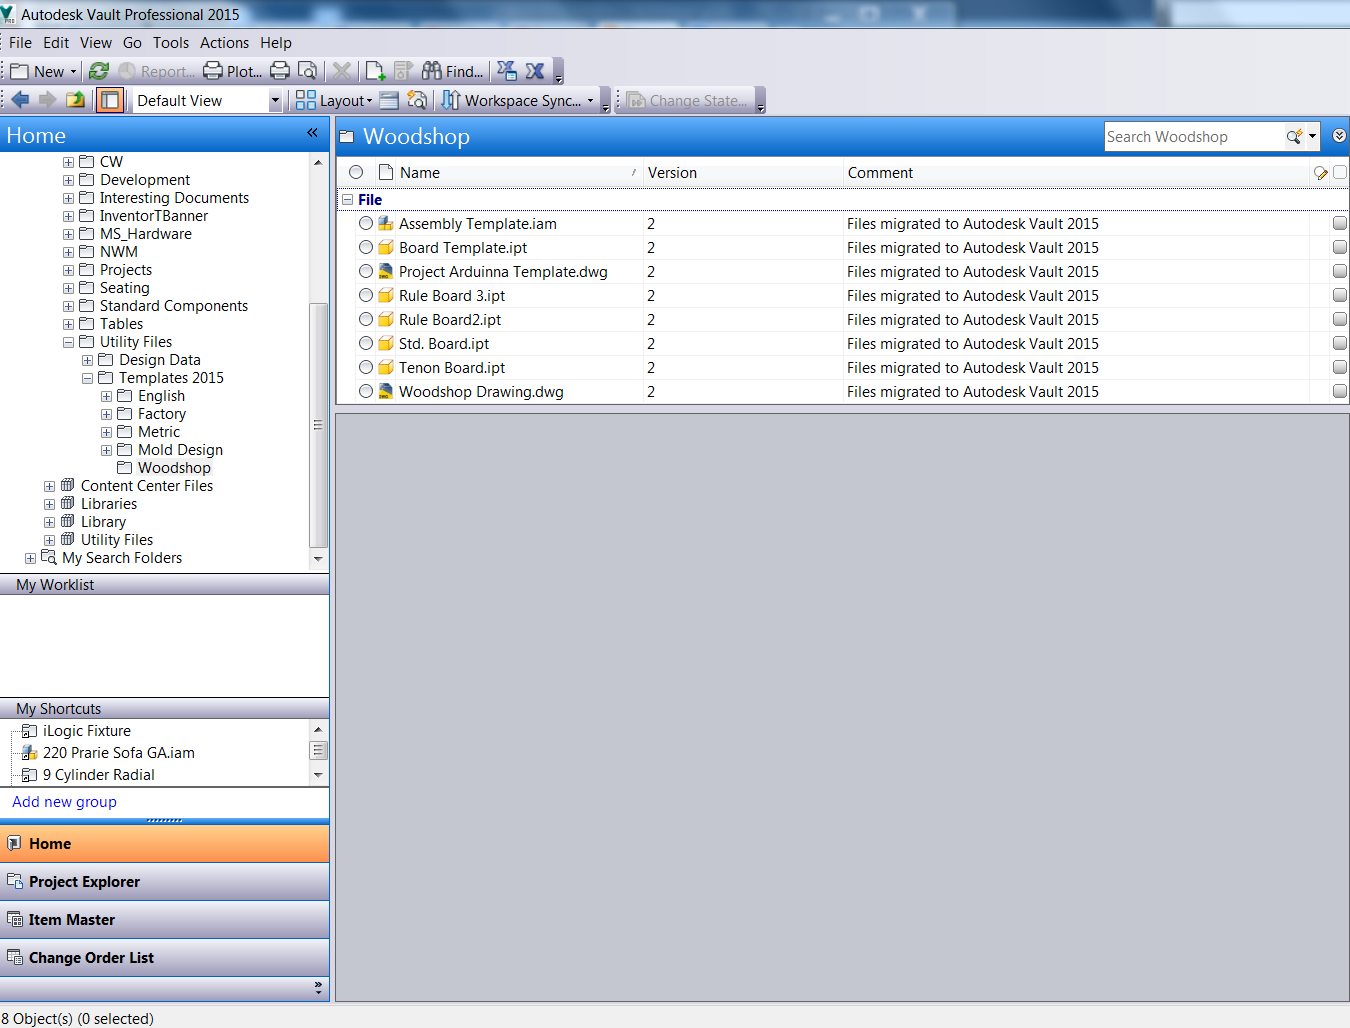
I can even double check by looking at the new versions created in Vault.


Now, my templates are all ready to use!

And for the video of the steps, take a look below!


Thursday, April 24, 2014

Spring is the Time for Migration! Migrating to Autodesk Vault 2015 from 2014


An important step in migrating to a new version of the Autodesk Products is the upgrade of Autodesk Vault.  While this step is important, it's not necessarily difficult, but it does require some planning to make sure things go smoothly. 

Before even looking at your shiny new installation files, there are a few things you should make sure of:

  1. Do you have a valid backup of you Vault filestore and database?  Check.  Then double check.  Then think about the consequences of losing all your data.  Check again.
  2. Make sure you allot for downtime!  The installation takes time, not to mention that databases need to be migrated.  This can take a while, especially if you have a large amount of data.
    1. An additional consideration to this.  You can only skip one version while migrating a Vault.  For example, you can jump from Vault 2012 to Vault 2014, but if you're trying to go from Vault 2011 to Vault 2015, you'll have to jump to Vault 2012 or 2013, then to Vault 2014.  Take this into consideration for your planning.  
  3. Recall that Vault server can run one version back of many of the Autodesk Products.  For example, Vault Server 2015 can run 2014 based applications, and 2014 Server can run 2013 based applications.  Take this under consideration.  It might be wise to update the server, while saving the clients for later.  
    1. EDIT 18-June-2014 See comments below!  David pointed out that the 2015 version of Vault server can run 2014 AND 2013 versions of the clients!  I mistakenly thought it was only the 2014 version!  Make sure take note, and thanks David for the correction! Check out the Readme Here for all the details.
      Also note that the Vaults have to be common (Professional to Professional, Workgroup to Workgroup, etc. 
  4. Consider a test migration on a separate server!  While most migrations go off without a hitch, that doesn't help if you're the one exception to that rule.  It's not paranoia if something is really out to get you.
  5. Did you check that backup?  Make good and sure.  The test migration in step 4 can be a way to verify your backup.   It's worth considering if you have the resources. 

Once the deployment is planned out, go ahead and install the new Vault server from your installation files. 

The Autodesk Vault Install will help guide you through the rest!

The process begins by starting the install from the Setup.exe file, found on your downloaded files, or USB media.


The first screen that appears will have three options, to install the Autodesk Vault Server, choose the Install Tools & Utilities Option.


Next, the End User License Agreement, or EULA appears.  I have to agree to this to proceed, so that's what I'll do!


The Vault installation informs me that it sees an upgradeable version of my Vault.  This is my 2014 version, which I do indeed want to upgrade.  I'll choose that option.


Moving to the next step allows for the selection of which programs I'd like to install.  At this point, I'm interested in installing Autodesk Vault Basic Server 2015.

I've already installed Autodesk Content Service with Factory Design Suite Ultimate, in my previous post.

Content Center is downloaded for Inventor 2015.  Hovering over the "information shows this information.


Also note that the Network License Manager can't be installed.  This is due to the fact I've already got a copy installed.  Hovering over the "No Smoking" symbol will give this information.


Finally, I place my Vault on my D: drive. This is because my C: is a smaller partition, and I want to put programs like the Vault Server on my larger data drive.


Finally! I can click the install button, and get the installation going!

The installation will take some time.  This is part of where that "allotting for downtime" note comes into play!

Add caption
After a little time, the installation will wrap up.  I close the final screen, and this is where I get to take a moment.  The installation is done, but the migration is next.

Now it's time to open the newly installed Vault Data Management Console  The first part of the migration starts.


But there are still a few more steps.  I'll need to log into my Vault, where I'm presented with a message indicating that I need to migrate my Vaults and Libraries, and asking me if I want to do so.

Of course, I'm going to agree! I can't use the Vault until I do.


At last, the end is in sight!

Now, a message asking me if I want copies of my custom Content Center Libraries created for Inventor 2014, Inventor 2015, or both.

You're options might be different here, based on whether or not you have custom Content Center Libraries or not.

In my case, I'm going to make sure I have libraries for Inventor 2014, and 2015, because I am going to be using both.


Now!  Vault is ready to go.  But there are a couple of last things that need to be done!

I'll update any scripts that are maintaining my Vault.  The installation paths have changed!  Backups won't run unless the scripts are updated!

If you're doing your own migration, don't forget this important step!

And if you prefer, I've also created a video of the steps too!  Check it out below!


Thursday, February 20, 2014

Resolving the Error: "Cannot drop the database KnowledgeVaultMaster because it is being used for replication"

“More important than the quest for certainty is the quest for clarity”
Francois Gautier

One thing about working with Autodesk Vault, is it's always got a surprise for you.  There are so many possible configurations, that it can be hard to take all the considerations into account.

A case I encountered, showed me just that. 

The condition I was working in was a replicated environment, where the Vault database and filestore existed on a server in one location, and an additional filestore existed in a completely different location.

It's an environment where I'm constantly learning something from, and this day was no exception.

I was in the process of restoring a backup, after reconfiguring the installation, and this unusual error came up.


Cannot drop the database KnowledgeVaultMaster because it is being used for replication

I was puzzled.  Never in my life had I seen this error before.  But a quick Google search yielded the solution at the Autodesk blog linked here.

It shows the solution as follows:

USE [database]
EXEC sp_removedbreplication @dbname=[database]
GO

Unfortunately for me, I'm not sure where to put this solution into action.

But fortunately, for me, I know someone who likely does, and I "use my life line".

Mike Carlson, Vault Guru Extraordinaire gives me the tips that I'm looking for.  He filled the gaps that I needed filled. 

With his help, here are the steps that I was able to use.

First, I opened SQL Server Management Studio.

Starting SQL Server Management Studio


Once opened, I logged into my Vault.  The default login is SA, with a default password of AutodeskVault@26200 per the Autodesk Advanced Configuration Guide.

Logging into SQL Server Management Studio

Once logged in I was able to find what I needed in the interface.  First, I expand the database folder, find the KnowledgeVaultMaster database, right click, and choose Query.


Starting the Query

Once the Query window is open, I can paste in the following lines, and replace [database] with KnowledgeVaultMaster.


USE KnowledgeVaultMaster
EXEC sp_removedbreplication @dbname=KnowledgeVaultMaster
GO

The command ready to Execute
 Once the query is run, a message acknowledging a successful execution of the command will appear at the bottom of the screen.

The command after clicking the Execute button

After this, the restore ran perfectly fine, and I was back in business!   This seems like an obscure thing to come up, but I'm glad I found the solution, and someone with the knowledge to know what to do with it!

NOTE!

SQL Server Management Studio is needed to run this command.  It can be found on the SQL installation disk.  There is also an Express version that can be downloaded from Microsoft here.


Wednesday, December 11, 2013

BOM Management with Autodesk Vault and Inventor - A KETIV webinar

“Fast is fine, but accuracy is everything.”
Xenophon

Bill of Materials in Autodesk Inventor, and Autodesk Vault Professional have a lot going on.  They can be tweaked, adjusted, and modified to a huge extent.

Sometimes this is to make sure that the Bill of Materials accurately represents the assembly, other times it's to make sure that information flows accurately through the organization so the design intent represented on the final drawing accurately represents what the designer intended.


A screen capture from the webcast
Fortunately, Nicole Morris and Mike Carlson, my colleagues at KETIV, created a nice webcast that goes through many of the details of the Bill of Materials in Inventor and Vault Professional. 

It's worth checking out! 

                                                    Take a look by clicking on this link!

Thursday, November 28, 2013

Seek and You Shall Find - Searching for Files Using Open From Vault

“You are not discovering yourself, but creating yourself anew. Seek, therefore, not to find out who you are, seek to determine who you want to be.”
Anonymous 

In a previous post, I talked about how I had created a non-nonsensical file naming scheme to place my files in Autodesk Vault.

I also talked about how I needed to use the indexing of properties inside of Autodesk Vault to make sure that I tracked all the files correctly.

In this example, I'm using the a blanket chest I found in the  book "Pleasant Hill Shaker Furniture" book.  Which you can find at the link HERE.


That's all fantastic.  But how do I accomplish that? 

First, I have to make sure that I fill out properties in Inventor's iProperty screen.  Sure, you could argue it takes extra time, but it only takes a few minutes, and the payoff, being able to find files, is well worth that work.

Do all the iProperties in Inventor have to be filled out?  No!  But what should be filled out, are the ones that are important to you!

Samples of the iProperties filled out


I fill out fields like Title, Description,and Keywords.  I could fill out more, but these are plenty for what I need.

Why do this? Because when I'm opening a file, I can search it easily when using Inventor's
Open From Vault tool. 

But how, when opening a file, do I find the files?

First, start out by choosing the Open from Vault icon.

Open from Vault

This will open up a dialog box that looks a lot like the Inventor File Open dialog box.  Make sure to choose Search from the pulldown in the left hand column.


The Search field in the Open From Vault dialog box

This will switch the search screen, that where searches can be made for Files and Folders by names, and.... .(wait for it)... The properties I entered in the iProperties into Inventor.

Also note, that when the search screen is selected, a flyout opens that shows all the different properties used inside of Vault.  All properties can be searched simultaneously, or individual properties can be searched by selecting that property.

In this case, I'm typing the word Blanket in the search field, and searching for all fields that contain that word.  


The completed search

 All values containing the word "Blanket" will display.  In this case, the word I'm searching for is located in the Description field.

Now all that has to be done is to select the desired file, open it, and start designing!


Opening the file.
P.S. All the columns may not display in the first view.  To show the desired columns, right click on the Title Bar and choose "Choose Columns" from the menu.


Now a list of fields appears.  Just drag and drop to place what you want!


Monday, October 21, 2013

Making Sense of File Numbering Systems - Why do they have to?

“We put forth a very strong number. It's always hard to know, it's impossible to know what numbers are out there.”
Tim Purpura

This weekend has been a busy one, so this weekend's blog post is a short one.  But it's reflecting something that I've been thinking of doing for some time though.

File numbering schemes.  Users spend hours and hours trying to figure out which one to use.

Is it better to use a sequential?  One where the numbers have no meaning with regard to the files they're associated with? 

Or is it better to create one where the file name has a meaning.  A given portion of the file name tells the user this an assembly, or this component is made out of stainless steal, or is a custom part.  The different meanings can go on forever, and are different from company to company.

In my own, personal file structure in Autodesk Vault, I've done what so many are guilty of doing.  I've ignored it.

My own Vault file names are an example of what I'd tell someone not to do.

They have a mishmash of names.  Most have some sort of meaning.  Some are just names I threw in because I needed a name in a hurry. 

Others are names that I changed with Vault's Rename command because I needed to make room for another file with the same name (I have "Enforce Unique File Names" checked).


An example of my similar, but not consistent file names.

I've wanted to clean that up.  I would like more consistency in my file names.  But I just haven't had the time or desire to create one. 

So I decided to steal a number scheme from someone who's already created one.  I'm going to use the one the FAA uses for their Air Worthiness Directives


How does the FAA do it?  They start with the year, then count which two week period in the year the document was issued.  Then finally, number the documents in sequential order.

For example an Air Worthiness Directive numbered 2012-20-06 would mean the document was issued in the year 2012, in the 40th week of the year (20th two week period), and that it was the 6th document issued in that time.

I'm going to give it a try in my own Vault, and see how it works out!  I'll use the file naming scheme, and for searching, I'm going to search for keywords and properties associated to the files. 


An example of the properties I've added.  I'll probably adjust them, but it's a start.
It will require discipline to make sure I fill out my properties, but it's something I should already be doing!

I'll keep you posted on how it goes.  There will be benefits, there will be drawbacks.  The real question is, which will outweigh which?

So what do you think?  Are you a fan of meaningful, or non-meaningful file names?


Sunday, October 13, 2013

Migration Errors Moving from Autodesk Vault 2012 to 2013 - Scary! But an Easy Fix!

“It was tough. We have some experience on our side, which is nice.”
Paul Testa

One thing about my job, is I learn something new every day.

Friday, I was upgrading a server from Autodesk Vault 2012 SP2 to Autodesk Vault 2013. 

This should be easy.  I've done it a dozens times. 

But this time, it's different.  Instead of the usual upgrade magic, I get this error.


What?!?  What does this mean?!?

Database not supported?!?!? 


How can a 2013 not be able to migrate a 2012 database?!?!?

It's Friday, 2PM.  I am not looking forward to fighting a database into the wee hours of the night. 

I call a couple of colleagues.  We puzzle over it a bit. 

Then.. The solution comes from an experienced Vault user.

"Bring Vault 2013 up to the latest service pack." 

I do it, and it works. 

I breath a sigh of relief.  As a matter of fact, I breath a couple of more sighs, just to be sure.

Finally, I ask "What happened?  I've never seen that before".

My colleague explains that he's run into cases where an older version of Vault (in this case 2012) gets a service pack that's issued after a new release (2013 in this case).

Since 2012 install I was working on had Service Pack 2 installed, and that service pack came out after Vault 2013's release.  The Vault 2013 Service Pack 0 install didn't know what to do. 

Service Pack 1 for Vault 2013 had the updates to the migration process that were required.

I'm grateful for the experience of that colleague.  Without that, I probably would have tried to rebuild the 2012 installation.  This would have worked, but it would have taken hours instead of minutes.

I would have never thought to try the service pack.  

Now I know, should I ever run into this again!

And for the rest of you out in the 'Verse, I hope this tip helps you, should you ever run into the same thing!

Sunday, September 22, 2013

Linking AutoCAD Block Properties into Autodesk Vault

“The mind's cross-indexing puts the best librarian to shame.”
Sharon Begley

It's been a busy week this week!  So unfortunately, I haven't had a chance to build videos.  But instead of holding the post back, I'd rather share what I have now.

I'm hoping to build the videos a bit later, and add them in!  In the meantime,  I hope the post below is helpful!  

I recently found myself doing indexing AutoCAD block attributes into Autodesk Vault.  During this process, I thought to myself: "Self, this is probably something that should be documented". 

So I decided to share it here!

First, the "Setup"!

I've created a block with just one attribute in it.  FACILITY NAME.  What I would like to do, is place this file into Vault, and make the facility name a property that can be searched by within Vault.


The first thing I want to do is take note of the block name in Vault. This can can be accomplished in AutoCAD, and selecting block, and using the command BATTMAN (for batch attribute manager, not the Caped Crusader).


Next take note of the attribute tag that's going to be indexed in Vault.

In this case, the tag is named FACILITY_NAME.  This is important for the next step, where Vault is "taught" what information to read from the block.


Now that the tag name is known, it's time to open up the Autodesk Data Management Server Console (ADMS).  Once logged in, select Tools>Index Block Attributes.


Selecting this tool will open up the Index Block Attributes dialog.   Choosing the New button will bring up a dialog where the block name is entered.


Make sure to type it exactly as it appeared in AutoCAD!

Accept and close the dialog boxes.

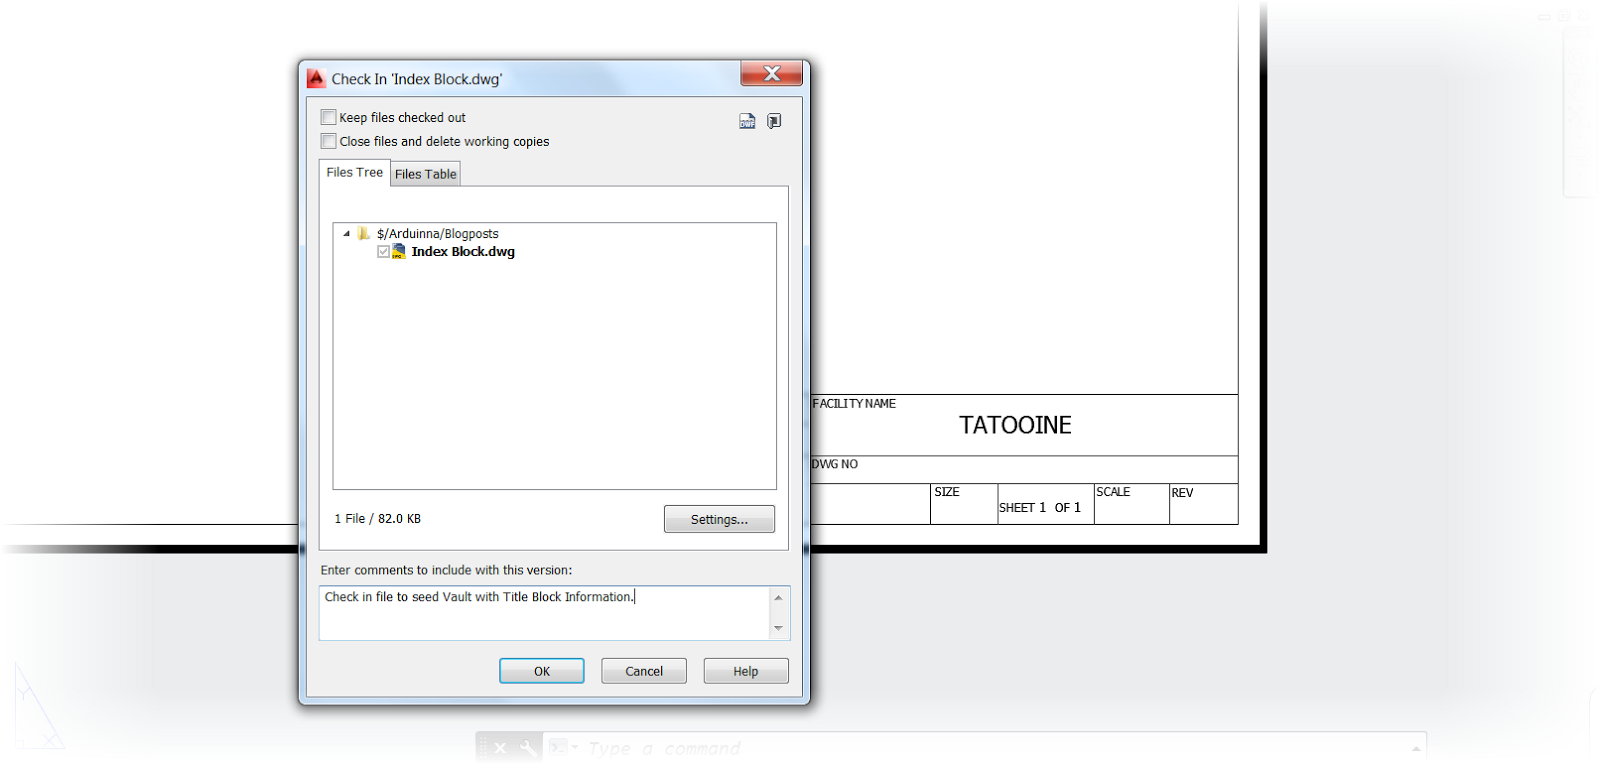
Now, Vault needs to be seeded with a file containing the block to be indexed.  The first step in this process, is to check in the file in Vault.

Checking the file into Vault
Now, the "Connection"!

Now with the file checked into Vault, the appropriate property needs to be created and mapped. 

First, go to Tools>Vault Settings.


The Vault Settings dialog box will appear.  Choose Properties from here.


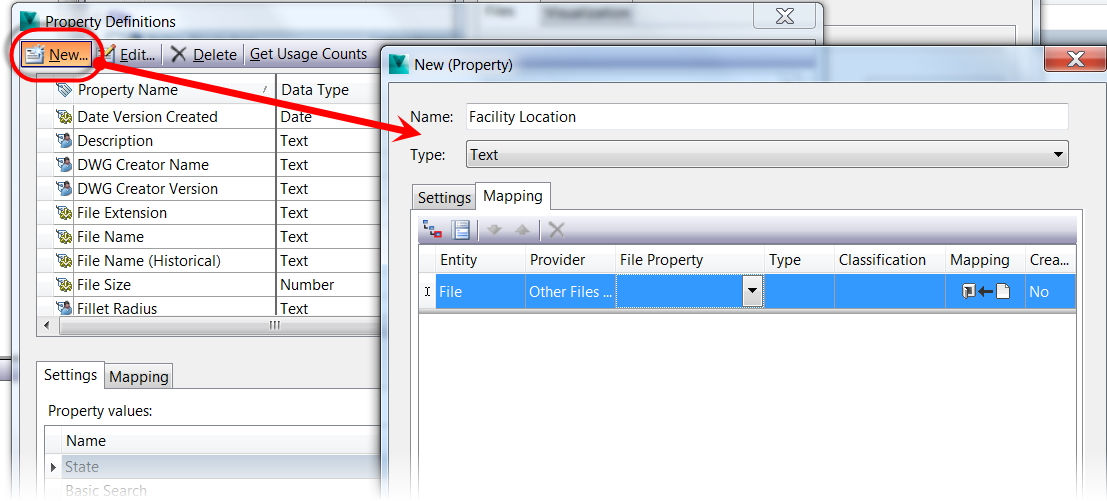
Now, it gets fun!  Click the New button to create a new property.  I'm going to call it "Facility Location".

Add caption
The next part of this step is to map in the actual AutoCAD block property to the Vault Property.  This is where the connection is made.

Click in the empty File Property box to bring up the "Import Properties" button, and choose Import from Vault.  


Now the seed file can be located by browsing in Vault.


The list of properties will appear.  Browsing through the list will yield Title Block Enter Facility Name, which is exactly the property that's needed!


Accept this value and close all the dialog boxes.  There are a few more steps to go, but not too many.

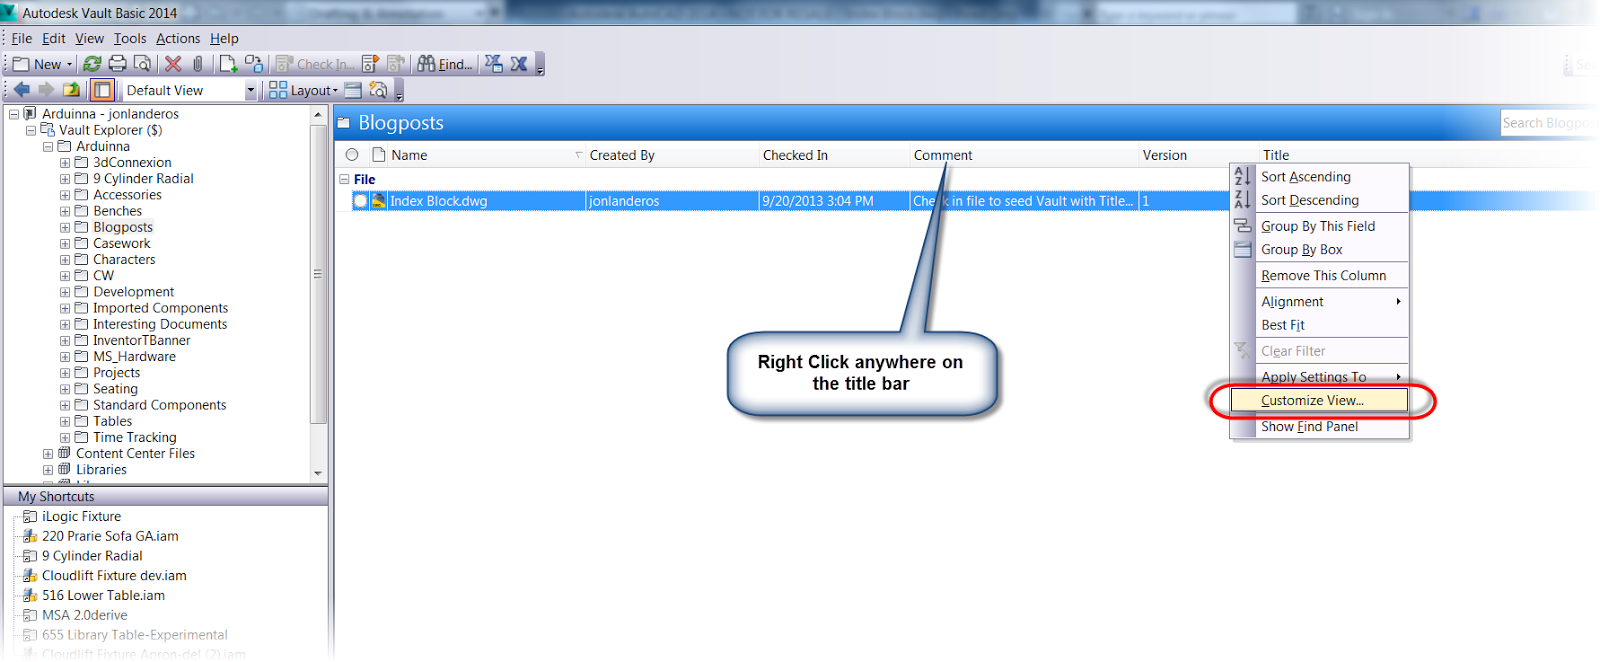
Using Customize View, make the new property in visible in Vault Explorer by right clicking on the title bar in Vault Explorer and choosing Customize View.

Customizing the view
Now, follow that up by locating the Facility Location property, and moving it to the visible fields panel.  The "Move Up" and "Move Down" buttons can be used to reposition the field if desired.

Accepting this, the field will appear in Vault Explorer, but there's one issue.  It's empty! 

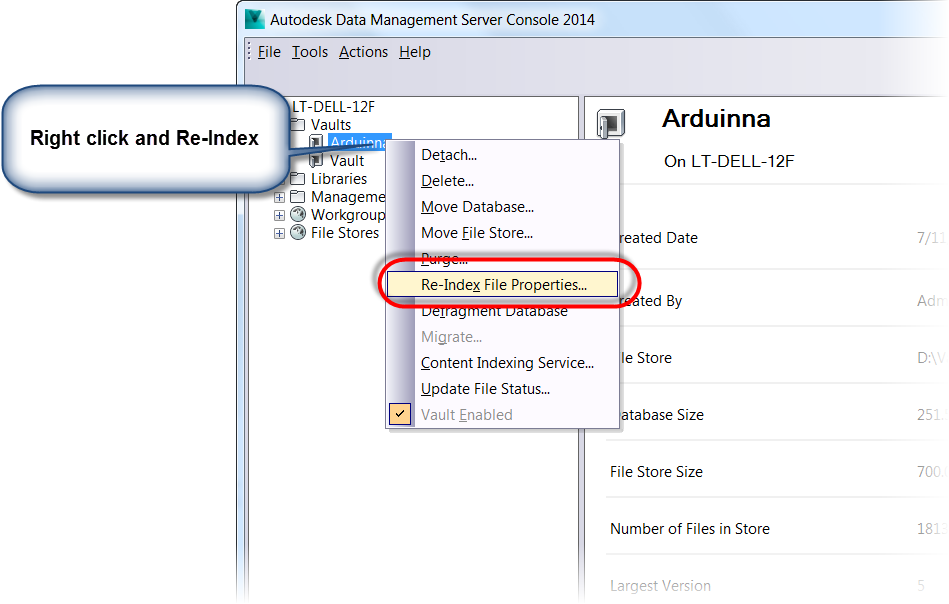
There's one more step left.  Return to the ADMS Console, and select the desired Vault, and choose Re-Index Properties.  This will reread the properties in Vault, including the one just added. 

Note that this process can take a while if there are a lot of files, so give it some time to finish.  If there are a lot of files, it could take over an hour.

Re-Indexing the properties


Now, after the files have Re-Indexed it's time to return to Vault Explorer and refresh the screen by hitting F5.

Now the property is visible!

At long last, the process is finished!

I know this seems like a long winded process, and I wouldn't disagree that there are quite a few steps involved.  After all, I just spent hours writing them all out! 

But now that it's done, it's done.  Any additional AutoCAD files that contain this block will populate the fields from this point forward.  So the heavy work is done, now it's time to reap the benefits!


The properties are done!

Give it a try!  It can make a big difference automating those much needed steps!

****************************Edit 13-October-2013************************************

I've added the videos to accompany this blog post!

*****************************************************************************************


Part 1


Part 2